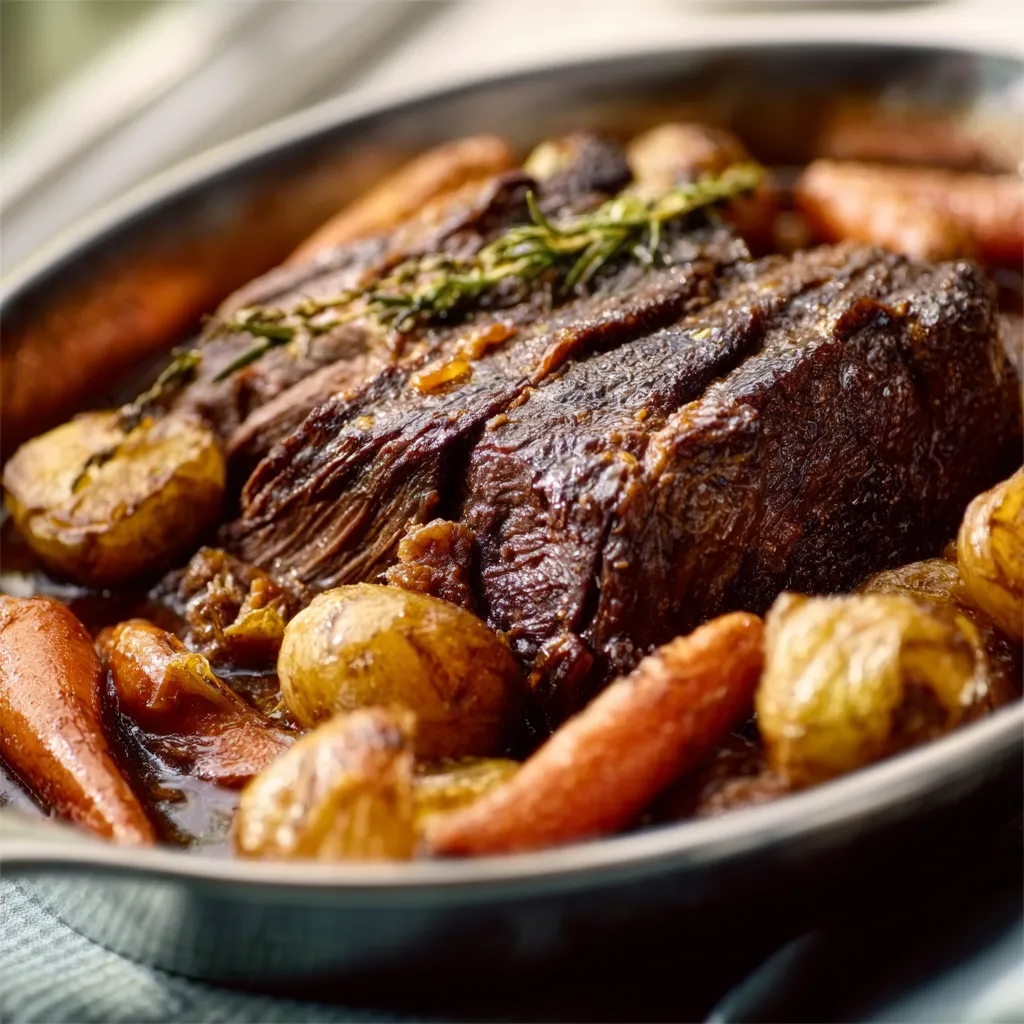
The scent of a Sunday pot roast isn’t just dinner; it’s a slow, savory clock that measures the best hours of the week. It’s the sound of a lid settling onto a Dutch oven, a quiet pact that for the next few hours, your only job is to wait for magic to happen.
This recipe delivers that magic with zero fuss. You’ll get a roast so tender it yields to a spoon, nestled in a rich, glossy gravy, surrounded by vegetables that have drunk deeply of all that flavor. It’s a one-pot tradition that feels like a reward, not a chore.
Why This Recipe Works
- Bold Reason 1 (Texture/Flavor): A two-step sear creates a deep, caramelized crust that locks in juices and forms the foundation of your gravy.
- Bold Reason 2 (Technique): Low, slow oven braising, not a stovetop simmer, guarantees even, fall-apart tenderness every single time.
- Bold Reason 3 (Result): Building layers of flavor in the same pot—from searing meat to toasting tomato paste—creates a complex, restaurant-worthy sauce with minimal effort.
Key Ingredients for Success
Great pot roast starts with humble, honest ingredients. There’s no need for fancy cuts or obscure spices; the alchemy happens in the pot itself.
")
Focus on quality where it counts most: the meat and the broth. The rest is pantry poetry.
- Chuck Roast (3-4 lbs): This is the non-negotiable star. Its beautiful marbling of fat and connective tissue melts during the long cook, basting the meat from within and making it succulent (avoid lean cuts like sirloin—they’ll dry out).
- Kosher Salt & Freshly Ground Black Pepper: Season aggressively. This is a big piece of meat, and the seasoning needs to penetrate.
- High-Heat Oil (Avocado or Grapeseed): For a proper, blistering sear without the oil smoking.
- Yellow Onions (2 large), Carrots (4), Celery Ribs (3): The classic aromatic trinity. They sweeten and build the base flavor layer.
- Garlic (6 cloves): Smashed, not minced, so it infuses without burning.
- Tomato Paste (2 tbsp): Your flavor secret weapon. Cooking it for a minute caramelizes it, adding a subtle sweetness and rich umami depth to the gravy.
- Red Wine (1 cup, like Cabernet or Merlot): The deglazing hero. It lifts all the flavorful browned bits (fond) from the pot and adds acidity to balance the richness.
- Beef Broth (3 cups, low-sodium): Low-sodium is key so you control the final salt level of your gravy.
- Fresh Thyme & Bay Leaves (3 sprigs & 2 leaves): Earthy, aromatic herbs that perfume the braising liquid perfectly.
- Potatoes (1.5 lbs Yukon Gold) & Extra Carrots: Added halfway through. Yukon Golds hold their shape but become creamy inside.
Pantry Substitutions
- No Red Wine? Use an equal amount of additional beef broth mixed with 1 tablespoon of balsamic or red wine vinegar for acidity.
- Allergic to Tomatoes? Omit the tomato paste and add an extra teaspoon of Worcestershire sauce for savory depth.
- Different Herbs: Rosemary sprigs can stand in for thyme, or use 1 teaspoon dried Italian seasoning in a pinch.
- Potato Swap: Halved baby potatoes or peeled and chunked russets work well, though russets may break down a bit more.
- Slow Cooker Friendly: After searing and deglazing, transfer everything to a slow cooker and cook on LOW for 8-10 hours.
Creative Add-ins
Once you’ve mastered the classic, these twists can make it new again. Think of them as your personal signature.
A single unexpected ingredient can transform the entire profile of the dish. Don’t be afraid to play.
- Umami Bomb: Stir in 1 tablespoon of soy sauce or Worcestershire sauce with the broth for an incredible savory boost.
- Mushroom Magic: Sear 8 ounces of sliced cremini mushrooms after the beef for an earthy, meaty dimension.
- Spice Route: Add a star anise pod and a cinnamon stick to the braising liquid for a subtly warm, complex note that will have people guessing your secret.
- Sun-Dried Tomato Lift: Chop a handful of oil-packed sun-dried tomatoes and add them with the broth. They add a sweet-tart punch.
The Complete Method
This process is a gentle, hands-off braise. The active time is about 30 minutes; the oven does the heavy lifting for the next 3 hours.
Trust the timeline. The wait is what makes the meat transcendently tender and the gravy rich.

1. Season and Sear the Beast
Pat your chuck roast completely dry with paper towels. This is critical for a good sear.
Generously season all sides with salt and pepper. In your large Dutch oven, heat the oil over medium-high heat until shimmering. Sear the roast for 4-5 minutes per side, including the edges, until a deep brown crust forms. Remove to a plate.
2. Build the Flavor Foundation
In the same pot, reduce the heat to medium. Add the chopped onions, carrots, and celery with a pinch of salt.
Cook, stirring occasionally, for 8-10 minutes until softened and just starting to brown. Add the smashed garlic and tomato paste, cooking for 1 more minute until the paste darkens slightly and smells fragrant.
3. Deglaze and Nestle
Pour in the red wine, scraping the bottom of the pot with a wooden spoon to release all the glorious browned bits. Let it simmer for 2-3 minutes to cook off the raw alcohol.
Pour in the beef broth and add the thyme and bay leaves. Bring to a simmer, then carefully place the seared roast back into the pot, along with any accumulated juices.
4. The Long, Slow Braise
Cover the pot with a tight-fitting lid and transfer it to the preheated oven. Let it cook, undisturbed, for 2 hours.
This is where the connective tissue begins its slow melt into gelatin, basting the meat from the inside out.
5. Add the Vegetables
After 2 hours, carefully remove the pot from the oven. The meat should already be starting to feel tender.
Nestle the chunked potatoes and extra carrots around the roast. Submerge them as much as possible in the liquid. Cover and return to the oven for another 1 to 1.5 hours.
6. Rest and Thicken
The roast is done when it is fork-tender and easily shreds. Transfer the meat and vegetables to a platter and tent loosely with foil.
For the gravy, skim excess fat from the surface of the liquid. You can serve it as-is, or for a thicker gravy, simmer it on the stovetop for 10-15 minutes until reduced. A slurry of 2 tbsp cornstarch mixed with 2 tbsp cold water, whisked in, will thicken it quickly.
Where People Go Wrong
- Bold Warning 1: Skipping the Sear: This isn’t just for color. The Maillard reaction during searing creates hundreds of flavor compounds that become your gravy. Don’t rush it.
- Bold Warning 2: Using the Wrong Cut: Tenderloin or round roast will become dry and tough. Chuck, brisket, or rump roast have the necessary fat and collagen to become tender through braising.
- Bold Warning 3: Boiling, Not Braising: A gentle simmer in the oven is key. A rolling boil on the stovetop will make the meat tough and stringy. Low and slow is the rule.
Perfect Pairings
This is a centerpiece that demands simple, comforting sides. They should be vehicles for that incredible gravy.
Think of textures that complement the soft, yielding meat and vegetables. You want something to soak and something with a slight crunch.
A pile of buttery egg noodles or a bowl of creamy mashed potatoes is non-negotiable for gravy purposes.
Add a bright, crisp contrast with a simple green salad dressed in a sharp vinaigrette. It cuts the richness perfectly.
For a vegetable side, roasted Brussels sprouts or steamed green beans with almonds offer a nice textural difference.
And don’t forget the bread. A warm, crusty loaf of baguette or rolls is essential for wiping the plate clean.
Thanks for stopping by! I hope this dish brings joy to your table.

Why is a chuck roast the best cut of meat for this pot roast recipe?
Chuck roast is the non-negotiable star because of its beautiful marbling of fat and connective tissue. This melts during the long, slow cook, basting the meat from within and making it succulent. Leaner cuts like sirloin or tenderloin will dry out and become tough during braising.
What is a good substitute if I don’t have red wine for deglazing the pot?
You can use an equal amount of additional beef broth mixed with 1 tablespoon of balsamic or red wine vinegar. This provides the necessary acidity to lift the flavorful browned bits (fond) from the pot and balance the richness of the dish.
What is the most common mistake people make that ruins a pot roast?
The most common mistakes are skipping the sear, using the wrong cut of meat, or boiling instead of braising. Skipping the sear misses out on creating foundational flavor for the gravy. Using a lean cut like tenderloin leads to dry meat. A rolling boil on the stovetop makes meat tough, whereas a gentle, low-and-slow oven braise is essential for tenderness.
Can I make this Sunday pot roast recipe in a slow cooker?
Yes, this recipe is slow cooker friendly. After completing the searing and deglazing steps on the stovetop, you simply transfer everything to a slow cooker and cook it on LOW for 8-10 hours to achieve the same fall-apart tenderness.
Sunday Pot Roast
Ingredients
Equipment
Method
- Preheat oven to 325°F (163°C).
- Pat the chuck roast completely dry with paper towels. Generously season all over with salt and pepper.
- Heat oil in a large Dutch oven over medium-high heat until shimmering. Sear the roast for 4-5 minutes per side, including the edges, until a deep brown crust forms. Transfer roast to a plate.
- Reduce heat to medium. Add the chopped onions, carrots, and celery to the pot with a pinch of salt. Cook for 8-10 minutes, stirring occasionally, until softened and starting to brown.
- Add the smashed garlic and tomato paste. Cook for 1 minute, stirring, until the paste darkens slightly and becomes fragrant.
- Pour in the red wine, scraping the bottom of the pot with a wooden spoon to release all the browned bits. Simmer for 2-3 minutes to cook off the raw alcohol.
- Add the beef broth, thyme sprigs, and bay leaves. Bring to a simmer.
- Carefully place the seared roast back into the pot along with any accumulated juices. Cover with the lid.
- Transfer the covered pot to the preheated oven. Braise undisturbed for 2 hours.
- Carefully remove the pot from the oven. Nestle the potato chunks and remaining carrot chunks around the roast, submerging them in the liquid as much as possible.
- Cover and return to the oven for another 1 to 1.5 hours, until the meat and vegetables are fork-tender.
- Transfer the meat and vegetables to a platter and tent loosely with foil to rest.
- For the gravy, skim excess fat from the surface of the braising liquid. For a thicker gravy, simmer the liquid on the stovetop for 10-15 minutes to reduce, or whisk in a slurry of 2 tablespoons cornstarch mixed with 2 tablespoons cold water and simmer until thickened.
- Shred or slice the roast. Serve with the vegetables and gravy.
