Velvet, in dessert form, is a promise of pure luxury, a texture so smooth and rich it feels like a secret whispered just for you. We’ve all fallen for the dramatic allure of a classic red velvet cake, with its subtle cocoa notes and striking crimson hue. But what happens when you take that iconic flavor and swirl it into the tangy, creamy embrace of cheesecake, then shrink it down into a perfect, party-ready bite?
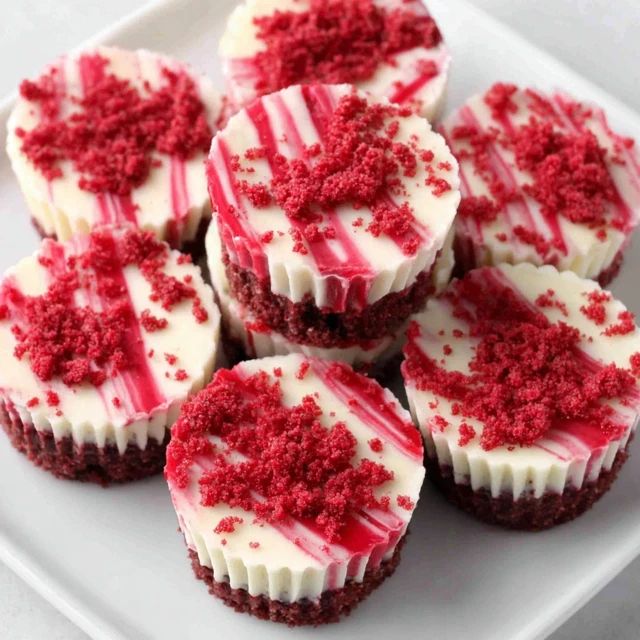
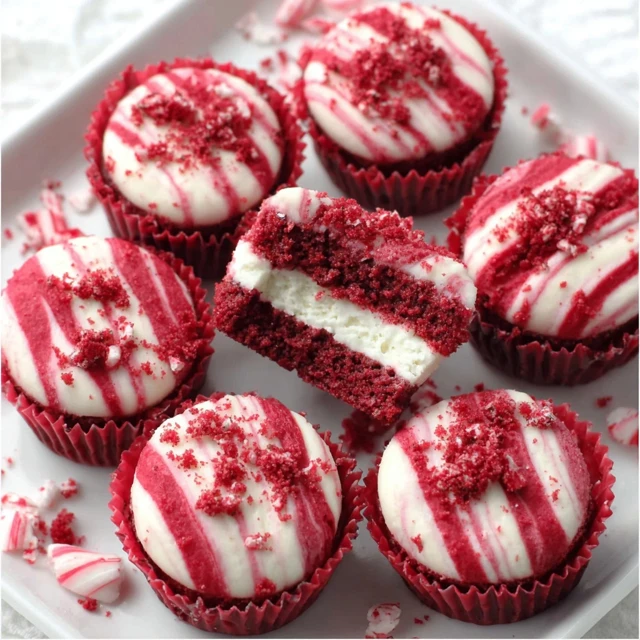
You get a dessert that stops the show, a tiny masterpiece that delivers on every single promise. These Red Velvet Cheesecake Bites are the best of both worlds, featuring a buttery Oreo crust, a layer of moist red velvet cake, and a cloud of tangy cream cheese filling, all crowned with a dollop of cream cheese frosting. They are decadent, elegant, and surprisingly simple to create.
The Red Velvet Cheesecake Bites Difference
- Perfect Texture Fusion: This recipe layers a crisp chocolate cookie crust, a tender red velvet cake base, and a silky-smooth cheesecake topping. The contrast is absolutely divine and hits every note.
- Simplified Technique: We bake the cake and crust together, then top with a no-bake cheesecake filling. This streamlines the process, eliminating the need for a tricky water bath and reducing the risk of cracks.
- Showstopper Appearance: The deep red, stark white, and dark chocolate layers create a visually stunning dessert that looks like it came from a high-end bakery, making it perfect for holidays, parties, or any special occasion.
The Building Blocks
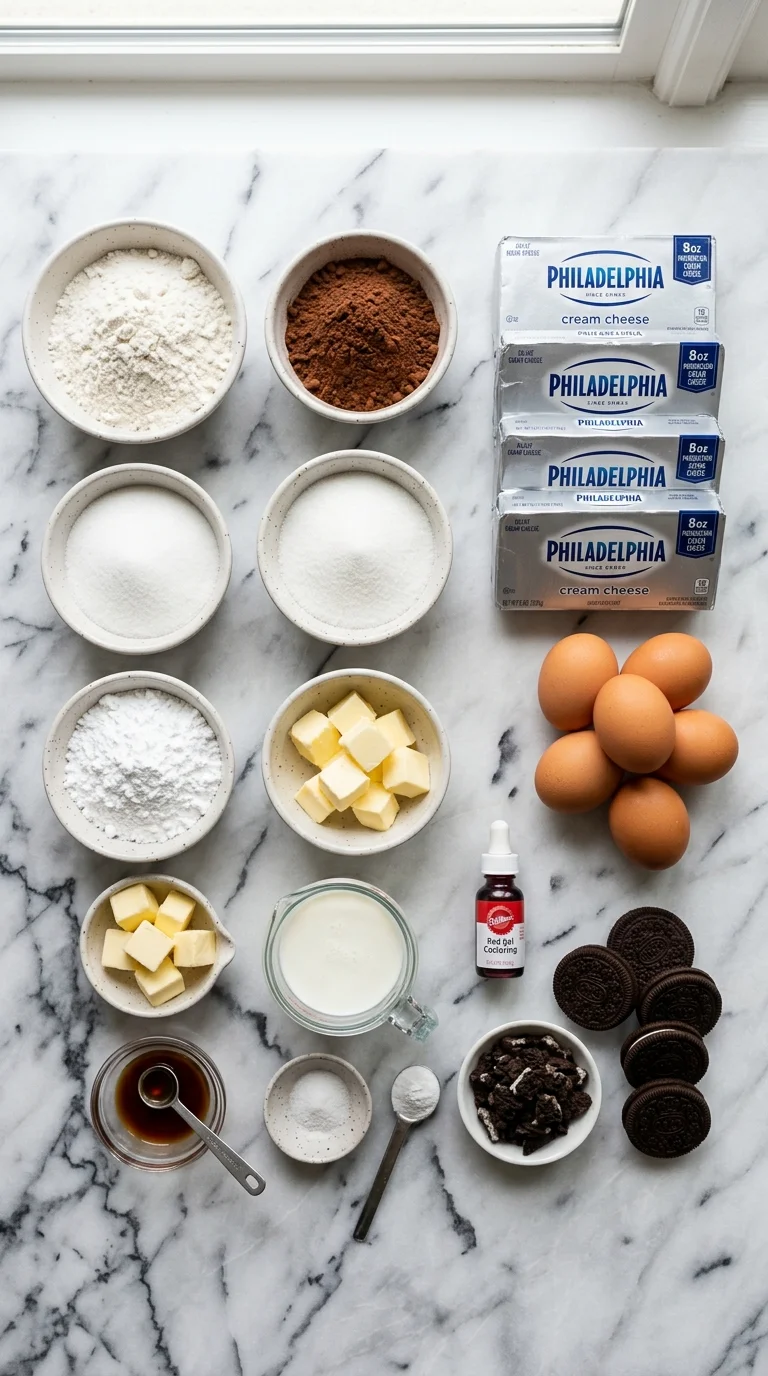
The magic of these bites comes from using quality ingredients that work in harmony. Don’t be tempted to skimp on the full-fat dairy; it’s the heart and soul of that luxurious cheesecake texture we’re aiming for.
For the Oreo Crust
- Chocolate Sandwich Cookies (like Oreos): (About 24 cookies) The classic choice for a rich, dark, and crunchy foundation that complements the red velvet perfectly.
- Unsalted Butter: (Melted) This is the glue that holds our crust together, transforming fine crumbs into a firm, pressable base.
For the Red Velvet Cake Layer
- All-Purpose Flour: The structural backbone of our tender cake layer.
- Granulated Sugar: Provides sweetness and helps create a moist, tender crumb.
- Unsweetened Cocoa Powder: (Not Dutch-processed) This gives red velvet its signature subtle chocolate flavor.
- Baking Soda: Our leavening agent, which reacts with the acidic ingredients to give the cake lift.
- Salt: A pinch is essential for balancing the sweetness and enhancing the cocoa notes.
- Large Egg: (At room temperature) Binds the ingredients and adds richness. Room temperature ingredients incorporate more smoothly.
- Vegetable Oil: Guarantees a moist cake layer that won’t dry out in the oven.
- Buttermilk: (At room temperature) The signature tang of red velvet! Its acidity tenderizes the gluten and activates the baking soda.
- White Vinegar: Another acid that reacts with the baking soda for an extra-tender crumb and helps brighten the red color.
- Vanilla Extract: Adds a warm, aromatic depth that rounds out the flavors.
- Red Food Coloring: (Gel is best) Use a high-quality gel food coloring for a vibrant, deep red without adding excess liquid to the batter.
For the No-Bake Cheesecake & Frosting
- Cream Cheese: (Full-fat, softened to room temperature) This is non-negotiable! Full-fat, brick-style cream cheese is essential for a firm, rich, and creamy cheesecake layer. Low-fat or whipped versions will not set properly.
- Powdered Sugar: Dissolves instantly, ensuring a silky-smooth, non-gritty texture for both the filling and the frosting.
- Heavy Whipping Cream: (Cold) When whipped, it provides the light, airy structure for our no-bake cheesecake filling.
- Vanilla Extract: A splash enhances the sweetness and complements the tangy cream cheese.
Adapting the Recipe
- Gluten-Free Option: To make these gluten-free, simply use your favorite gluten-free chocolate sandwich cookies for the crust and substitute the all-purpose flour with a 1-to-1 gluten-free baking flour blend.
- No Buttermilk? No Problem: If you don’t have buttermilk, you can make a quick substitute. For every 1 cup of milk, stir in 1 tablespoon of lemon juice or white vinegar. Let it sit for 5-10 minutes until it curdles slightly.
- Food Coloring Alternatives: If you prefer to avoid artificial dyes, you can use natural food coloring made from beets, though the color will be more of a deep magenta than a bright red. You can also omit it entirely for a “cocoa velvet” cheesecake bite.
- Different Crusts: Feel free to experiment! A crust made from crushed vanilla wafers, shortbread cookies, or even the crumbs from our Red Velvet Blossoms Cookies would be delicious.
Gourmet Variations
Ready to take these little beauties to the next level? These simple twists can add a touch of gourmet flair and make the recipe uniquely yours.
First, consider a chocolate ganache drizzle. After the cheesecake has fully set, melt semi-sweet chocolate with a splash of heavy cream and gently drizzle it over the top of the bites. The glossy finish adds a professional touch and an extra layer of chocolatey goodness.
For a bit of texture, try folding mini semi-sweet chocolate chips into the cheesecake filling before spreading it over the cake layer. This adds a delightful crunch and deepens the chocolate flavor profile.
Finally, don’t underestimate the power of a different extract. Swap half of the vanilla extract in the cheesecake filling for almond extract for a subtle, nutty complexity that pairs beautifully with the red velvet and chocolate.
Step-by-Step Instructions
This process is all about layering flavors and textures. We’ll work from the bottom up, creating a perfect foundation before adding the creamy, dreamy topping. Take your time and enjoy the process!
1. Prepare the Pan and Crust
First things first, let’s get our pan ready. Preheat your oven to 350°F (175°C). Line a 9×9 inch square baking pan with parchment paper, leaving some overhang on two sides. This will act as a sling, making it super easy to lift the entire block out later for clean cutting.In a food processor, pulse the chocolate sandwich cookies until they become fine crumbs. If you don’t have a food processor, place them in a zip-top bag and crush them with a rolling pin. Pour the crumbs into a bowl, add the melted butter, and stir with a fork until every crumb is moistened. Press this mixture firmly and evenly into the bottom of your prepared pan.
2. Mix the Red Velvet Cake Batter
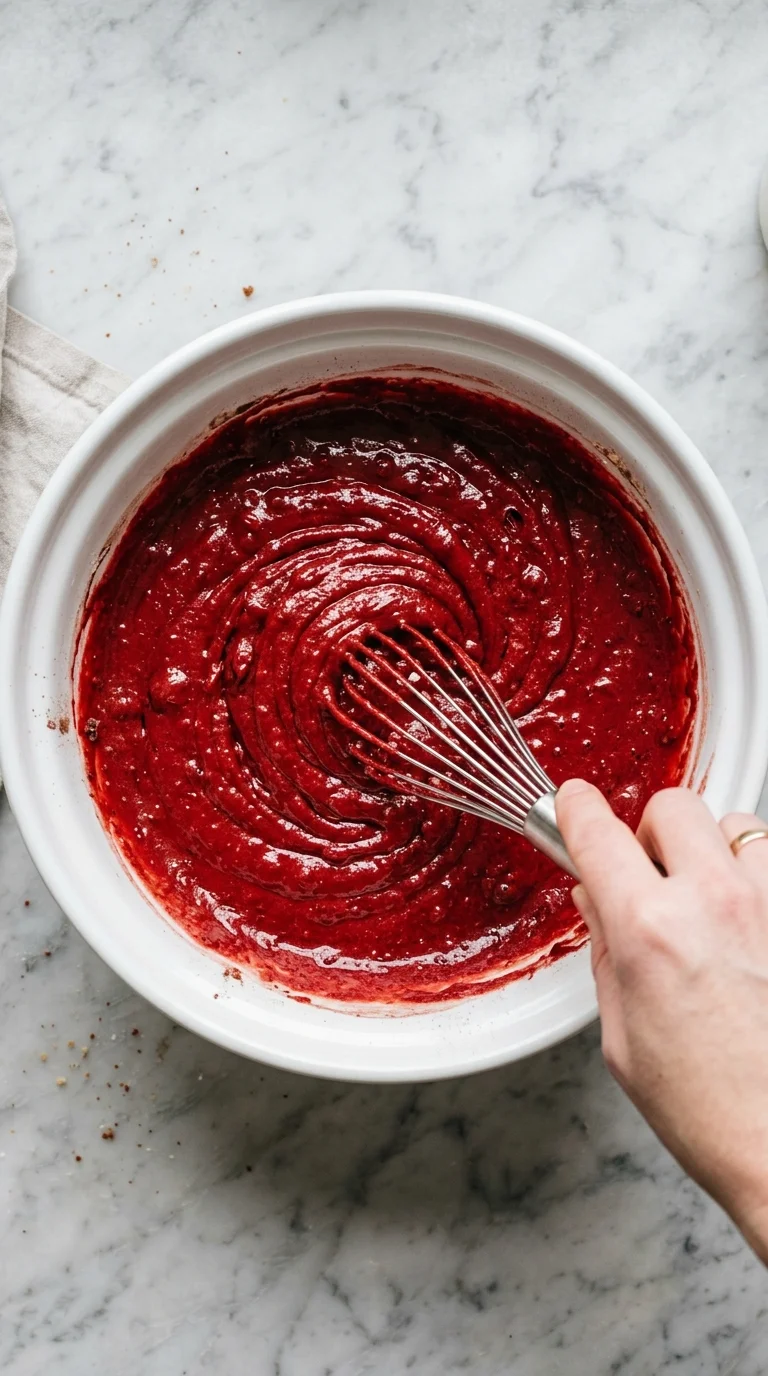
In a medium bowl, whisk together the dry ingredients: flour, sugar, cocoa powder, baking soda, and salt. In a separate, larger bowl, whisk together the wet ingredients: the egg, oil, buttermilk, vinegar, and vanilla extract.Now, add the red food coloring to the wet ingredients. Start with about 1 tablespoon of gel coloring and whisk until you have a vibrant, uniform red color. Pour the dry ingredients into the wet ingredients and whisk until just combined. Be careful not to overmix; a few small lumps are perfectly fine.
3. Bake and Cool the Base
Gently pour the red velvet cake batter over the prepared Oreo crust, spreading it into an even layer with an offset spatula. Bake for 20-25 minutes, or until a wooden skewer inserted into the center of the cake layer comes out clean or with a few moist crumbs attached.Let the pan cool completely on a wire rack. This is a crucial step! If you add the cheesecake filling to a warm cake, it will melt and become a soupy mess. Patience is key here. The process is similar to how you’d cool the base for our Strawberry Cheesecake Bites.
4. Whip Up the Cheesecake Filling
While the cake cools, let’s make the glorious no-bake cheesecake topping. In a large bowl, use a hand mixer or a stand mixer fitted with the paddle attachment to beat the softened cream cheese until it’s completely smooth and free of lumps. Scrape down the sides of the bowl.Add the powdered sugar and vanilla extract, and beat on low speed until combined, then increase to medium speed and beat until smooth. In a separate, chilled bowl, whip the cold heavy cream until stiff peaks form. Be careful not to over-whip it into butter!
5. Combine and Layer the Cheesecake
Gently fold about one-third of the whipped cream into the cream cheese mixture to lighten it. Then, add the remaining whipped cream and fold until it’s fully incorporated and no streaks remain. The goal is to keep as much air in the mixture as possible for a light, fluffy texture. This no-bake method is so versatile, it even works for treats like our Baileys Cheesecake Balls.Spoon the cheesecake filling over the completely cooled red velvet cake layer. Spread it evenly from edge to edge. Cover the pan with plastic wrap and transfer it to the refrigerator to chill for at least 6 hours, but preferably overnight. This chilling time is essential for the cheesecake to set up firmly.
6. Make the Frosting and Garnish
Just before serving, you can whip up a quick cream cheese frosting. Simply beat together a few ounces of cream cheese with some powdered sugar, a splash of milk or cream, and vanilla until smooth. You can pipe this on top for a professional look.Once chilled and firm, use the parchment paper sling to lift the entire block out of the pan. Use a large, sharp knife to cut it into small, even squares. For the cleanest cuts, wipe the knife with a damp paper towel between each slice. Garnish each bite with a swirl of frosting and some red velvet cake crumbs or mini chocolate chips. The final result is a showstopper, just as impressive as a full Red Velvet Cake or a batch of beautiful Red Velvet Cupcakes.
Avoid These Pitfalls
- Using Cold Cream Cheese: This is the number one cause of lumpy cheesecake. Your cream cheese must be fully softened to room temperature to beat into a perfectly smooth, creamy consistency.
- Not Chilling Long Enough: The no-bake cheesecake layer needs at least 6 hours (ideally overnight) in the refrigerator to set properly. Rushing this step will result in soft, messy bites that don’t hold their shape.
- Overmixing the Cake Batter: Once you combine the wet and dry ingredients for the red velvet layer, mix only until they are just combined. Overmixing develops the gluten in the flour, leading to a tough, dense cake instead of a tender one.
Serving Ideas
These Red Velvet Cheesecake Bites are a complete dessert all on their own, but a little extra flair never hurts! They are perfect for holiday dessert platters, Valentine’s Day treats, or any party where you want to impress your guests.
For a simple and elegant presentation, arrange them on a white platter to make the colors pop. A small dollop of stabilized whipped cream and a sprinkle of chocolate shavings on each bite adds a touch of sophistication.
If you love fruit, a single fresh raspberry or a slice of strawberry on top provides a wonderful tartness that cuts through the richness of the cheesecake. This is a similar idea to the presentation of our Deviled Strawberries Cheesecake Bites, which always get rave reviews.
Serve them chilled, straight from the refrigerator, for the best texture. They pair wonderfully with a cup of strong coffee or a glass of cold milk. For an adult pairing, a glass of sparkling rosé or a coffee liqueur would be a decadent treat.
If you tried this recipe and loved it, please leave a 5-star rating below. It helps us so much
What makes this recipe easier than a traditional baked cheesecake?
This recipe simplifies the process by layering a no-bake cheesecake filling over a baked red velvet cake base. This streamlined technique eliminates the need for a tricky water bath and reduces the risk of the cheesecake cracking, which are common challenges with traditional cheesecakes.
Can I use low-fat or whipped cream cheese for the cheesecake layer?
No, it is essential to use full-fat, brick-style cream cheese that has been softened to room temperature. According to the article, low-fat or whipped versions will not set properly and will result in a filling that is too soft and doesn’t hold its shape.
What can I use if I don’t have any buttermilk?
If you don’t have buttermilk, you can make a quick substitute. For every 1 cup of milk, stir in 1 tablespoon of lemon juice or white vinegar. Let the mixture sit for 5-10 minutes until it curdles slightly, and then it’s ready to be used in the recipe.
Why is it so important to cool the cake layer completely before adding the filling?
It is a crucial step to let the red velvet cake base cool completely. If you add the no-bake cheesecake filling to a warm cake, the filling will melt and become a soupy mess instead of setting into a firm, distinct layer.
Showstopper Red Velvet Cheesecake Bites
Ingredients
Equipment
Method
- Prepare Pan and Crust: Preheat oven to 350°F (175°C). Line a 9×9 inch pan with parchment paper, leaving an overhang. Pulse cookies into fine crumbs in a food processor. Mix crumbs with melted butter until moistened. Press mixture firmly into the bottom of the prepared pan.
- Mix Cake Batter: In a medium bowl, whisk together flour, sugar, cocoa powder, baking soda, and salt. In a larger bowl, whisk together the egg, oil, buttermilk, vinegar, and vanilla. Stir the red food coloring into the wet ingredients until uniform. Add the dry ingredients to the wet and whisk until just combined; do not overmix.
- Bake and Cool Base: Pour the cake batter over the crust and spread evenly. Bake for 20-25 minutes, or until a skewer inserted into the center comes out clean. Let the pan cool completely on a wire rack.
- Make Cheesecake Filling: In a large bowl, beat the 16 oz of softened cream cheese with an electric mixer until completely smooth. Add 1 cup of powdered sugar and 1 tsp of vanilla, and beat until combined and smooth. In a separate chilled bowl, whip the cold heavy cream until stiff peaks form.
- Combine and Layer Cheesecake: Gently fold one-third of the whipped cream into the cream cheese mixture to lighten it. Then, fold in the remaining whipped cream until no streaks remain. Spoon the filling over the cooled cake layer and spread evenly. Cover and refrigerate for at least 6 hours, or preferably overnight, until firm.
- Frost, Cut, and Serve: For the frosting, beat the 4 oz of cream cheese, 1 cup of powdered sugar, milk/cream, and 1/2 tsp of vanilla until smooth. Lift the chilled block from the pan using the parchment sling. Cut into 16 even squares, wiping the knife clean between cuts. Pipe or dollop frosting on each bite and garnish with mini chocolate chips or cake crumbs if desired. Serve chilled.
Notes
Variations: For a gluten-free version, use gluten-free sandwich cookies and a 1-to-1 gluten-free flour blend. Drizzle with chocolate ganache or fold mini chocolate chips into the cheesecake filling for extra decadence.
Buttermilk Substitute: If you don’t have buttermilk, mix 1/2 cup of milk with 1/2 tablespoon of lemon juice or white vinegar and let it sit for 5-10 minutes.
Storage: Store the cheesecake bites in an airtight container in the refrigerator for up to 5 days.
