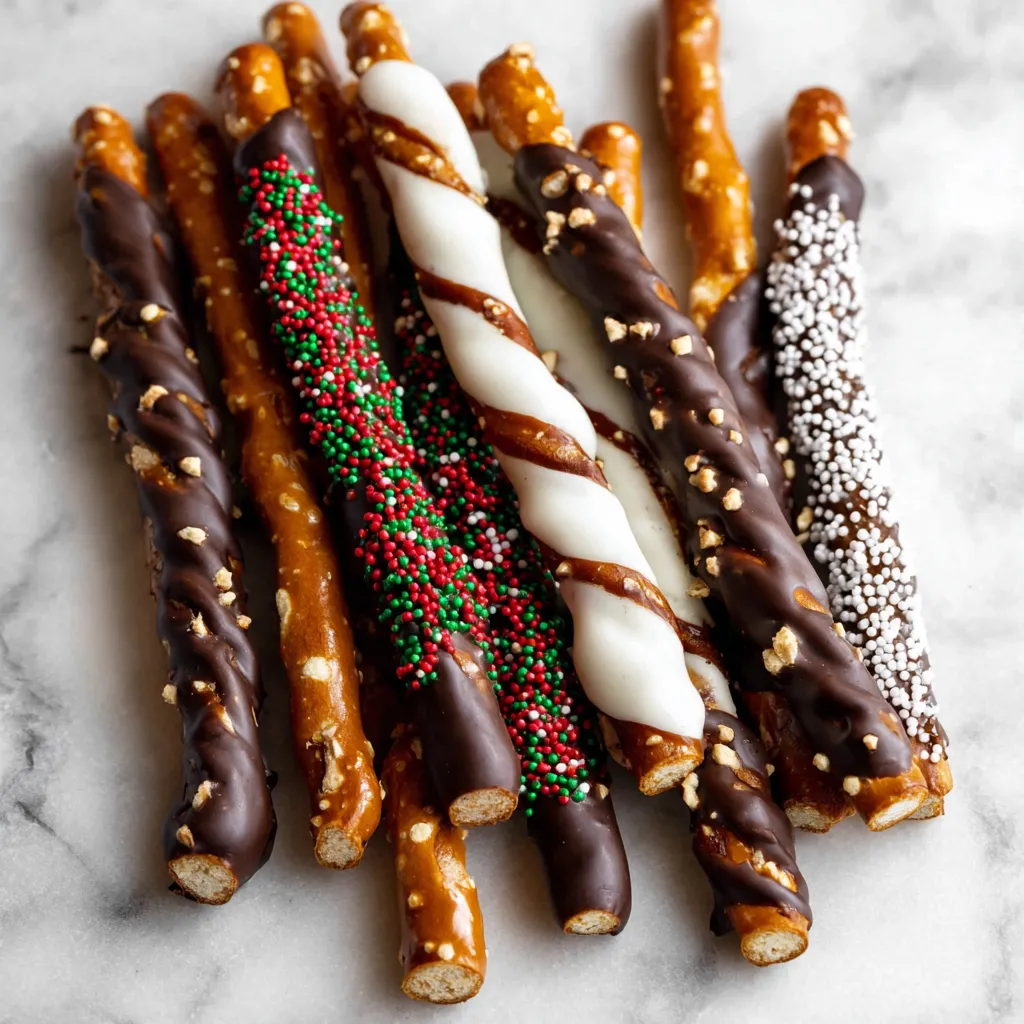
The satisfying snap of a pretzel rod coated in smooth, decadent chocolate, followed by a burst of colorful sprinkles – it’s pure joy in every bite! These Chocolate Covered Pretzel Rods aren’t just a treat; they’re an edible work of art that’s surprisingly simple to create. Get ready to impress your friends and family (and maybe even yourself!) with this easy and delightful recipe.
Ingredients
What You’ll Need:
- Pretzel Rods: 1 bag (approximately 30-40 rods) – look for sturdy ones that won’t break easily.
- Chocolate: 12 oz semi-sweet, milk, or dark chocolate chips (or a combination!) – high-quality chocolate makes a difference.
- Vegetable Shortening or Coconut Oil: 1-2 tablespoons – this helps thin the chocolate for a smoother coating.
- Sprinkles: Your favorite assortment! Jimmies, nonpareils, sanding sugar, crushed candy canes – the possibilities are endless.
- Optional Toppings: Chopped nuts, shredded coconut, mini chocolate chips, sea salt.
Let’s Talk Chocolate (and Troubleshooting!)

Choosing the right chocolate is key to success! While chocolate chips are convenient, using a high-quality baking chocolate (like Ghirardelli or Guittard) will give you the best flavor and texture. You can also use melting wafers, which are specifically designed for candy making and tend to melt more smoothly.
Troubleshooting Melting Chocolate: Chocolate can be finicky! Here’s what to do if you run into problems:
- Seizing: This happens when moisture gets into the chocolate, causing it to become grainy and stiff. To prevent this, make sure your bowl and utensils are completely dry. If it happens anyway, try adding a teaspoon of vegetable shortening at a time, stirring vigorously, until the chocolate smooths out.
- Burning: Chocolate burns easily! Melt it slowly and gently, stirring frequently. If you’re using a microwave, heat in 30-second intervals, stirring in between, until melted.
- Too Thick: If your melted chocolate is too thick to coat the pretzels smoothly, add a little more vegetable shortening or coconut oil, one teaspoon at a time, until it reaches the desired consistency.
Step-by-Step Instructions
Getting Started:
- Prepare Your Workspace: Line a baking sheet with parchment paper or wax paper. This will prevent the pretzels from sticking.
- Melt the Chocolate: In a heat-safe bowl set over a simmering pot of water (double boiler method) or in the microwave, melt the chocolate and vegetable shortening (or coconut oil) together. Stir frequently until smooth and completely melted.
Dipping Time!
- Dip the Pretzels: Hold a pretzel rod by one end and dip it into the melted chocolate, swirling to coat evenly. You can dip the entire rod or leave a portion uncoated for easy handling.
- Remove Excess Chocolate: Gently tap the pretzel rod against the side of the bowl to remove any excess chocolate. You can also use a fork to scrape off excess.
- Add Sprinkles (or Other Toppings): Immediately sprinkle the dipped pretzel rod with your favorite toppings while the chocolate is still wet. Work quickly, as the chocolate will start to set.
- Set and Harden: Place the decorated pretzel rod on the prepared baking sheet. Repeat with the remaining pretzel rods and chocolate.
- Chill (Optional): To speed up the hardening process, you can place the baking sheet in the refrigerator for 10-15 minutes.
Creative Variations: Beyond the Basics
Once you’ve mastered the basic technique, the fun really begins! Here are some ideas to get your creative juices flowing:
- Flavor Combinations: Experiment with different types of chocolate, such as white chocolate, milk chocolate, or even flavored chocolate like peppermint or raspberry.
- Drizzled Designs: Once the base chocolate has set, drizzle with a contrasting color of chocolate for a decorative effect.
- Candy Bar Inspired: Crush your favorite candy bars (like Snickers, Reese’s, or Heath) and sprinkle them on the pretzels.
- Nutty Delight: Dip the pretzels in chocolate and then roll them in chopped nuts, such as pecans, walnuts, or almonds.
- Salty-Sweet Perfection: Sprinkle with sea salt for a delightful salty-sweet contrast.
- Holiday Themes: Use holiday-themed sprinkles and colors for festive occasions. Think red and green for Christmas, pastel colors for Easter, or orange and black for Halloween. You could even make Chocolate Pretzel Wreaths.
Tips for Perfectly Pretty Pretzels
Want your Chocolate Covered Pretzel Rods to look like they came straight from a candy shop? Here are a few extra tips:
- Use a Dipping Tool: A chocolate dipping tool or fork can help you coat the pretzels more evenly and remove excess chocolate.
- Work in Batches: Don’t melt all the chocolate at once. Melt it in batches to prevent it from hardening before you’re finished.
- Keep the Chocolate Warm: If the chocolate starts to harden while you’re working, simply reheat it gently.
- Presentation Matters: Arrange the finished pretzel rods in a pretty box or on a platter for a beautiful presentation. These are great for gifting! Consider making White Chocolate Reindeer Chow as well.
Storage Secrets
To keep your Chocolate Covered Pretzel Rods fresh and delicious, store them in an airtight container at room temperature. They will typically last for up to a week. If you live in a warm climate, you may want to store them in the refrigerator to prevent the chocolate from melting. These pretzels are similar to Rolo Pretzels, but last longer in storage.
Perfect for Gifting and Parties
Chocolate Covered Pretzel Rods are the perfect treat for any occasion! They’re easy to make, customizable, and always a crowd-pleaser. Wrap them individually in cellophane bags and tie with a ribbon for a thoughtful gift, or display them on a platter at your next party. They’re even easier to make than Christmas Crack!
More Sweet Treats to Try
If you loved making these chocolate covered pretzel rods, here are a few other recipes you might enjoy:
- Christmas Puppy Chow – A festive and addictive snack mix.
- Christmas Puppy Chow – Another take on the classic puppy chow recipe.
So, gather your ingredients, put on some music, and get ready to have some fun in the kitchen! Making Chocolate Covered Pretzel Rods is a simple yet satisfying way to create a delicious and impressive treat that everyone will love. Enjoy!
What kind of chocolate is recommended for the best flavor and texture?
While chocolate chips are convenient, using a high-quality baking chocolate (like Ghirardelli or Guittard) will give you the best flavor and texture. Melting wafers, specifically designed for candy making, also melt smoothly and work well.
How do I prevent my chocolate from seizing when melting it?
Seizing happens when moisture gets into the chocolate. To prevent this, make sure your bowl and utensils are completely dry. If it seizes anyway, try adding a teaspoon of vegetable shortening at a time, stirring vigorously, until the chocolate smooths out.
How should I store the chocolate covered pretzel rods?
Store them in an airtight container at room temperature. They will typically last for up to a week. If you live in a warm climate, you may want to store them in the refrigerator to prevent the chocolate from melting.
What are some creative variations I can try with chocolate covered pretzel rods?
You can experiment with different types of chocolate, drizzle with contrasting colors, crush candy bars as toppings, roll in chopped nuts, sprinkle with sea salt for a salty-sweet flavor, or use holiday-themed sprinkles.
Irresistible Chocolate Covered Pretzel Rods
Ingredients
Equipment
Method
- Line a baking sheet with parchment paper or wax paper.
- In a heat-safe bowl set over a simmering pot of water (double boiler method) or in the microwave, melt the chocolate and vegetable shortening (or coconut oil) together.
- Stir frequently until smooth and completely melted.
- Hold a pretzel rod by one end and dip it into the melted chocolate, swirling to coat evenly.
- You can dip the entire rod or leave a portion uncoated for easy handling.
- Gently tap the pretzel rod against the side of the bowl to remove any excess chocolate. You can also use a fork to scrape off excess.
- Immediately sprinkle the dipped pretzel rod with your favorite toppings while the chocolate is still wet.
- Work quickly, as the chocolate will start to set.
- Place the decorated pretzel rod on the prepared baking sheet.
- Repeat with the remaining pretzel rods and chocolate.
- To speed up the hardening process, you can place the baking sheet in the refrigerator for 10-15 minutes.