Whispers of sweetness often arrive in the most delicate forms, and these pastel sugar cookie sandwiches are the softest, most beautiful whisper of all. They aren’t just a treat; they are a mood, a tiny celebration of all things gentle and joyful, captured between two impossibly tender cookies. This recipe was born from a desire to create something that looked as dreamy as it tasted, a confection that could anchor a spring dessert table or simply make a Tuesday afternoon feel like a special occasion.
What we’re creating together is more than just a dessert; it’s a little piece of edible art. Imagine biting through two pillowy, soft sugar cookies that melt in your mouth, giving way to a swirl of light, fluffy, and perfectly sweet buttercream. The subtle pastel hues make them one of the most charming Easter cookies you’ll ever make, but their simple, classic flavor is timeless. Get ready to fall in love with your new favorite way to bake.
The Pastel Sugar Cookie Sandwiches Difference
- Impossibly Soft Texture: We use a combination of cream cheese and cake flour in the cookie dough. The cream cheese adds a subtle tang and incredible moisture, ensuring these are the most tender, soft sugar cookies you’ve ever had.
- No-Spread, No-Fuss Dough: This dough is specifically designed to hold its shape. A proper chill time means your cookies will bake into perfect, uniform circles, ideal for creating beautiful, neat buttercream cookie sandwich treats.
- Stunning, Simple Pastels: You don’t need to be a pastry chef to achieve these gorgeous colors. A few drops of gel food coloring into a simple, stable buttercream is all it takes to create these cute Easter treats that will wow everyone.
The Building Blocks
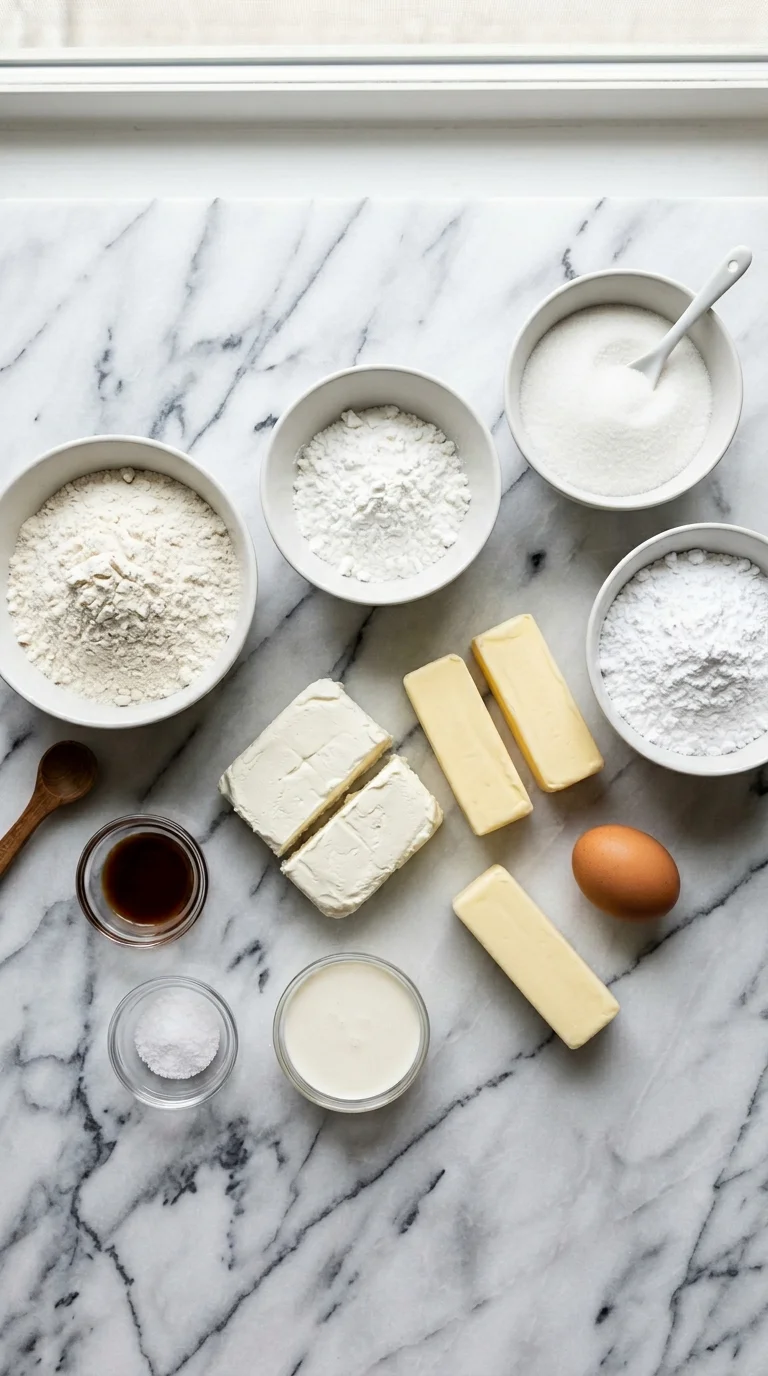
The magic of these sugar cookie sandwiches lies in using simple, high-quality ingredients that work together in perfect harmony. Each component plays a critical role in achieving that signature soft bite and creamy finish, so let’s gather our tools for this wonderful spring baking idea.
For the Soft Sugar Cookies:
- Unsalted Butter: (1 cup, softened to room temperature) The foundation of our cookie’s flavor and texture. Using unsalted butter allows us to control the salt content precisely.
- Cream Cheese: (4 ounces, softened to room temperature) This is our secret weapon! It makes the cookies incredibly tender and moist with a very subtle, pleasant tang that balances the sweetness.
- Granulated Sugar: (1 cup) Provides the primary sweetness and helps create that classic sugar cookie chew.
- Large Egg: (1, at room temperature) Acts as a binder, bringing the dough together and adding richness.
- Vanilla Extract: (2 teaspoons) Pure vanilla extract is essential for a deep, aromatic flavor that complements the buttercream.
- All-Purpose Flour: (2 ½ cups) The main structural component of our cookies.
- Cornstarch: (2 tablespoons) Another key to softness! Cornstarch helps create a more tender, melt-in-your-mouth crumb.
- Baking Powder: (1 teaspoon) Gives the cookies a slight lift, keeping them light rather than dense.
- Salt: (½ teaspoon) Crucial for balancing all the sweet flavors and making them pop.
For the Pastel Buttercream Filling:
- Unsalted Butter: (1 cup, softened to room temperature) The base of our rich and creamy filling.
- Powdered Sugar: (3-4 cups, sifted) Sifting is non-negotiable here! It ensures a silky-smooth buttercream without any lumps.
- Heavy Cream or Milk: (2-4 tablespoons) Used to adjust the consistency of the frosting until it’s perfectly light and pipeable.
- Vanilla Extract: (1 teaspoon) For that classic, sweet frosting flavor.
- Salt: (A pinch) Just a tiny bit to cut through the sweetness.
- Gel Food Coloring: (Pastel pink, blue, yellow, green, etc.) Gel coloring is a must for vibrant hues without adding extra liquid, which can ruin the buttercream’s texture.
Swaps & Alternatives
Don’t have everything on hand? No worries! Here are a few simple swaps you can make in a pinch.- No Cream Cheese? You can substitute it with an equal amount of softened butter, but the cookies will be slightly less tender and won’t have that subtle tang.
- All-Purpose Flour Only: If you don’t have cornstarch, you can replace it with an equal amount of all-purpose flour. The cookies will still be delicious, just slightly less delicate.
- Different Extracts: Feel free to swap the vanilla in the buttercream for almond, lemon, or even rose extract for a different flavor profile. A little goes a long way!
- Vegan Butter & Cream Cheese: For a dairy-free version, you can use high-quality vegan butter sticks and vegan cream cheese. Use a plant-based milk like oat or almond milk for the buttercream.
- Shortening in Frosting: For an extra-stable buttercream, especially in warmer weather, you can replace half of the butter with an equal amount of vegetable shortening.
Chef’s Twists
Ready to take these pastel desserts to the next level? These simple additions can add a layer of gourmet flair and make the recipe uniquely yours.
Zesty Citrus Buttercream
Add the finely grated zest of one lemon or half an orange to the buttercream along with the vanilla. The bright citrus notes cut through the sweetness beautifully and create an incredible flavor combination. It reminds me of the fresh filling in my Zesty Lemon Cupcakes With Buttercream.Sparkling Sugar Edges
After assembling the cookie sandwiches, gently roll the exposed buttercream edges in sparkling sanding sugar or nonpareils that match your pastel colors. This adds a delightful crunch and a professional, bakery-style finish.Brown Butter Cookies
For a deeper, nuttier flavor, brown the butter for the cookie dough. Let it cool completely until it’s solid but soft (like room-temperature butter) before creaming it with the sugar and cream cheese. This one small step adds an unbelievable depth of flavor.How to Make Pastel Sugar Cookie Sandwiches
This process is straightforward and a perfect project for a lazy afternoon. We’ll make the dough, let it chill, bake the cookies, and then have fun with the buttercream. This is a fantastic kid friendly baking activity, especially the decorating part!
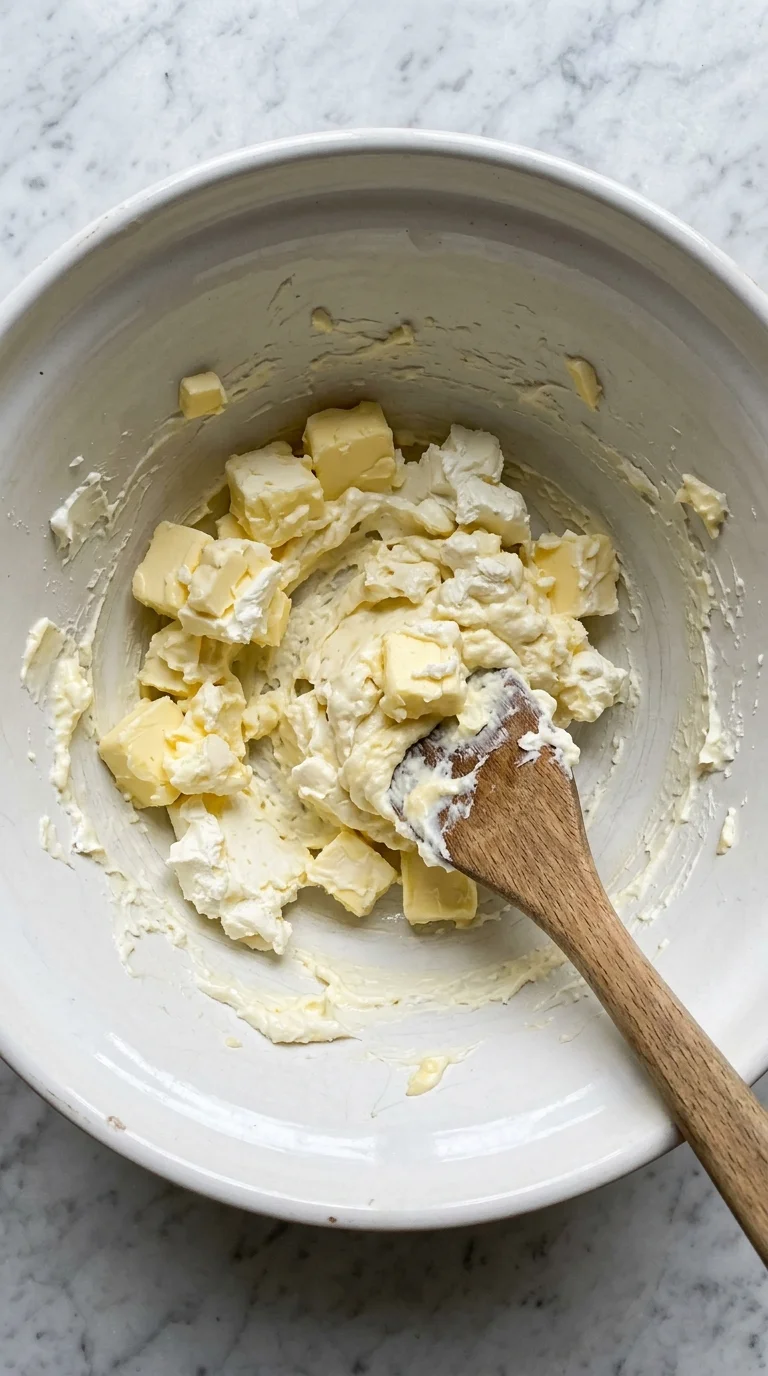
1. Cream the Fats and Sugar
In the bowl of a stand mixer fitted with the paddle attachment, or in a large bowl with a hand mixer, beat the softened butter and cream cheese on medium speed until smooth and creamy, about 2 minutes. Scrape down the sides of the bowl. Add the granulated sugar and beat on medium-high speed for another 3 minutes, until the mixture is light and fluffy.This step is crucial for incorporating air into the base, which leads to lighter cookies. Don’t rush it!
2. Add the Wet Ingredients
Add the egg and vanilla extract to the creamed mixture. Beat on medium speed until just combined, scraping down the sides of the bowl as needed to ensure everything is evenly incorporated.3. Combine the Dry Ingredients
In a separate medium bowl, whisk together the all-purpose flour, cornstarch, baking powder, and salt. This ensures the leavening agents are evenly distributed, so all your cookies rise uniformly.4. Finish the Cookie Dough
With the mixer on low speed, gradually add the dry ingredient mixture to the wet ingredients. Mix until just combined, being careful not to overmix. Overmixing develops gluten and can lead to tough cookies. The dough will be very soft and sticky at this point.5. Chill the Dough (The Most Important Step!)
Divide the dough in half, flatten each half into a 1-inch thick disk, and wrap tightly in plastic wrap. Refrigerate for at least 2 hours, or up to 2 days. Chilling is non-negotiable! It solidifies the fat, which prevents the cookies from spreading into thin, sad pancakes in the oven. This is the secret to perfect, thick, soft sugar cookies.6. Roll and Cut the Cookies
Preheat your oven to 350°F (175°C) and line two large baking sheets with parchment paper. Lightly flour your work surface and a rolling pin. Working with one disk of dough at a time, roll it out to about ¼-inch thickness. Use a 2-inch round cookie cutter to cut out circles. Place the cookies about 1-2 inches apart on the prepared baking sheets. Re-roll the scraps until all the dough is used. If the dough gets too warm, pop it back in the fridge for 10 minutes.This technique is similar to how we make our Soft Cut Out Sugar Cookies, ensuring each one is perfectly shaped.
7. Bake to Perfection
Bake for 9-11 minutes, or until the edges are set and the centers are just barely firm to the touch. The cookies should not be golden brown! We want them pale to keep them soft. Let the cookies cool on the baking sheet for 5 minutes before transferring them to a wire rack to cool completely. Completely cool cookies are essential before filling.8. Whip Up the Dreamy Buttercream
While the cookies cool, make the filling. In a large bowl with a hand mixer or a stand mixer, beat the softened butter on medium speed until it’s creamy and smooth. Sift in the powdered sugar, one cup at a time, mixing on low speed until incorporated before increasing the speed.Once all the sugar is added, add the vanilla and a pinch of salt. Add 2 tablespoons of heavy cream and beat on medium-high speed for 3-5 minutes until the buttercream is incredibly light, pale, and fluffy. If it’s too stiff, add more cream, one tablespoon at a time.
9. Create the Pastel Colors
Divide the buttercream evenly into small bowls (one for each color you want to make). Add one or two drops of gel food coloring to each bowl and stir until the color is uniform. Remember, a little gel coloring goes a long way, and the color will deepen slightly as it sits.10. Assemble Your Sugar Cookie Sandwiches
Pair up your cooled cookies by size. Transfer your colored buttercream to piping bags fitted with a round or star tip (or just use a zip-top bag with the corner snipped off). Pipe a generous swirl of buttercream onto the flat side of one cookie, then gently press another cookie on top to create your sandwich. Repeat with the remaining cookies and frosting.Avoid These Pitfalls
- Skipping the Chill Time: I know it’s tempting to rush, but unchilled dough will spread dramatically in the oven, leaving you with thin, crispy cookies instead of the thick, soft ones we’re aiming for. Give the dough its full 2 hours in the fridge.
- Overbaking the Cookies: The key to soft sugar cookies is to pull them from the oven when they look slightly underdone in the center. They will continue to bake on the hot pan. If the edges are golden brown, they’ve gone too far.
- Using Cold Butter for Frosting: Your butter for the buttercream MUST be at a soft room temperature. If it’s too cold, you’ll end up with a lumpy, greasy frosting that’s impossible to smooth out.
Serving Ideas
These pastel sugar cookie sandwiches are stars on their own, but they truly shine when presented with a little thought. They are the perfect addition to any holiday dessert table, especially for Easter, baby showers, or spring birthdays.
Arrange them on a tiered cake stand or a simple white platter to let their beautiful pastel colors pop. The contrast makes them look even more appetizing. They are one of the most delightful spring baking ideas to share with friends and family.
For a kid-friendly treat, serve them with a tall glass of cold milk. For a more grown-up affair, they pair beautifully with a cup of hot tea or a latte. The simple, sweet flavor of the cookie and buttercream is a perfect complement to a warm beverage. If you love festive cookies, you should also try making Shamrock Sugar Cookies for St. Patrick’s Day or Heart Shaped Sugar Cookies for Valentine’s Day!
These also make wonderful gifts. Pack them in a clear-lidded box tied with a ribbon for a beautiful and delicious homemade present. They hold up well at room temperature for a day or two, or you can store them in an airtight container in the refrigerator for up to 5 days. Just let them sit out for about 20 minutes to soften before serving. If you’re looking for another super soft cookie, the texture of these reminds me of my Soft Pistachio Pudding Cookies. And if you ever just want a classic, our base Sugar Cookie Recipe is a fantastic starting point.
Know someone who loves Pastel Sugar Cookie Sandwiches? Share this recipe with them
What makes these sugar cookies so uniquely soft and tender?
The secret to the cookies’ impossibly soft texture is the combination of cream cheese and cornstarch in the dough. The cream cheese adds incredible moisture and a subtle tang, while the cornstarch helps create a more tender, melt-in-your-mouth crumb.
Why is it so important to chill the cookie dough for at least two hours?
Chilling the dough is a non-negotiable step because it solidifies the fat (butter and cream cheese). This prevents the cookies from spreading too much in the oven, ensuring they hold their shape and bake into the thick, soft, perfect circles needed for sandwiches.
How can I get vibrant pastel colors in the buttercream without making it watery?
The recipe recommends using gel food coloring. Unlike liquid food coloring, gel-based colors are highly concentrated, so you only need a few drops to achieve stunning pastel hues without adding extra liquid that could ruin the buttercream’s light and fluffy texture.
Can I make a dairy-free or vegan version of these cookie sandwiches?
Yes, you can. For a dairy-free version, substitute the butter and cream cheese with high-quality vegan butter sticks and vegan cream cheese. For the buttercream, use vegan butter and a plant-based milk like oat or almond milk.


Dreamy Pastel Sugar Cookie Sandwiches
Ingredients
Equipment
Method
- In the bowl of a stand mixer with the paddle attachment, or in a large bowl with a hand mixer, beat the softened butter and cream cheese on medium speed until smooth and creamy, about 2 minutes. Add the granulated sugar and beat on medium-high for another 3 minutes until light and fluffy.
- Add the egg and vanilla extract to the creamed mixture. Beat on medium speed until just combined, scraping down the sides of the bowl as needed.
- In a separate medium bowl, whisk together the all-purpose flour, cornstarch, baking powder, and salt.
- With the mixer on low speed, gradually add the dry ingredients to the wet ingredients. Mix only until just combined, being careful not to overmix. The dough will be very soft.
- Divide the dough in half, flatten each into a 1-inch thick disk, and wrap tightly in plastic wrap. Refrigerate for at least 2 hours, or up to 2 days. This step is mandatory to prevent spreading.
- Preheat your oven to 350°F (175°C) and line two large baking sheets with parchment paper. On a lightly floured surface, roll one disk of dough out to about ¼-inch thickness. Use a 2-inch round cookie cutter to cut out circles.
- Place the cookies 1-2 inches apart on the prepared baking sheets. Re-roll scraps as needed. If the dough becomes too warm, return it to the refrigerator for 10 minutes.
- Bake for 9-11 minutes, until the edges are set and the centers are just barely firm. Do not let them turn golden brown. Let cool on the baking sheet for 5 minutes before transferring to a wire rack to cool completely.
- While the cookies cool, make the buttercream. In a large bowl, beat the softened butter until creamy. Sift in the powdered sugar, one cup at a time, mixing on low. Once incorporated, add the vanilla and a pinch of salt.
- Add 2 tablespoons of heavy cream and beat on medium-high speed for 3-5 minutes until the buttercream is very light and fluffy. Add more cream, one tablespoon at a time, if it’s too stiff.
- Divide the buttercream into small bowls for each color. Add 1-2 drops of gel food coloring to each and stir until uniform.
- Pair up the cooled cookies. Transfer buttercream to piping bags and pipe a generous swirl onto the flat side of one cookie. Gently press another cookie on top to create a sandwich. Repeat with all cookies.
