A truly great corned beef hash is a study in contrasts, a humble dish with a grand ambition. It’s about transforming the tender, salty richness of leftover brisket into a breakfast masterpiece defined by its textural symphony.
This method is your roadmap to that perfect plate: creamy potatoes, savory shreds of beef, and onions sweetened in the pan, all bound together by a crust so golden and crisp it sings. Let’s turn your leftovers into a legend.
Why This Method Works
- Patience is Your Best Ingredient: The key to a deep, crunchy crust isn’t more heat, but undisturbed cooking. Letting the hash form a single layer and leaving it be is the non-negotiable rule.
- Potatoes Cook Twice for Texture: Parboiling the potatoes ensures they’re fully tender and creamy inside before they ever hit the hot fat, guaranteeing no raw centers and maximum crisp outside.
- Fat is Flavor, Not Foe: Using a generous amount of butter or the rendered fat from your Crispy Oven Roasted Corned Beef And Cabbage isn’t just for frying; it’s what conducts heat evenly and toasts every morsel to perfection.
The Essentials
")
The beauty of hash lies in its simplicity, but each component plays a crucial role. Starting with well-cooked, flavorful corned beef makes all the difference—whether it’s from a classic Corned Beef And Cabbage or your own favorite method.
- Cooked Corned Beef: (About 2 cups, chopped. The star of the show. Leftover from a Slow Cooker Corned Beef And Cabbage works beautifully, as it’s fall-apart tender.)
- Yukon Gold Potatoes: (1 lb, diced. Their waxy texture holds its shape while becoming creamy inside, and they develop a gorgeous golden crust.)
- Yellow Onion: (1 medium, diced. It sweetens as it cooks, providing the essential aromatic base.)
- Butter or Rendered Beef Fat: (3-4 tablespoons. This is your frying medium. Beef fat, saved from your Oven Roasted Corned Beef, adds incredible depth.)
- Salt and Black Pepper: (To taste. Remember, the corned beef is already seasoned, so taste as you go.)
- Fresh Parsley: (For garnish. A bright, fresh finish that cuts the richness.)
Pantry Substitutions
- Potatoes: Russet potatoes can be used for a fluffier interior, but may break down more easily.
- Fat: A neutral oil like avocado or vegetable oil works if you have no butter or beef fat.
- Onion: A white or red onion can stand in for yellow in a pinch.
- Herbs: Dried parsley or a pinch of thyme can be used if fresh isn’t available.
Kitchen Experiments
Once you’ve mastered the classic, the canvas is yours to paint. A little change can make it feel like a whole new meal.
For a sweet and savory twist, add a tablespoon of the glaze from our Brown Sugar Glazed Corned Beef to the pan. You can also stir in a handful of diced bell peppers with the onions for color and sweetness.
A “Reuben-style” hash with a handful of shredded Swiss cheese and a drizzle of Thousand Island dressing after plating is divine. For a heartier dinner hash, consider adding diced carrots or parsnips to the potatoes when you parboil them.
How to Make Crispy Corned Beef Hash
The process is straightforward, but it rewards a cook who pays attention. We’ll build flavors in stages, and I’ll guide you through every step. Don’t rush the crust—it’s worth the wait.
1. Prep and Parboil the Potatoes
Peel your potatoes and cut them into a 1/2-inch dice for even cooking. Place them in a pot of cold, salted water and bring to a boil.
Let them cook for just 4-5 minutes. They should be barely tender on the outside but still firm in the center. Drain them very well in a colander and let them air-dry a bit.
2. Sauté the Aromatics
While the potatoes dry, melt your butter or heat your beef fat in a large, heavy skillet (cast iron is ideal) over medium heat. Add the diced onion and cook, stirring occasionally, until it’s soft and translucent.
This takes about 5-7 minutes. We’re building a flavor foundation here, so don’t let the onions brown too much just yet.
3. Crisp the Potatoes
Increase the heat to medium-high. Add the well-drained potatoes to the skillet in a single layer. Let them cook without stirring for a good 4-5 minutes.
You want a deep golden crust to form on one side. Then, give them a careful stir or flip, and repeat the process until they’re crispy and golden all over.
")
4. Combine and Form the Hash
Now, reduce the heat back to medium. Add your chopped corned beef to the skillet, gently folding it into the potatoes and onions. Season carefully with black pepper.
Press the entire mixture down firmly and evenly with your spatula. This is the moment you form your hash cake, ensuring maximum contact with the hot pan.
5. Develop the Golden Crust
This is where your patience is tested and rewarded. Let the hash cook, undisturbed, for 6-8 minutes. Peek at the edges to check the color.
When you see a deep, brown crust forming, it’s time to flip. For the brave, a confident wrist can flip sections. Otherwise, divide it into quarters and flip each piece individually.
6. The Final Crisp and Serve
Let the other side cook, again undisturbed, for another 5-7 minutes until equally crisp and glorious. Give the whole pan a final gentle stir to incorporate some of that crust.
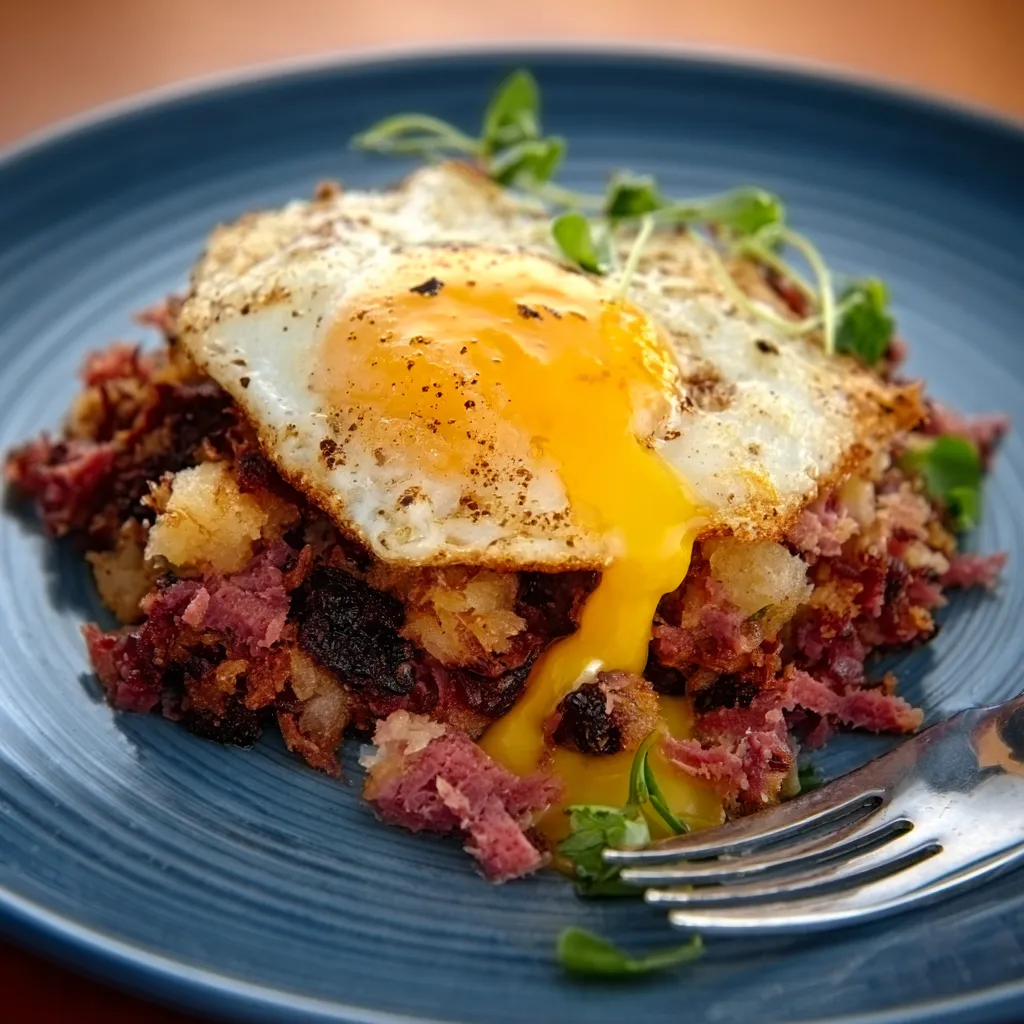
Taste and adjust seasoning. Serve immediately, garnished with fresh parsley, while the contrast between the crunchy exterior and soft interior is at its peak.
My Kitchen Notes
- Dry Potatoes are Crispy Potatoes: After parboiling, let your potatoes drain and steam dry in the colander for a few minutes. Wet potatoes will steam instead of fry, preventing that crucial crust.
- Don’t Crowd the Pan: If your skillet is too small, cook in two batches. Overcrowding creates steam and leads to a soggy, steamed hash instead of a crispy one.
- Resist the Urge to Stir: After you press the hash down, walk away! Constant stirring breaks up the forming crust. Let the pan do its magic.
- Use a Good Spatula: A thin, metal spatula (a fish spatula is perfect) is your best friend for getting under that crust and flipping it cleanly without breaking it apart.
Perfect Pairings
This hash is a complete meal in a skillet, but it loves company. A couple of eggs, fried or poached, with runny yolkes to sauce the hash, is the classic and perfect pairing.
For a lighter touch, a simple arugula salad with a lemon vinaigrette cuts through the richness beautifully. And don’t forget a dash of hot sauce or a dollop of whole-grain mustard on the side for a needed kick.
Thanks for stopping by! I hope this dish brings joy to your table.
What is the most important tip for getting a crispy crust on corned beef hash?
The key is patience and undisturbed cooking. After pressing the hash into a single layer in the pan, let it cook without stirring for 6-8 minutes to allow a deep, golden crust to form before flipping.
Why do you parboil the potatoes before frying them?
Parboiling the potatoes ensures they are fully tender and creamy on the inside before frying. This guarantees no raw centers and allows the outside to become maximally crispy when cooked in the hot fat.
What are some good substitutions if I don’t have butter or beef fat?
You can use a neutral oil like avocado or vegetable oil as a substitute for butter or rendered beef fat. The article also notes that Russet potatoes can replace Yukon Golds, and other onion types or dried herbs can be used.
How can I transform this classic hash into a ‘Reuben-style’ version?
To make a Reuben-style hash, stir in a handful of shredded Swiss cheese and drizzle the finished dish with Thousand Island dressing after plating.
Crispy Corned Beef Hash
Ingredients
Equipment
Method
- Peel and dice the potatoes. Place them in a pot of cold, salted water, bring to a boil, and parboil for 4-5 minutes until barely tender. Drain well in a colander and let them air-dry.
- While potatoes dry, melt butter or heat beef fat in a large, heavy skillet over medium heat. Add the diced onion and cook for 5-7 minutes until soft and translucent.
- Increase heat to medium-high. Add the drained potatoes to the skillet in a single layer. Cook without stirring for 4-5 minutes until a deep golden crust forms on one side. Stir or flip and repeat until potatoes are crispy and golden all over.
- Reduce heat back to medium. Add the chopped corned beef to the skillet, gently folding it into the potatoes and onions. Season carefully with black pepper (the corned beef is already salty).
- Press the entire mixture down firmly and evenly with a spatula to form a hash cake. Let it cook undisturbed for 6-8 minutes until a deep brown crust forms on the bottom.
- Carefully flip the hash, either in one piece or by dividing it into quarters. Let the other side cook undisturbed for another 5-7 minutes until equally crisp.
- Give the hash a final gentle stir to incorporate some of the crust. Taste and adjust seasoning. Serve immediately, garnished with fresh parsley.