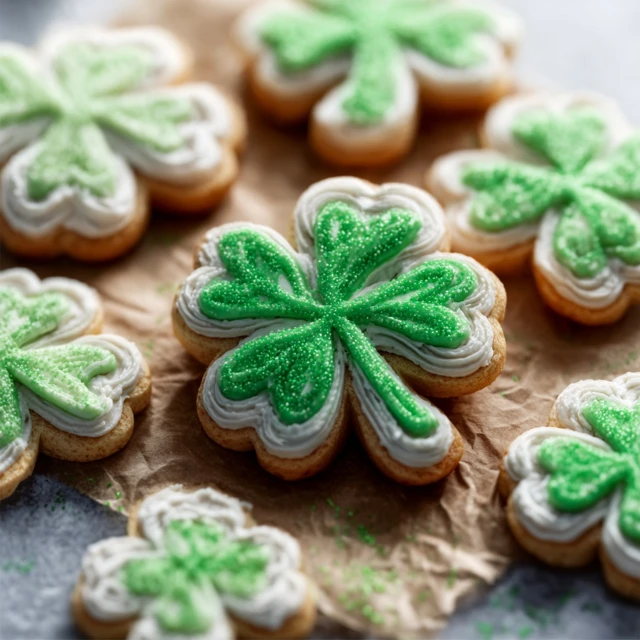
Green dough rolling out on a floured countertop signals the arrival of spring festivities better than any calendar date. These emerald treats capture the whimsical spirit of St. Patrick’s Day without requiring the luck of the Irish to execute perfectly.
You will achieve a tender, buttery crumb that holds its intricate three-leaf shape beautifully during baking, ensuring your design doesn’t turn into a shapeless blob. Whether you choose to frost them elaborately or enjoy the simple sugary crunch, the result is a melt-in-your-mouth experience everyone craves.
The Shamrock Sugar Cookies Difference
- Zero Spread Factor: The ratio of fat to flour is calculated precisely so the shamrock stems stay defined.
- Flavor Depth: A hint of almond extract elevates the simple vanilla profile to bakery-quality status.
- Dough Workability: This mixture is forgiving and re-rolls easily without becoming tough or dry.
The Essential Components
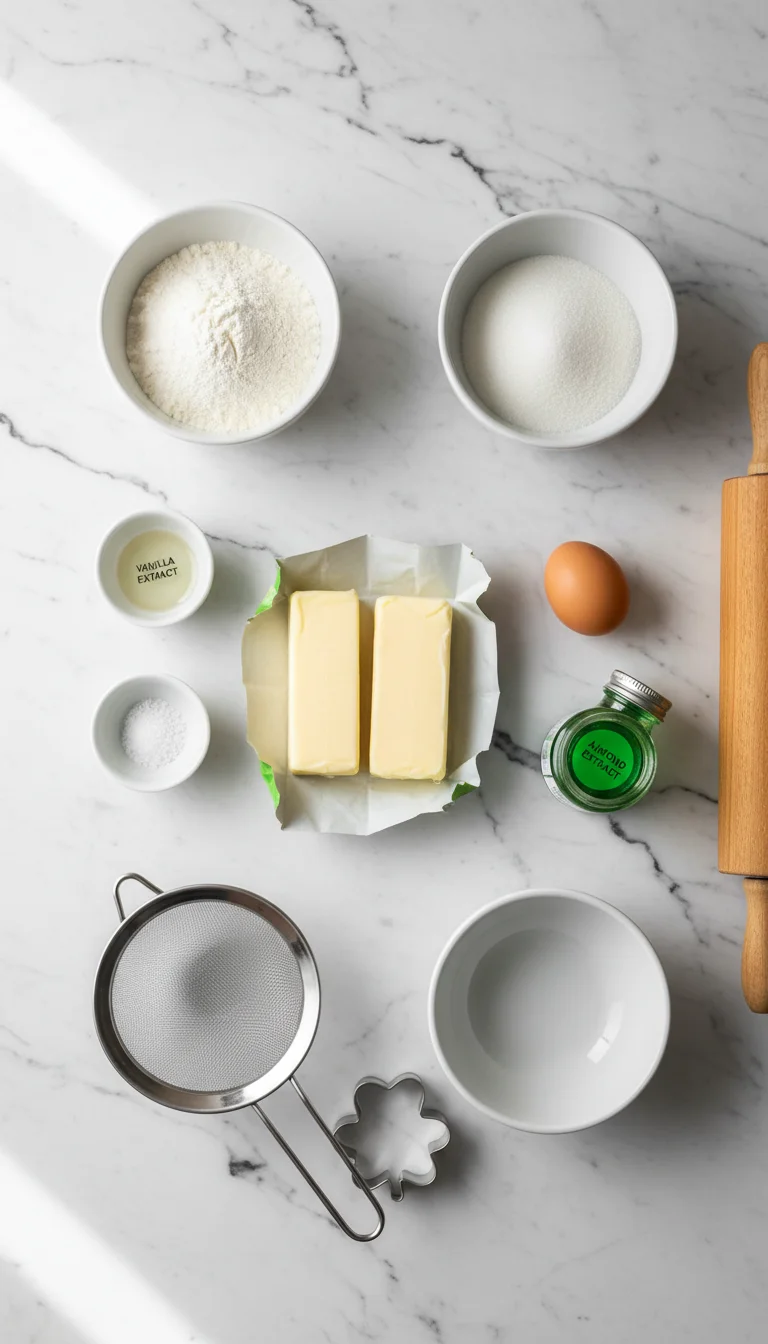
Creating the perfect festive treat starts with understanding your pantry staples. While the list looks simple, the quality of your butter and extracts will define the final flavor profile.
If you are looking for a standard base to master, this dough is very similar to my favorite Soft Cut Out Sugar Cookies, but adapted specifically for intricate shapes.
- Unsalted Butter (Room Temperature): This allows you to control the salt content and ensures a smooth emulsion with the sugar.
- Granulated White Sugar (For structure): Creates the crisp edges and aerates the butter during the creaming process.
- Large Egg (Binding agent): Adds richness and structure to the cookie; ensure it is at room temperature to prevent curdling the batter.
- Vanilla Extract (Flavor base): Use pure vanilla extract rather than imitation for a warm, authentic taste.
- Almond Extract (The secret weapon): Just a few drops give that nostalgic “wedding cake” flavor that makes sugar cookies addictive.
- All-Purpose Flour (The body): Provides the necessary gluten structure; measure by spooning and leveling to avoid dense cookies.
- Baking Powder (Leavening): Just enough to provide a light lift without causing the shape to puff and distort.
- Salt (Flavor enhancer): Balances the sweetness and makes the buttery notes pop.
- Gel Food Coloring (Vibrant hue): Gel is crucial because it adds intense green color without adding excess liquid that could ruin the dough consistency.
Swaps & Alternatives
- Salted Butter: If you only have salted butter, omit the additional salt listed in the recipe to keep the flavor balanced.
- Gluten-Free Flour: You can swap the all-purpose flour for a high-quality 1:1 gluten-free baking flour blend.
- No Almond Extract: If you have a nut allergy or dislike the flavor, simply double the vanilla extract or use lemon zest for a citrus twist.
- Natural Coloring: For a natural alternative to food dye, matcha powder can be used, though it will alter the flavor slightly.
Level Up This Recipe
Once you have mastered the basic dough, you can start experimenting with flavors and textures to make the platter even more exciting.
For a more sophisticated look, you might draw inspiration from these Vanilla Bean Shamrock Cookies, which use visible vanilla specks for an elegant finish.
- Chocolate Dipped: Dip half of the baked shamrock in melted dark chocolate and add festive sprinkles for a contrast in color and flavor.
- Minty Twist: Swap the almond extract for peppermint extract to mimic the flavor profile of the season. This creates a taste similar to Oreo Shamrock Shake Cookies.
- Sandwich Cookies: Bake the cookies slightly thinner and sandwich two together with green buttercream or ganache.
- Sparkle Finish: Before baking, brush the raw dough with a little egg white and sprinkle with green sanding sugar for a crunchy, glittering top.
Step-by-Step Instructions
Making these cookies is a relaxing process, but patience is required during the chilling stages. Do not rush the fridge time, as cold dough is the secret to sharp edges.
If you prefer a texture that is less sweet and more crumbly, you might want to look into making Irish Shortbread Cookies instead, but for a classic sugar cookie, follow the steps below.
1. Cream the Butter and Sugar
Start by placing your softened butter and granulated sugar in a large mixing bowl or the bowl of a stand mixer. Beat them together on medium-high speed for about 2 to 3 minutes.You are looking for a mixture that is pale yellow, light, and fluffy. This step incorporates air into the dough, which is essential for a tender bite.
2. Add Wet Ingredients and Color
Lower the mixer speed and add the egg, vanilla extract, and almond extract. Mix until the egg is fully incorporated and the batter looks smooth.At this stage, add your green gel food coloring. Start with a small amount and mix, adding more until you reach your desired shade of emerald green. Remember that the color will darken slightly as it bakes.
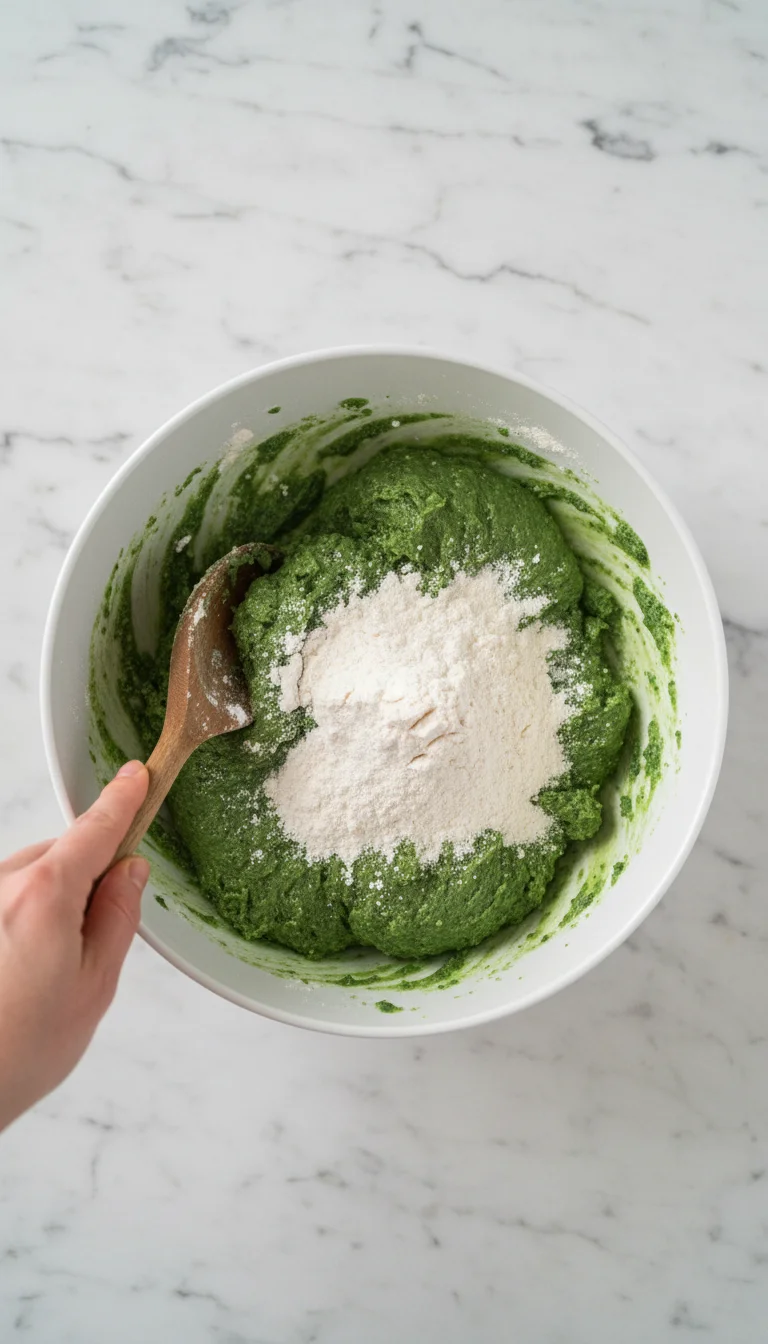
3. Incorporate Dry Ingredients
In a separate bowl, whisk together the flour, baking powder, and salt. This ensures the leavening agent is evenly distributed throughout the flour.Gradually add the flour mixture to the wet ingredients in two or three batches. Mix on low speed just until the flour disappears. Do not overmix, or the gluten will develop too much, leading to tough cookies.
4. Chill the Dough
Divide the dough into two equal balls and flatten them into discs. Wrap each disc tightly in plastic wrap.Refrigerate the dough for at least one hour, or up to overnight. This rest period allows the flour to hydrate fully and the butter to firm up, which is critical for cutting out shapes later.
5. Roll and Cut
Preheat your oven to 350°F (175°C) and line two baking sheets with parchment paper or silicone baking mats.Remove one disc of dough from the fridge. On a lightly floured surface, roll the dough out to about 1/4-inch thickness. Use a shamrock-shaped cookie cutter to cut out your designs.
6. Bake to Perfection
Place the cut-out cookies onto the prepared baking sheets, leaving about an inch of space between them. They won’t spread much, but they need airflow.Bake for 8 to 10 minutes. The goal is to pull them out when they are set and matte on top, but before the edges start to turn brown. We want them to stay green!
7. Cool Completely
Allow the cookies to cool on the baking sheet for 5 minutes. They will be soft when they first come out of the oven and need this time to firm up.Transfer them to a wire rack to cool completely before decorating. If you try to ice them while warm, the icing will melt and run off the edges.
Avoid These Pitfalls
- Warm Dough Disaster: If the dough gets too warm while rolling, the shamrocks will warp. Pop the tray in the freezer for 5 minutes before baking to set the shape.
- Over-Flouring: Using too much flour when rolling out the dough can result in dry, tasteless cookies. Try rolling between two sheets of parchment paper instead.
- Browning the Edges: Green cookies look best without brown edges. Watch the oven closely and remove them the second they look dry on the surface.
Perfect Pairings
These cookies are the star of the show, but they shine even brighter when served with the right beverages and companion treats. A festive platter is all about variety and theme.
For the ultimate St. Patrick’s Day celebration, serve these cookies alongside a tall, frosty Shamrock Shake. The minty creaminess of the shake pairs wonderfully with the buttery vanilla of the cookie.
If you are building a large dessert board, these flat cookies look adorable arranged next to taller treats like Pot Of Gold Cookie Cups. The contrast in height and texture makes for a stunning presentation.
For the adults, these cookies are sturdy enough to be dunked into an Irish coffee or a stout beer. The sweetness of the cookie cuts through the bitterness of dark beer or strong coffee beautifully.
Love this recipe? Pin it to your favorite board on Pinterest to save it for later!
Why is gel food coloring recommended for this recipe instead of liquid dye?
Gel food coloring is crucial because it adds intense green color without introducing excess liquid, which could ruin the consistency of the dough.
How can I prevent the shamrock cookies from losing their shape while baking?
To ensure the shape stays defined, chill the dough for at least one hour before rolling. Additionally, if the dough warms up while cutting shapes, place the baking tray in the freezer for 5 minutes before baking to set the shape.
What are suitable substitutes if I do not want to use almond extract?
If you have a nut allergy or dislike the flavor, you can double the vanilla extract, use lemon zest for a citrus twist, or swap it for peppermint extract for a minty flavor profile.
How do I know when the cookies are finished baking?
The cookies should be baked for 8 to 10 minutes until they are set and matte on top. It is important to remove them from the oven before the edges start to turn brown to keep them green.

Buttery Shamrock Sugar Cookies
Ingredients
Equipment
Method
- In a large mixing bowl or the bowl of a stand mixer, cream together the softened butter and granulated sugar on medium-high speed for 2 to 3 minutes until the mixture is pale yellow, light, and fluffy.
- Lower the mixer speed and add the egg, vanilla extract, and almond extract. Mix until the egg is fully incorporated and the batter looks smooth.
- Add the green gel food coloring, starting with a small amount and adding more until you reach your desired shade of emerald green.
- In a separate medium bowl, whisk together the flour, baking powder, and salt to ensure the leavening agent is evenly distributed.
- Gradually add the flour mixture to the wet ingredients in two or three batches, mixing on low speed just until the flour disappears. Do not overmix.
- Divide the dough into two equal balls and flatten them into discs. Wrap each disc tightly in plastic wrap and refrigerate for at least one hour (or up to overnight).
- Preheat your oven to 350°F (175°C) and line two baking sheets with parchment paper or silicone baking mats.
- Remove one disc of dough from the fridge. On a lightly floured surface, roll the dough out to about 1/4-inch thickness. Use a shamrock-shaped cookie cutter to cut out your designs.
- Place the cut-out cookies onto the prepared baking sheets, leaving about an inch of space between them.
- Bake for 8 to 10 minutes. Remove them when they are set and matte on top, but before the edges start to brown to maintain the green color.
- Allow the cookies to cool on the baking sheet for 5 minutes to firm up, then transfer them to a wire rack to cool completely before decorating.
