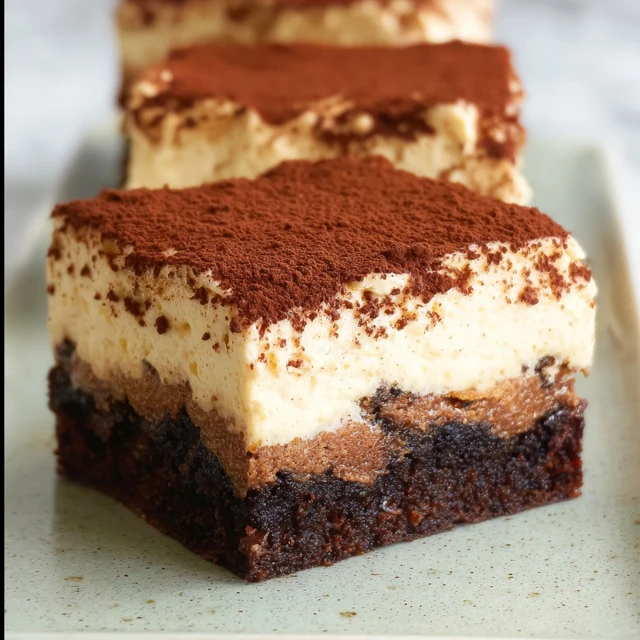
Swirls of creamy mascarpone cutting through a dark, fudgy landscape feel less like a dessert and more like a declaration. This isn’t just a brownie with a fancy hat; it’s a complete reimagining of two of the world’s most beloved desserts, a culinary mashup where Italy’s sophisticated coffee-kissed dream meets America’s rich, chocolatey obsession. We’re not just making a coffee-flavored brownie; we are building layers of distinct, harmonious flavor that honor both of its parents.
Get ready to create the most decadent, impressive dessert you’ve made all year. This Tiramisu Brownies recipe results in a deeply fudgy, espresso-soaked chocolate base crowned with a cloud of light, tangy, and impossibly creamy mascarpone topping. Every bite is a journey from the intense cocoa bitterness to the sweet, airy cream, all tied together with that signature coffee kick. It’s the ultimate treat for coffee lovers and one of the best bake ideas dessert can offer.
The Tiramisu Brownies Difference
- Contrast in Every Bite: The magic is in the texture play. You get a super dense, chewy, and fudgy brownie base that acts as the perfect foundation for the ethereal, light-as-air whipped mascarpone topping. It’s a sensory delight.
- Authentic Coffee Infusion: We use a potent espresso soak that gets brushed directly onto the warm brownie. This technique infuses every crumb with deep coffee flavor without turning the brownie into a soggy mess, a common pitfall in other recipes.
- Showstopper Simplicity: This dessert looks like it came from a high-end patisserie, making it one of the most impressive hosting dessert ideas. However, the steps are straightforward and achievable for any home baker, proving that nice desserts don’t have to be complicated.
The Building Blocks
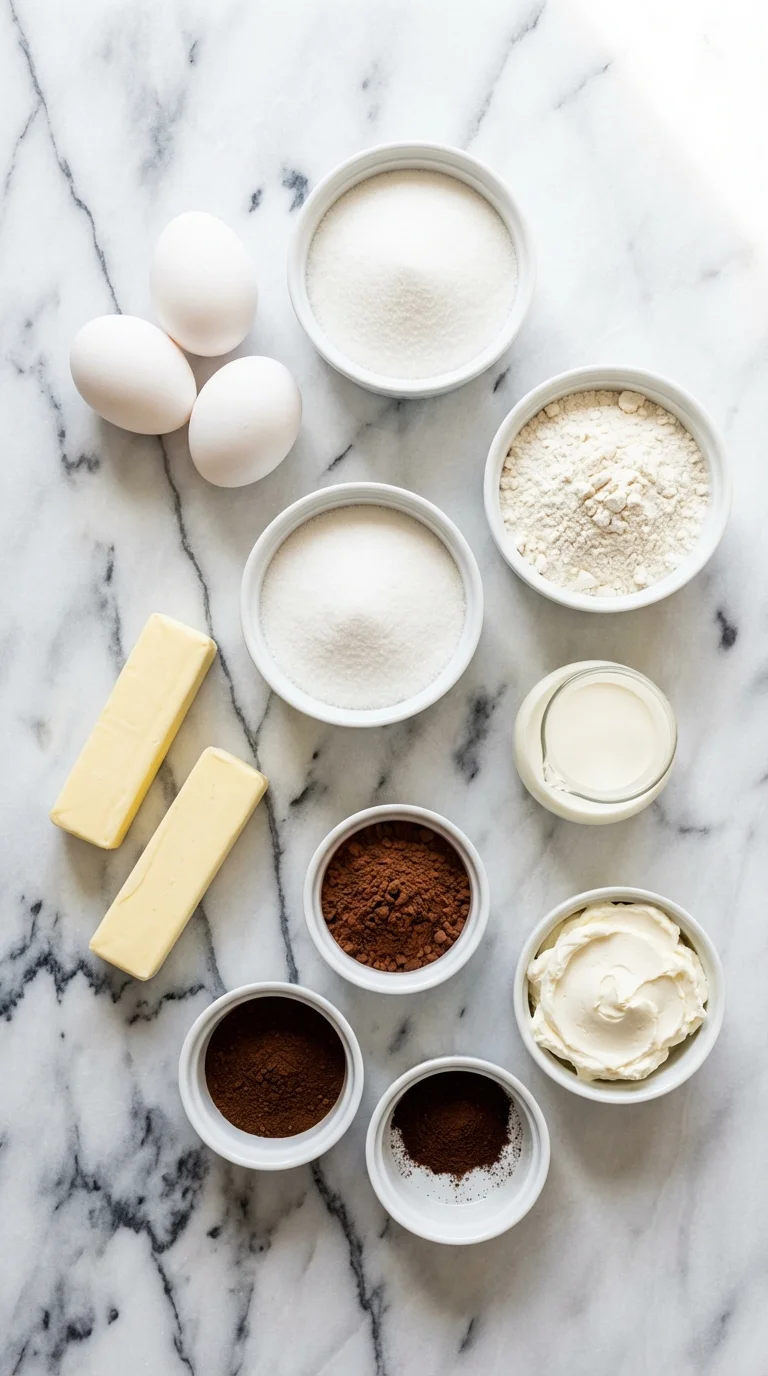
For the Fudgy Brownie Base:
- Unsalted Butter: (The foundation of flavor and fat, creating that melt-in-your-mouth texture).
- Granulated Sugar: (Provides sweetness and contributes to that classic crackly brownie top).
- Large Eggs: (Acts as a binder and adds richness. Make sure they are at room temperature for better incorporation).
- All-Purpose Flour: (Just enough to give the brownies structure without making them cakey).
- Unsweetened Cocoa Powder: (Choose a good quality one for a deep, dark chocolate flavor that isn’t overly sweet).
- Espresso Powder: (This is non-negotiable! It intensifies the chocolate flavor within the brownie itself).
- Salt: (Balances the sweetness and makes the chocolate and coffee notes pop).
- Semi-Sweet Chocolate Chips: (Optional, but they create wonderful little pockets of melted chocolate throughout).
For the Coffee Soak & Mascarpone Topping:
- Strong Brewed Coffee or Espresso: (Must be hot to dissolve the sugar and create a potent soak).
- Granulated Sugar: (To slightly sweeten the coffee soak).
- Mascarpone Cheese: (The heart of the topping; its rich, buttery, and slightly sweet flavor is irreplaceable. Must be at room temperature to avoid lumps).
- Heavy Whipping Cream: (Must be very cold to whip up properly and create a light, stable topping).
- Powdered Sugar: (Dissolves easily into the cream, providing sweetness without any graininess).
- Vanilla Extract: (Adds a layer of aromatic warmth to the creamy topping).
- Dutch-Processed Cocoa Powder: (For that signature tiramisu dusting. It’s smoother and less bitter than natural cocoa).
Swaps & Alternatives
While the classic combination is hard to beat, you can certainly make adjustments based on what you have in your pantry.- For Mascarpone: In a pinch, you can use full-fat block cream cheese. The flavor will be tangier and less rich, so it’s not a perfect substitute, but it will work. Ensure it’s fully softened to room temperature.
- For Espresso Powder: If you don’t have espresso powder for the batter, you can substitute it with an equal amount of instant coffee granules. For the soak, any very strong brewed coffee will do the trick.
- Add a Boozy Kick: Add 1-2 tablespoons of Kahlúa, dark rum, or Amaretto to the coffee soak for a more traditional and complex tiramisu flavor. This is one of my favorite brownies flavor ideas for an adult crowd.
- Gluten-Free Option: You can substitute the all-purpose flour with a good quality 1-to-1 gluten-free baking blend. The texture will be slightly different but still delicious.
Gourmet Variations
Ready to take this already incredible dessert to the next level? These simple twists can add a layer of gourmet sophistication that will have everyone asking for your secret. These are some of my favorite dessert recipes ideas to elevate a classic.First, try browning the butter for the brownie base. This simple step takes about 5-7 extra minutes but rewards you with an incredible nutty, toasty aroma and depth of flavor that pairs beautifully with the coffee and chocolate.
For another layer of flavor, consider adding a splash of liqueur. If you love boozy desserts, you’ll appreciate how a hint of coffee liqueur enhances the soak. For inspiration on how well spirits and chocolate pair, check out these incredible Baileys Irish Cream Brownies or even the rich Guinness Cake With Baileys Frosting.
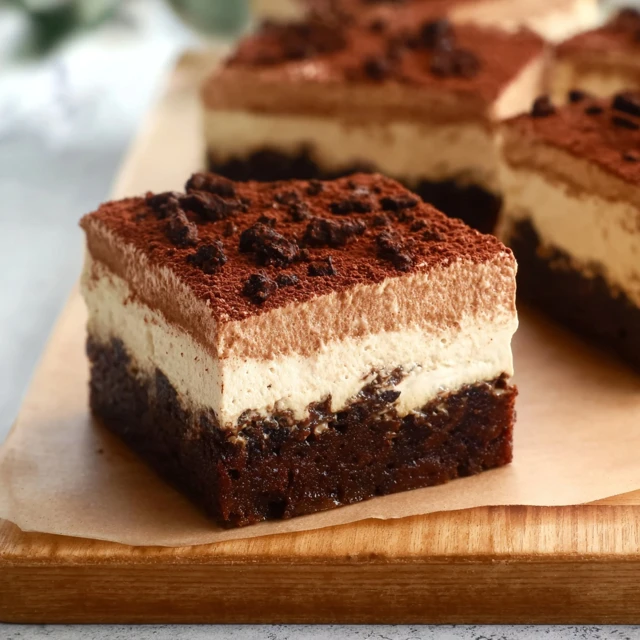
Finally, don’t just stop at a cocoa powder dusting. After dusting, add a generous amount of finely shaved high-quality dark chocolate over the top. It adds a wonderful textural element and an extra hit of pure chocolate flavor. This is how you turn a great dessert into one of those unforgettable brown desserts.
How to Make Tiramisu Brownies
1. Prepare the Pan and Preheat the Oven
First things first, let’s get our station ready. Preheat your oven to 350°F (175°C). Take an 8×8 inch square baking pan and grease it thoroughly with butter or non-stick spray. For super easy removal, create a parchment paper sling by lining the pan with two overlapping sheets, leaving some overhang on the sides to act as handles.2. Melt the Chocolate and Butter
In a medium, microwave-safe bowl, combine the unsalted butter and the semi-sweet chocolate chips. Microwave in 30-second intervals, stirring well after each one, until the mixture is completely melted and smooth. Be patient here to avoid scorching the chocolate. You can also do this in a double boiler over simmering water.3. Whisk the Wet Ingredients
In a large mixing bowl, whisk together the granulated sugar and the room-temperature eggs until the mixture is pale, slightly frothy, and has increased in volume. This step is crucial for creating that desirable shiny, crackly top on your brownies. Whisk in the vanilla extract.4. Combine and Create the Brownie Batter
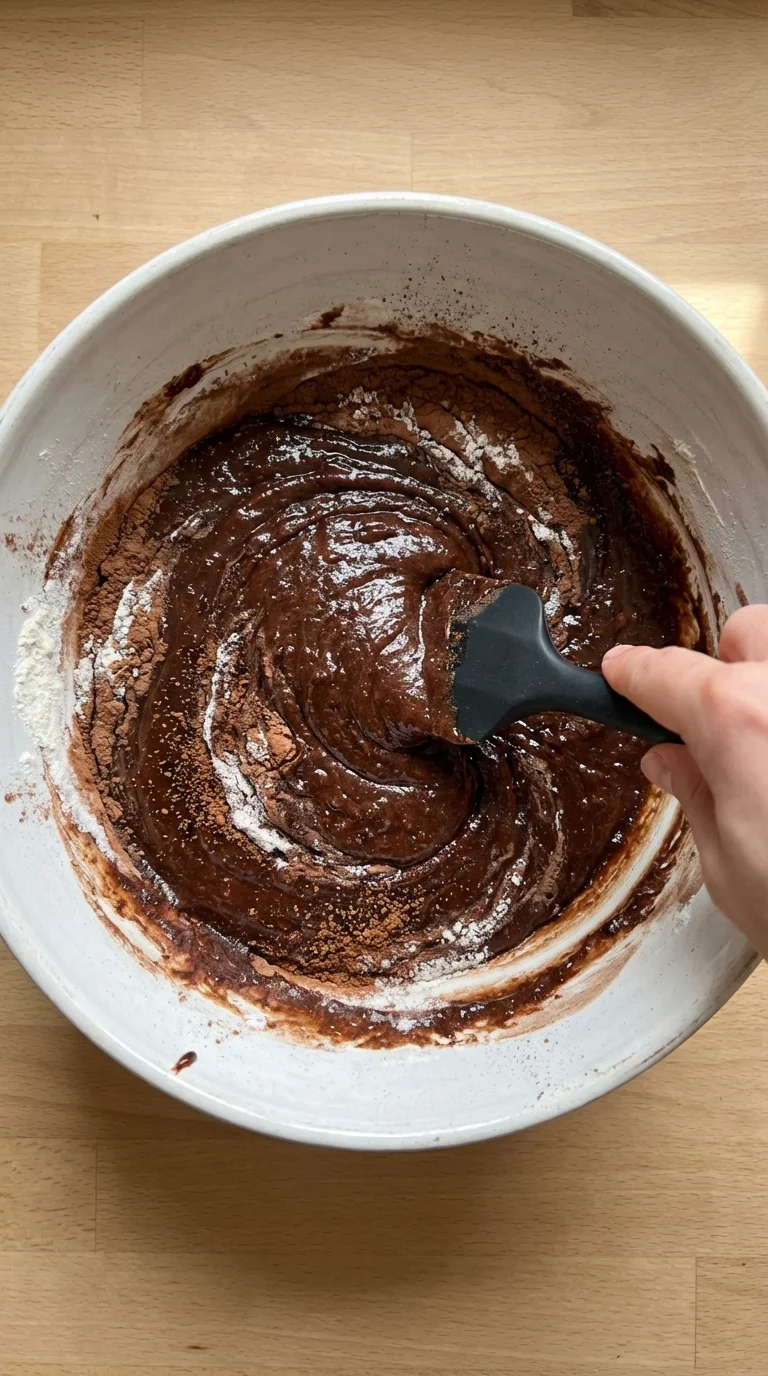
Pour the melted butter and chocolate mixture into the egg and sugar mixture and whisk until just combined. In a separate small bowl, sift together the all-purpose flour, unsweetened cocoa powder, espresso powder, and salt. Add the dry ingredients to the wet ingredients and fold them in gently with a spatula until just a few streaks of flour remain. Do not overmix! Overmixing develops gluten and leads to tough, cakey brownies instead of fudgy ones. The unique texture of these brownies is what sets them apart, much like the amazing chew you get from Fudgy Sourdough Discard Brownies.5. Bake the Fudgy Brownie Base
Pour the batter into your prepared 8×8 inch pan and spread it into an even layer with your spatula. Bake for 25-30 minutes. The key to a perfect fudgy brownie is to slightly underbake it. A toothpick inserted into the center should come out with moist, fudgy crumbs attached, not wet batter or completely clean. Let the brownie cool in the pan on a wire rack.6. Prepare the Coffee Soak
While the brownie is cooling, make the coffee soak. In a small bowl, combine the hot, strong brewed coffee (or espresso) and the granulated sugar. Stir until the sugar is completely dissolved. If you’re adding any liqueur, stir it in now.7. Whip the Mascarpone Topping
In the bowl of a stand mixer fitted with the whisk attachment, or in a large bowl with a hand mixer, beat the very cold heavy whipping cream, powdered sugar, and vanilla extract on medium-high speed until stiff peaks form. Be careful not to overbeat, or it will turn grainy. In a separate bowl, use a spatula to gently stir the room-temperature mascarpone cheese until it’s smooth and creamy. Add the softened mascarpone to the whipped cream and gently fold it in until the mixture is uniform and smooth.8. Assemble Your Masterpiece
Once the brownie has cooled for at least 30 minutes (it should still be slightly warm), use a pastry brush to generously brush the coffee soak all over the top surface. Don’t be shy; use all of it! The warm brownie will absorb it beautifully. Then, spoon the mascarpone topping over the coffee-soaked brownie and use an offset spatula to spread it into a gorgeous, even layer.9. Chill for Perfect Slices
This is the hardest part: waiting. Cover the pan with plastic wrap and refrigerate for at least 4 hours, but preferably overnight. This chilling time is absolutely critical. It allows the flavors to meld together and solidifies the topping, ensuring you can get clean, beautiful, professional-looking slices. Just before serving, dust the top generously with Dutch-processed cocoa powder using a fine-mesh sieve.Avoid These Pitfalls
- Overbaking the Brownies: The number one mistake! A dry, cakey brownie base will ruin the entire dessert. Pull them from the oven when a toothpick shows moist crumbs. They will continue to set as they cool.
- Using Cold Mascarpone: If you add cold, firm mascarpone directly to your whipped cream, you will get a lumpy, unpleasant topping. It MUST be at room temperature and stirred until smooth before folding it in.
- Skipping the Chill Time: I know it’s tempting to dig in, but cutting into these brownies too soon will result in a soupy mess. The chill time is non-negotiable for the topping to set and the flavors to fully develop.
Serving Ideas
These Tiramisu Brownies are a complete dessert experience all on their own. They are best served chilled, straight from the refrigerator, to maintain the integrity of that beautiful mascarpone layer. The contrast between the cool, creamy topping and the dense, chewy brownie is pure bliss.For a truly elegant presentation, dust with cocoa powder just before you slice and serve. This is one of those brown desserts that always gets a “wow” from guests. It’s an ideal choice for dinner parties, holidays, or any occasion where you need a reliable showstopper. It’s a fantastic warm brownie dessert idea if you prefer, but be aware the topping will soften significantly—I recommend serving it chilled for the best experience.
If you’re building a dessert buffet, these brownies stand out beautifully. Consider pairing them with a fruit-forward option for contrast, like a classic Italian Strawberry Shortcake or even its fun cousin, the Strawberry Shortcake Brownies. And if you happen to have any leftovers (which is unlikely!), they are absolutely divine crumbled into a decadent Brownie Trifle.
Did you change any ingredients? Let me know in the comments how you made this recipe your own
What makes these Tiramisu Brownies different from regular coffee-flavored brownies?
The main differences are the contrast in textures between the super dense, fudgy brownie base and the light, whipped mascarpone topping, and the authentic coffee infusion. A potent espresso soak is brushed directly onto the warm brownie, infusing it with deep coffee flavor without making it soggy.
Can I use cream cheese instead of mascarpone for the topping?
Yes, in a pinch you can substitute mascarpone with full-fat block cream cheese. However, be aware that the flavor will be tangier and less rich. It is essential to let the cream cheese soften completely to room temperature to avoid a lumpy topping.
Why is it so important to chill the Tiramisu Brownies before serving?
Chilling for at least four hours, or preferably overnight, is a critical step. It allows the flavors to meld together and solidifies the mascarpone topping. This ensures you can cut clean, beautiful slices and prevents the dessert from being a soupy mess.
How do I prevent the brownie base from becoming dry and cakey?
The key to a fudgy brownie base is to slightly underbake it. You should remove the pan from the oven when a toothpick inserted into the center comes out with moist crumbs attached, not completely clean. The brownies will continue to set as they cool.
Tiramisu Brownies: A Coffee Lover’s Dream
Ingredients
Equipment
Method
- Preheat your oven to 350°F (175°C). Grease an 8×8 inch square baking pan and line it with a parchment paper sling, leaving an overhang on the sides.
- In a medium, microwave-safe bowl, combine the unsalted butter and semi-sweet chocolate. Microwave in 30-second intervals, stirring after each, until completely melted and smooth. Alternatively, use a double boiler.
- In a large mixing bowl, whisk together the granulated sugar and room-temperature eggs until pale and slightly frothy. Whisk in the vanilla extract.
- Pour the melted chocolate mixture into the egg mixture and whisk until just combined. In a separate small bowl, sift together the all-purpose flour, unsweetened cocoa powder, espresso powder, and salt. Add the dry ingredients to the wet and fold gently with a spatula until just combined. Do not overmix.
- Pour the batter into the prepared pan and spread evenly. Bake for 25-30 minutes, or until a toothpick inserted into the center comes out with moist, fudgy crumbs. Let the brownie cool in the pan on a wire rack.
- While the brownie cools, prepare the coffee soak. In a small bowl, combine the hot coffee and granulated sugar, stirring until the sugar dissolves. If using, stir in the liqueur.
- To make the topping, beat the cold heavy cream, powdered sugar, and vanilla extract in a large bowl with a mixer on medium-high speed until stiff peaks form. In a separate bowl, stir the room-temperature mascarpone until smooth, then gently fold it into the whipped cream until uniform.
- Once the brownie has cooled for at least 30 minutes (it should still be slightly warm), use a pastry brush to apply the entire coffee soak over the top surface. Spread the mascarpone topping evenly over the soaked brownie.
- Cover the pan and refrigerate for at least 4 hours, or preferably overnight, to allow the topping to set and flavors to meld. Just before serving, dust generously with Dutch-processed cocoa powder using a fine-mesh sieve.
