The Gelatinous Dance: Unlocking the Science of Chia Seed Jelly
At its heart, this recipe hinges on the remarkable gelling properties of chia seeds. Unlike traditional jelly, which relies on gelatin or pectin, chia seeds create a natural gel through the power of soluble fiber. When hydrated, these tiny seeds absorb water and form a mucilaginous coating. This coating is a complex carbohydrate called polysaccharide, and it’s what gives chia seed pudding and, in our case, jelly its characteristic texture. The amount of liquid, the ratio of chia seeds to liquid, and the time allowed for hydration all play crucial roles in achieving the perfect consistency. Too little liquid, and you end up with a pasty mess. Too much, and you have a watery soup. Temperature also plays a role; while refrigeration isn’t strictly necessary for the gelling process, it helps to firm up the jelly and enhance its texture. Additionally, the acidity of the strawberries helps to activate the chia seeds and can influence the set.The Ultimate Strawberry Chia Seed Jelly Squares Recipe
 This recipe is the culmination of countless attempts to achieve the perfect balance of flavor, texture, and ease of preparation. Get ready to create a healthy and delicious treat!
Ingredients:
- 2 cups fresh strawberries, hulled and roughly chopped
- 1/4 cup water
- 2 tablespoons honey (or maple syrup for a vegan option)
- 1/4 cup chia seeds
- 1 tablespoon lemon juice (optional, but recommended for brighter flavor)
Instructions:
- Prepare the Strawberry Puree: Combine the chopped strawberries and water in a saucepan. Cook over medium heat for 5-7 minutes, stirring occasionally, until the strawberries are softened.
- Blend to Smoothness: Carefully transfer the strawberry mixture to a blender or use an immersion blender to puree until completely smooth.
- Sweeten and Adjust: Pour the strawberry puree back into the saucepan. Stir in the honey (or maple syrup) and lemon juice. Taste and adjust sweetness as needed.
- Incorporate the Chia Seeds: Remove the saucepan from the heat. Gradually whisk in the chia seeds, ensuring there are no clumps.
- Let it Sit: Allow the mixture to sit for 5 minutes, stirring occasionally to prevent the chia seeds from settling at the bottom.
- Transfer to a Dish: Pour the chia seed mixture into a square or rectangular dish (approximately 8×8 inches) lined with parchment paper. This will make it easier to remove the jelly squares later.
- Refrigerate: Cover the dish and refrigerate for at least 4 hours, or preferably overnight, to allow the chia seeds to fully gel.
- Cut and Serve: Once the jelly has set, lift it out of the dish using the parchment paper. Cut into squares and serve. Enjoy!
My Chia Seed Jelly Journey: A Culinary Investigation
My first few attempts were a disaster, to put it mildly. I envisioned perfectly formed, glistening squares of strawberry goodness. What I got instead was either a runny mess or a gritty, flavorless brick. Then, I had an “Aha!” moment – it wasn’t just about throwing ingredients together; it was about understanding the science behind the gelling process and tweaking the recipe accordingly.The Great Liquid Ratio Debacle
Like many of you, I initially thought more liquid would equal more jelly. Wrong! My first batch used way too much water, resulting in a thin, almost drinkable concoction. It tasted like watered-down strawberries with a gritty texture. I learned that the chia seed to liquid ratio is absolutely crucial. Too much liquid, and the chia seeds simply can’t absorb enough to create a firm gel. I gradually reduced the liquid until I found the sweet spot.The Sweetness Struggle
Finding the right level of sweetness was another challenge. Strawberries, while delicious, can vary significantly in sweetness depending on the season and variety. Some batches were overly tart, while others were almost cloyingly sweet. Experimenting with different sweeteners, like honey and maple syrup, helped me dial in the perfect balance. I found that a touch of lemon juice not only brightened the flavor but also helped to cut through any excessive sweetness. Consider trying other desserts, such as Strawberry Crunch Cheesecake Tacos, for a different approach to sweetness.The Texture Tango
The texture was another tricky aspect to master. Initially, the jelly was either too gritty or too soft. The key, I discovered, was in the blending process. Thoroughly pureeing the strawberries before adding the chia seeds eliminated any large chunks and created a smoother, more consistent texture. I also experimented with different types of chia seeds. Black chia seeds are the most common, but white chia seeds are also available and tend to have a milder flavor. For another texture experiment, compare this to the Strawberries And Cream Overnight Oats.The Overnight Revelation
Patience is a virtue, especially when it comes to chia seed jelly. I initially tried to rush the setting process, checking the jelly every hour. Needless to say, it was never quite ready. Letting the jelly set overnight in the refrigerator made a world of difference. The extra time allowed the chia seeds to fully hydrate and create a firm, stable gel. Consider preparing these overnight while also preparing Strawberry Santa Treats to have different dessert options.The Foolproof Formula: The Ultimate Chia Seed Jelly Technique
After numerous experiments, I’ve distilled the process down to a simple, foolproof technique. Follow these steps, and you’ll be enjoying perfect Strawberry Chia Seed Jelly Squares every time!- Prioritize the Puree: Ensure your strawberry puree is completely smooth by using a high-speed blender or immersion blender. This eliminates any unwanted chunks and creates a velvety texture.
- Liquid Precision: Use the exact amount of water specified in the recipe. Too much or too little can significantly affect the gelling process.
- Sweeten Strategically: Taste and adjust the sweetness of the strawberry puree before adding the chia seeds. This allows you to fine-tune the flavor to your liking.
- Whisk Wisely: Gradually whisk the chia seeds into the strawberry puree to prevent clumping. Stir occasionally as the mixture sits to ensure even distribution.
- Patience is Paramount: Refrigerate the jelly for at least 4 hours, or preferably overnight, to allow the chia seeds to fully gel. Resist the urge to check it prematurely!
- Parchment Power: Line your dish with parchment paper for easy removal and clean cutting.
- Flavor Freedom: Experiment with different flavor combinations! Try adding a pinch of cinnamon, a splash of vanilla extract, or a handful of other berries to the strawberry puree. What about replicating the flavors in Deviled Strawberries Ultimate Cheesecake Bites?
What makes chia seeds turn into a jelly-like substance?
Chia seeds contain soluble fiber that, when hydrated, forms a mucilaginous coating. This coating, a complex carbohydrate called polysaccharide, creates a natural gel, giving chia seed jelly its characteristic texture.
What is the ideal chia seed to liquid ratio for making these jelly squares?
The article does not specify a precise ratio, but it emphasizes using the exact amount of water specified in the recipe. Too much liquid results in a watery soup, while too little creates a pasty mess. The recipe provided uses 1/4 cup of water for 2 cups of strawberries.
How long should I refrigerate the strawberry chia seed mixture?
The mixture should be refrigerated for at least 4 hours, but preferably overnight, to allow the chia seeds to fully gel and create a firm, stable jelly.
Can I use a different sweetener other than honey?
Yes, you can use maple syrup as a vegan alternative to honey. You can also adjust the sweetness of the strawberry puree to your liking before adding the chia seeds.
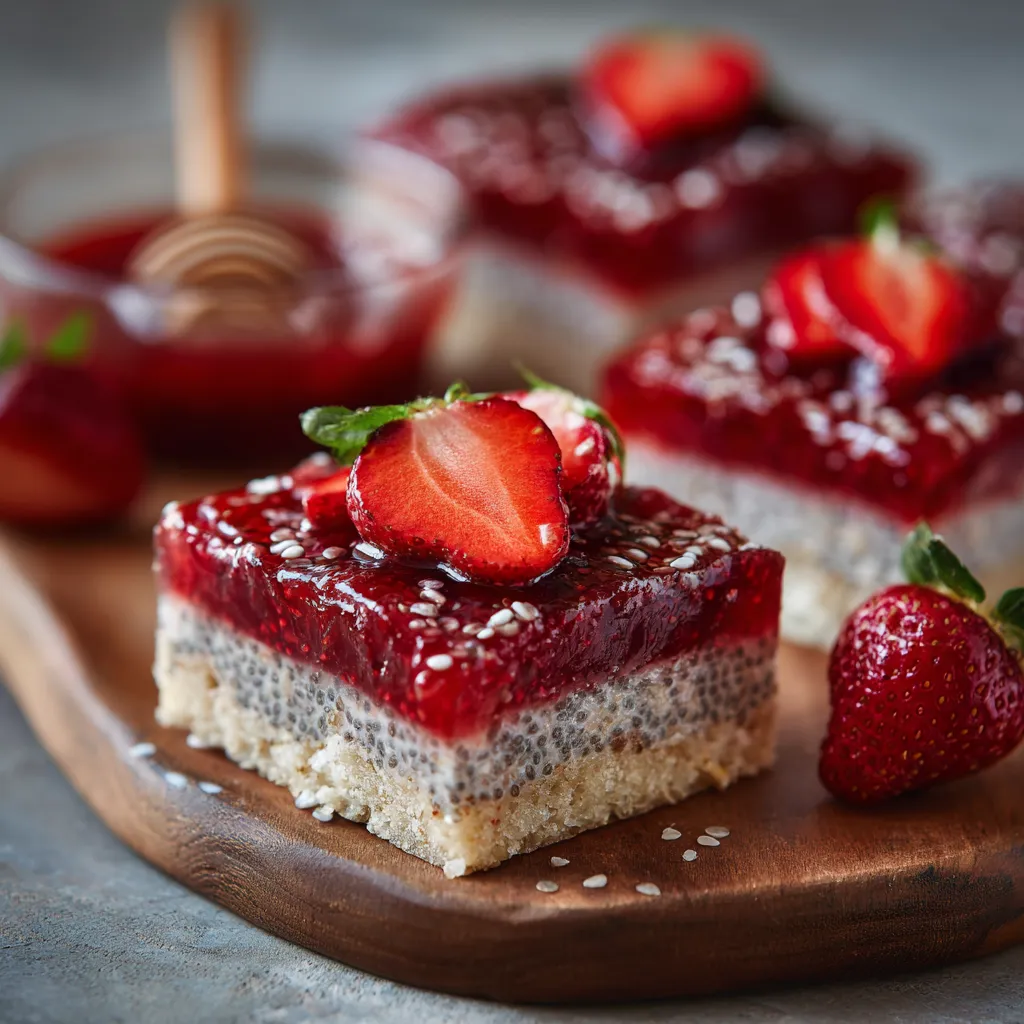
Strawberry Chia Seed Jelly Squares
Ingredients
Equipment
Method
- Prepare the Strawberry Puree: Combine the chopped strawberries and water in a saucepan. Cook over medium heat for 5-7 minutes, stirring occasionally, until the strawberries are softened.
- Blend to Smoothness: Carefully transfer the strawberry mixture to a blender or use an immersion blender to puree until completely smooth.
- Sweeten and Adjust: Pour the strawberry puree back into the saucepan. Stir in the honey (or maple syrup) and lemon juice. Taste and adjust sweetness as needed.
- Incorporate the Chia Seeds: Remove the saucepan from the heat. Gradually whisk in the chia seeds, ensuring there are no clumps.
- Let it Sit: Allow the mixture to sit for 5 minutes, stirring occasionally to prevent the chia seeds from settling at the bottom.
- Transfer to a Dish: Pour the chia seed mixture into a square or rectangular dish (approximately 8×8 inches) lined with parchment paper. This will make it easier to remove the jelly squares later.
- Refrigerate: Cover the dish and refrigerate for at least 4 hours, or preferably overnight, to allow the chia seeds to fully gel.
- Cut and Serve: Once the jelly has set, lift it out of the dish using the parchment paper. Cut into squares and serve. Enjoy!