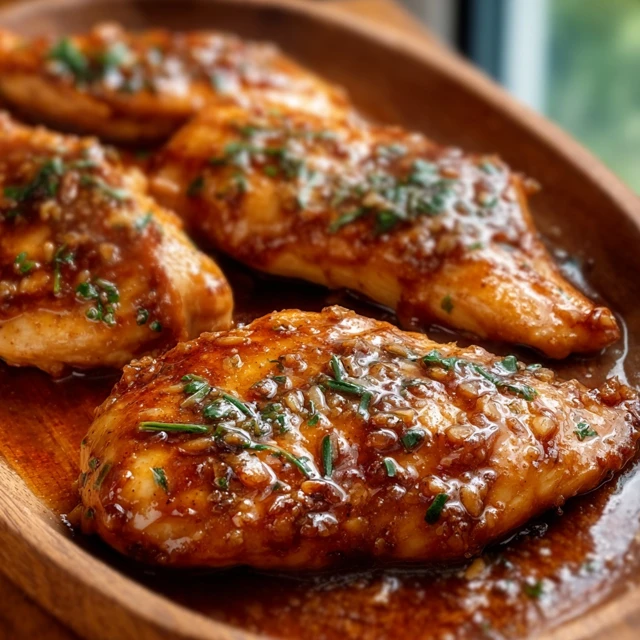
Some flavor combinations feel like they were written in the stars, a perfect harmony of notes that just clicks. Honey and garlic is one of those timeless duets, a culinary chord that resonates with a deep, universal comfort. It’s the kind of pairing that can take a humble chicken breast, often maligned for being bland or dry, and elevate it into something truly spectacular, transforming it from a simple protein into the undeniable star of your dinner plate.
This recipe is your new weeknight hero, delivering a dish that tastes like a decadent treat from your favorite takeout spot but comes together in under 30 minutes. We’re talking about tender, juicy chicken breast pan-seared to golden perfection, then lovingly coated in a sticky, glistening sauce that is simultaneously sweet, savory, and bursting with aromatic garlic. Every single bite is an explosion of flavor that will have you scraping the pan for every last drop of that liquid gold.
The Honey Garlic Chicken Breast Difference
- Perfectly Balanced Sauce: This isn’t just a sugary glaze. We use low-sodium soy sauce, a touch of apple cider vinegar, and a cornstarch slurry to create a sauce that’s deeply savory with the perfect amount of sweetness and a thick, clingy consistency.
- The Two-Stage Sear: We sear the chicken first to develop a beautiful golden-brown crust and lock in the juices. It finishes cooking directly in the sauce, ensuring it absorbs every bit of flavor without ever becoming dry.
- Weeknight Wow Factor: The result is a stunningly glossy, restaurant-quality meal made with pantry staples. It’s a reliable, fast, and incredibly satisfying recipe that makes any Tuesday feel like a special occasion.
The Building Blocks

The beauty of this dish lies in its simplicity, but using quality ingredients is what makes it truly sing. Each component plays a critical role in building that signature sweet and savory flavor profile that makes honey garlic chicken so irresistible.
- Boneless, Skinless Chicken Breasts: The lean canvas for our masterpiece. You can also slice them into thinner cutlets for even faster cooking.
- Olive Oil: For searing the chicken and creating that essential golden crust.
- Salt and Black Pepper: To season the chicken from the very beginning, building a foundation of flavor.
- Honey: (The star of the show! Use a good quality liquid honey for the best floral sweetness and smooth consistency.)
- Low-Sodium Soy Sauce: (Crucial for providing savory, umami depth without making the dish overly salty. It allows you to control the final seasoning.)
- Fresh Garlic: (Absolutely non-negotiable. Minced fresh garlic provides an aromatic, pungent kick that garlic powder simply cannot replicate.)
- Apple Cider Vinegar: (The secret weapon! A small splash cuts through the richness and sweetness, adding a bright, tangy note that balances the entire sauce.)
- Cornstarch: (Mixed with water to create a slurry, this is what transforms the thin sauce into a thick, glossy glaze that clings beautifully to the chicken.)
- Water: To create the cornstarch slurry and loosen the sauce to the perfect consistency.
- Optional Garnishes: Toasted sesame seeds and thinly sliced green onions for a pop of color, texture, and fresh flavor.
Swaps & Alternatives
Don’t have everything on hand? No problem at all! This recipe is wonderfully flexible.
- Chicken Thighs: For a juicier, more forgiving cut of meat, boneless, skinless chicken thighs work beautifully. Just be sure to adjust the cooking time slightly.
- Gluten-Free Option: Simply swap the soy sauce for tamari or coconut aminos to make this entire dish gluten-free.
- Sweetener Swap: While honey is classic, you can substitute it with maple syrup for a different, slightly woodsy sweetness.
- Vinegar Varieties: No apple cider vinegar? Rice vinegar is an excellent substitute that provides a similar tangy brightness.
- Arrowroot Starch: If you prefer to avoid cornstarch, an equal amount of arrowroot starch will also work perfectly as a thickener.
Flavor Boosts
Ready to take this classic to the next level? These simple additions can add incredible depth and complexity, making the recipe feel brand new.
One of my favorite additions is a teaspoon of freshly grated ginger. Added along with the garlic, it introduces a warm, zesty spice that pairs beautifully with the other ingredients.
For those who enjoy a little heat, a pinch of red pepper flakes (or more, to your taste!) tossed into the sauce will add a gentle warmth that cuts through the sweetness. It’s a simple change that makes a huge difference.
A tiny splash of toasted sesame oil, stirred in at the very end *after* the heat is off, adds an incredible nutty aroma and a layer of savory depth. A little goes a long way here!
Finally, for an even richer sauce, you can deglaze the pan with a splash of dry white wine or chicken broth after searing the chicken and before adding the garlic. Scrape up all those browned bits for an extra flavor boost.
How to Make Honey Garlic Chicken Breast

This process is quick, simple, and incredibly rewarding. We’ll build the flavors step-by-step, resulting in a perfectly cooked chicken breast coated in an irresistible sauce. It’s a much faster alternative to a Slow Cooker Honey Garlic Chicken, perfect for a busy night.
1. Prepare the Chicken
First things first, let’s get the chicken ready. Pat the chicken breasts completely dry with paper towels. This step is critical! A dry surface is essential for getting a beautiful, golden-brown sear instead of just steaming the meat. Season both sides generously with salt and freshly cracked black pepper. If your chicken breasts are particularly thick, you can slice them in half horizontally to create thinner cutlets, which will cook faster and more evenly. For more tips on handling chicken, my guide to the perfect Baked Chicken Breast has some great pointers.
2. Whisk Together the Magic Sauce
In a small bowl or liquid measuring cup, combine the honey, low-sodium soy sauce, and apple cider vinegar. Whisk them together until the honey is fully dissolved and the mixture is smooth. In a separate, even smaller bowl, whisk together the cornstarch and cold water until there are absolutely no lumps. This is your slurry. Set both bowls aside near the stove; things are about to move quickly!
3. Sear for Golden-Brown Perfection
Place a large skillet over medium-high heat and add the olive oil. Once the oil is shimmering, carefully place the seasoned chicken breasts in the pan, making sure not to overcrowd it. You want to hear a confident sizzle. Cook for about 4-6 minutes per side, or until deeply golden brown and cooked through. The exact time will depend on the thickness of your chicken. Once cooked, remove the chicken from the skillet and set it aside on a plate.
4. Sauté the Aromatics
Reduce the heat under the skillet to medium-low. There should be some delicious browned bits (fond) stuck to the bottom of the pan—that’s pure flavor! Add the minced garlic to the skillet and cook for just 30-60 seconds, stirring constantly, until it’s fragrant. Be very careful here; burnt garlic will turn bitter and ruin the sauce, so pull it off the heat if you need to.
5. Simmer and Thicken
Pour the honey-soy sauce mixture into the skillet with the garlic. As it bubbles, use a wooden spoon or spatula to scrape up all those browned bits from the bottom of the pan. Bring the sauce to a gentle simmer. Now, give your cornstarch slurry a quick re-whisk (it may have settled) and pour it into the simmering sauce. Continue to stir as the sauce almost instantly thickens and becomes glossy. This should only take about a minute.
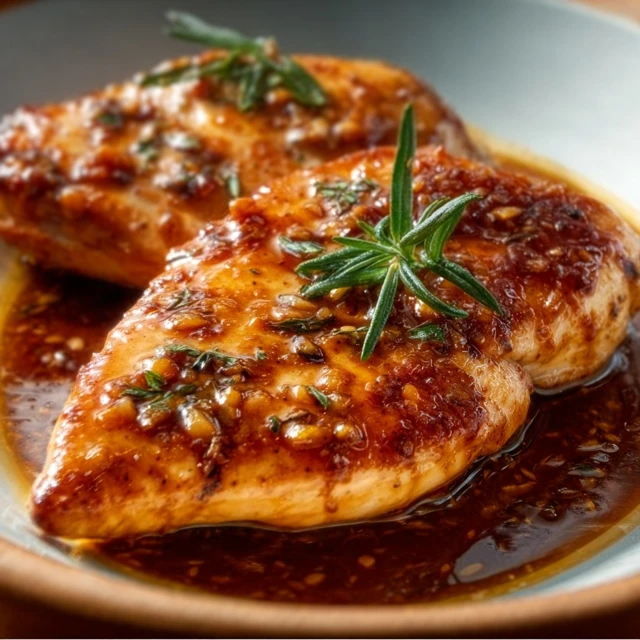
6. Bring It All Together
Return the seared chicken breasts (and any juices that have collected on the plate) back into the skillet. Turn the chicken over and over in the sauce, spooning it over the top to ensure every nook and cranny is coated in that beautiful, sticky glaze. Let it bubble together for another minute to allow the flavors to meld. If you love this flavor profile, you’ll also adore the similar vibe in my Crockpot Teriyaki Chicken.
Avoid These Pitfalls
- Soggy Sear: Not drying the chicken breast thoroughly with paper towels is the number one reason for a lackluster sear. Moisture creates steam, which prevents that beautiful golden crust from forming.
- Burnt Garlic: Garlic goes from fragrant to burnt and bitter in a matter of seconds. Keep the heat on medium-low and stir constantly. If you smell it getting too toasty, pull the pan off the heat immediately.
- Overcrowding the Pan: Placing too many chicken breasts in the skillet at once will lower the temperature and cause them to steam instead of sear. Cook in batches if necessary to give each piece plenty of space.
Perfect Pairings
This honey garlic chicken is so versatile, it pairs wonderfully with almost anything. The
What can I do if my honey garlic sauce isn’t thick enough?
The key to a thick, glossy sauce is a cornstarch slurry. To create one, whisk cornstarch and cold water together until there are no lumps. Pour this mixture into the simmering sauce in the pan, and it should thicken almost instantly while you stir.
Can I use chicken thighs instead of chicken breasts for this recipe?
Yes, you can definitely use boneless, skinless chicken thighs. They are a juicier cut of meat and work beautifully in this recipe. Just be sure to adjust the cooking time slightly as needed.
My chicken didn’t get a golden-brown crust. What did I do wrong?
The most common reasons for a poor sear are not drying the chicken completely with paper towels before cooking, or overcrowding the pan. Moisture causes the chicken to steam instead of sear. Ensure the chicken is very dry and cook in batches if necessary to give each piece enough space.
How can I add a little spice or extra flavor to this dish?
For extra flavor, you can add a teaspoon of freshly grated ginger along with the garlic for a zesty spice. To add heat, toss a pinch of red pepper flakes into the sauce. For a nutty aroma, stir in a small splash of toasted sesame oil after you’ve turned off the heat.
Sticky Sweet Honey Garlic Chicken Breast
Ingredients
Equipment
Method
- Pat the chicken breasts completely dry with paper towels. A dry surface is essential for a good sear. Season both sides generously with salt and pepper.
- In a small bowl, whisk together the honey, low-sodium soy sauce, and apple cider vinegar until smooth. In a separate, smaller bowl, whisk together the cornstarch and cold water to create a lump-free slurry. Set both aside.
- Heat the olive oil in a large skillet over medium-high heat. Once shimmering, carefully place the chicken in the pan. Cook for 4-6 minutes per side, until deeply golden brown and cooked through. Remove the chicken from the skillet and set aside on a plate.
- Reduce the heat to medium-low. Add the minced garlic to the skillet and cook for 30-60 seconds, stirring constantly, until fragrant. Be careful not to let it burn.
- Pour the honey-soy sauce mixture into the skillet, scraping up any browned bits from the bottom of the pan. Bring to a gentle simmer. Give the cornstarch slurry a quick re-whisk and pour it into the sauce, stirring continuously until the sauce thickens and becomes glossy, about 1 minute.
- Return the cooked chicken and any accumulated juices back to the skillet. Spoon the sauce over the chicken, turning to coat it completely. Let it bubble for one more minute to allow the flavors to meld. Garnish with toasted sesame seeds and sliced green onions before serving.
