Relief washes over you the moment you realize dessert doesn’t require preheating the oven on a sweltering day. It’s a small, sweet victory in the kitchen, a promise of something spectacular without the fuss, the heat, or the complicated timing. These no-bake strawberry dessert cups are the embodiment of that victory, a recipe built on simple layers and fresh flavors that feels both effortlessly chic and deeply comforting, like a secret you can’t wait to share.
What you’re creating here is more than just a quick dessert; it’s a little cup of pure happiness. Imagine plunging your spoon through a bright, juicy strawberry topping, into a cloud of tangy, ethereal cream cheese filling, all the way down to a buttery, crisp graham cracker crust. Each bite is a perfectly balanced symphony of textures and tastes that sings of sunshine and lazy afternoons, proving that the most memorable treats are often the simplest ones.
The No-Bake Strawberry Dessert Cups Difference
- A Symphony of Textures: The magic is in the contrast. You get the crisp, sandy texture of the buttery graham cracker crust, the impossibly smooth and silky cheesecake filling, and the soft, juicy burst of fresh strawberries in every single spoonful.
- Effortless Elegance: This recipe delivers a show-stopping result with minimal effort. Because it requires no baking, it’s a foolproof option for beginners and a brilliant time-saver for experienced cooks. It’s a dessert that looks like it took hours but comes together in minutes.
- Perfectly Balanced Flavor: We’re not just layering ingredients; we’re building flavor. The slight tang from the cream cheese cuts through the richness, the sweetness of the berries provides a fresh counterpoint, and the salty-sweet crust grounds everything. It’s a truly harmonious and unforgettable taste.
The Building Blocks
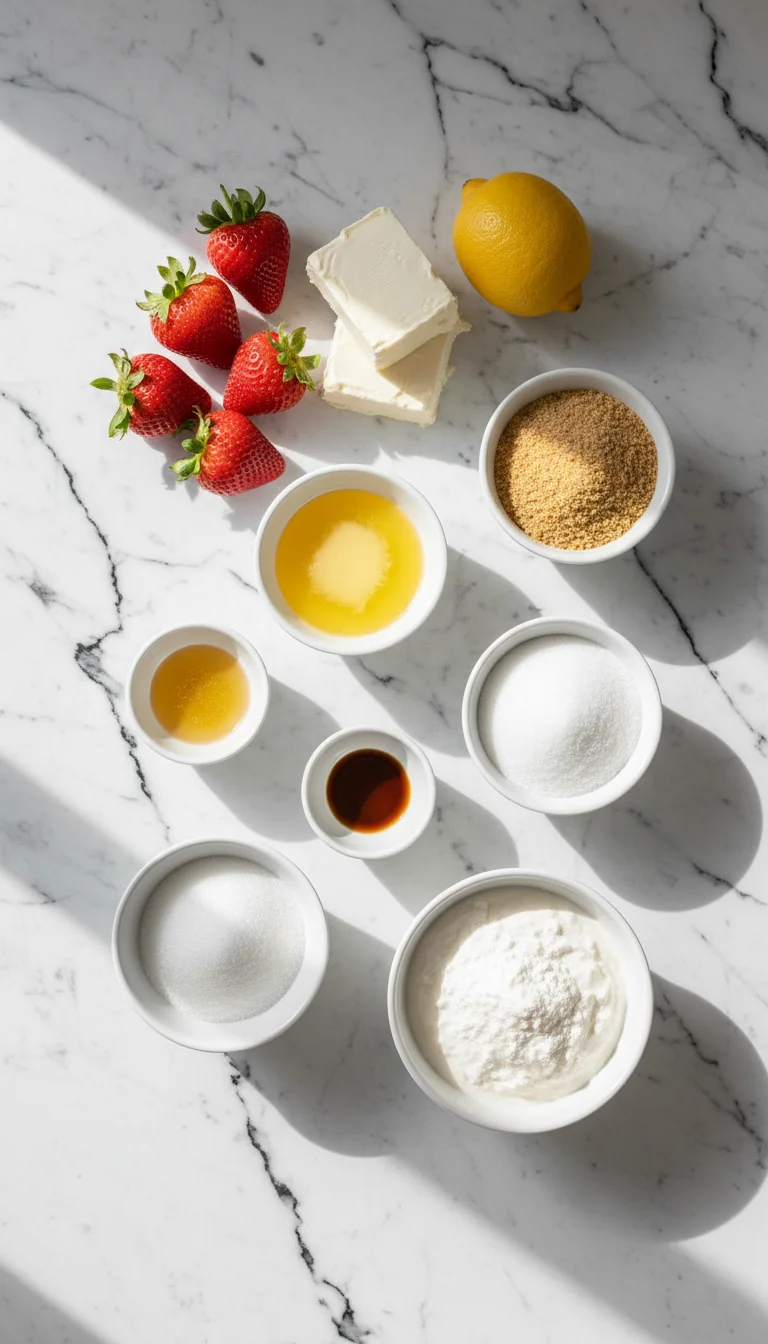
The beauty of a no-bake recipe lies in its simplicity, but that means the quality of each component truly shines. Using fresh, vibrant ingredients will take these dessert cups from good to absolutely divine. Think of this list as your map to dessert perfection.
- Graham Crackers: 1 ½ cups of finely crushed crumbs (about 10-12 full sheets). (This is the classic, buttery, and slightly spiced foundation that pairs perfectly with cheesecake flavors.)
- Unsalted Butter: 6 tablespoons, melted. (The glue that holds our delicious crust together, adding richness and a satisfying snap.)
- Granulated Sugar: 2 tablespoons for the crust, plus ½ cup for the filling. (Just enough to sweeten the crust and balance the tang of the cream cheese.)
- Cream Cheese: 16 ounces (two blocks), softened to room temperature. (This is non-negotiable! Softened cream cheese is the key to a lump-free, velvety smooth filling. It provides the signature tang and structure.)
- Heavy Whipping Cream: 1 cup, cold. (This is what makes the filling light and airy, like a mousse. It must be very cold to whip up properly.)
- Powdered Sugar: ½ cup. (It dissolves instantly into the cream cheese, ensuring a silky texture without any grittiness.)
- Pure Vanilla Extract: 2 teaspoons. (Enhances all the other flavors and adds a warm, aromatic depth.)
- Fresh Strawberries: 2 pints (about 4 cups), hulled and sliced or diced. (The star of the show! Use ripe, sweet, and fragrant berries for the best possible flavor.)
- Lemon Juice: 1 tablespoon, fresh. (A secret weapon that brightens the strawberry flavor and prevents the topping from being overly sweet.)
Swaps & Alternatives
Don’t have everything on hand? No problem. This recipe is wonderfully flexible. Here are a few simple swaps you can make in a pinch.
- For the Crust: Feel free to get creative! You can easily substitute the graham crackers with crushed shortbread cookies, vanilla wafers, or even digestive biscuits for a different flavor profile.
- For the Berries: While strawberries are classic, this dessert works beautifully with a mix of fresh berries. Try raspberries, blueberries, or blackberries, or a combination of all three.
- Lighter Filling: For a slightly tangier and lighter version, you can replace half of the cream cheese (one 8-ounce block) with full-fat Greek yogurt. The texture will be a bit softer but still delicious.
- Different Extracts: Swap the vanilla extract for almond extract for a nutty note, or add a splash of orange liqueur like Grand Marnier to the strawberry topping for a sophisticated twist.
Gourmet Variations
Ready to take these simple cups to the next level? These little additions can transform your dessert into a truly gourmet experience that will have everyone asking for the recipe.
A touch of citrus zest is a game-changer. Try adding the finely grated zest of one lemon or lime to the cream cheese filling. It cuts through the richness and enhances the bright flavor of the strawberries, making the entire dessert feel even fresher.
For a deeper, more complex flavor, create a simple balsamic glaze to drizzle over the strawberries. Just simmer balsamic vinegar in a small saucepan until it’s slightly thickened and syrupy. The tangy, sweet glaze is an incredible complement to the berries and creamy filling.
Introduce another layer of texture and flavor by sprinkling toasted sliced almonds, pistachios, or even a bit of white chocolate shavings on top just before serving. The crunch is a wonderful surprise and adds a professional-looking finish. If you love strawberry desserts with a bit of flair, you might also adore these Strawberry Crunch Cheesecake Tacos.
How to Make No-Bake Strawberry Dessert Cups
The process is as breezy and enjoyable as the dessert itself. We’re essentially breaking it down into three simple parts: making the crust, whipping the filling, and preparing the topping. Just follow along, and you’ll have these ready to chill in no time.
1. Prepare the Graham Cracker Crust
First things first, let’s build our foundation. If you’re using full graham cracker sheets, you can crush them in a food processor until they are fine crumbs, or place them in a zip-top bag and crush them with a rolling pin—a great way to get out a little frustration!
In a medium bowl, combine the finely crushed graham cracker crumbs, 2 tablespoons of granulated sugar, and the melted butter. Stir with a fork until the mixture is well-combined and resembles wet sand. Press about 2-3 tablespoons of the mixture firmly into the bottom of your serving glasses or jars. Use the back of a spoon to create a flat, even layer. Place the cups in the refrigerator to set while you prepare the filling.
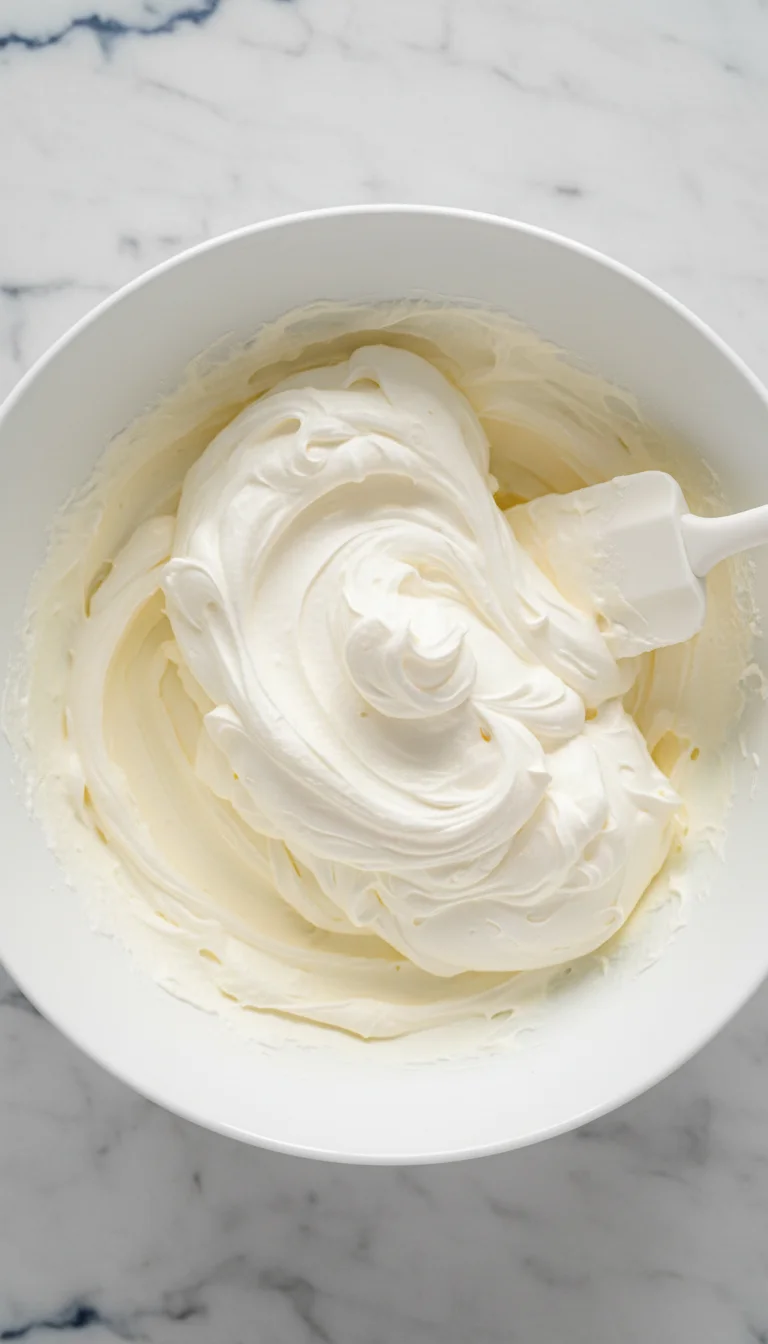
2. Whip Up the Creamy Cheesecake Filling
This step is where the magic happens. The key to a perfectly smooth filling is ensuring your cream cheese is truly at room temperature. In a large bowl, use a hand mixer or a stand mixer fitted with the paddle attachment to beat the softened cream cheese and ½ cup of granulated sugar on medium speed until completely smooth and creamy, scraping down the sides of the bowl as needed.
Beat in the powdered sugar and vanilla extract until just combined. In a separate, chilled bowl, whip the cold heavy cream on high speed until stiff peaks form. Be careful not to over-whip, or it will become grainy. Gently fold about one-third of the whipped cream into the cream cheese mixture to lighten it up. Then, add the remaining whipped cream and fold until everything is evenly combined and no streaks remain. The mixture should be light, airy, and luscious. This technique is similar to what makes our Strawberry Cheesecake Bites so irresistible.
3. Macerate the Fresh Strawberries
Macerating is just a fancy word for letting the strawberries sit in a little sugar, which draws out their natural juices and creates a beautiful, syrupy sauce. It intensifies their flavor and makes for the perfect topping.
In a bowl, gently toss the sliced or diced strawberries with the remaining 2 tablespoons of granulated sugar and the fresh lemon juice. Let the mixture sit at room temperature for about 15-20 minutes, stirring occasionally. You’ll see the berries soften and release their glorious juices. This simple technique is also the secret to a perfect topping for a Southern Strawberry Layer Cake.
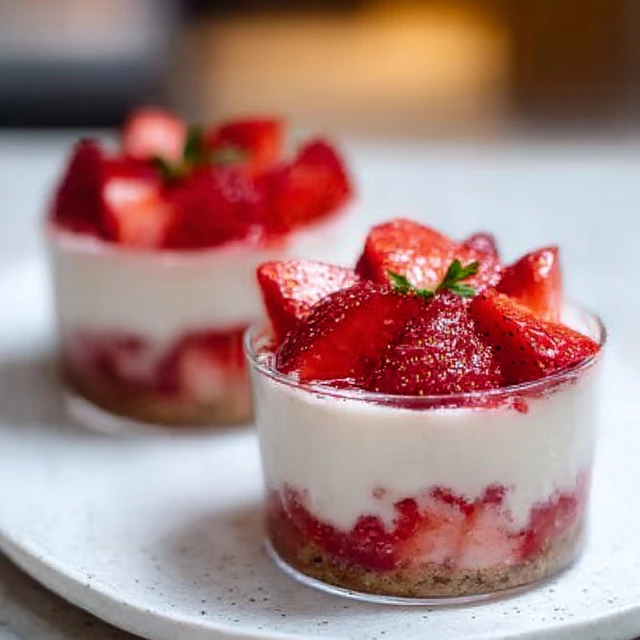
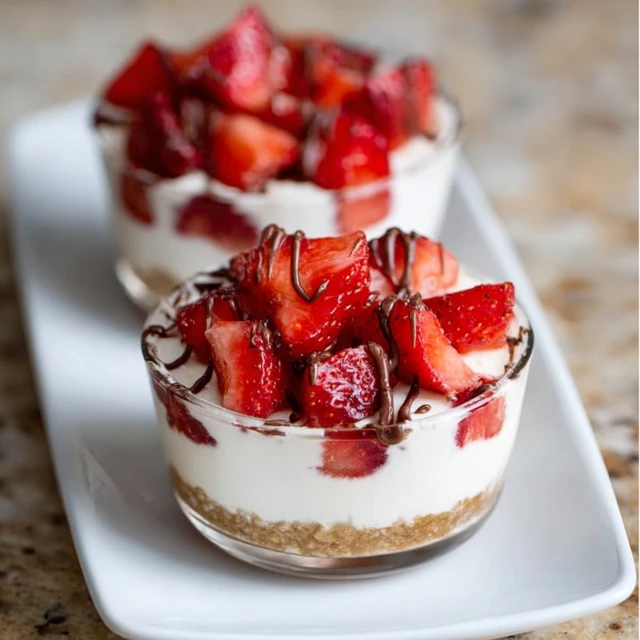
4. Assemble Your Dessert Cups
Now for the fun part! Retrieve your cups with the chilled crusts from the refrigerator. Spoon or pipe the cheesecake filling evenly over the crusts, filling each cup about two-thirds full. You can smooth the top with a small spatula or the back of a spoon. The assembly is reminiscent of creating individual Strawberry Shortcake Trifles, where each layer is a distinct pleasure.
Finally, spoon the juicy strawberry topping over the cheesecake filling, making sure to include some of that lovely syrup. You can be as neat or as rustic as you like with this step. For a fun twist on a strawberry cheesecake dessert, you could even try these Deviled Strawberries Cheesecake Bites next time!
5. Chill for Perfection
This is perhaps the most important, and most difficult, step: waiting. Cover the dessert cups with plastic wrap and refrigerate them for at least 4 hours, or preferably overnight. This chilling time is crucial; it allows the filling to set up and firm, and gives the flavors a chance to meld together beautifully.
Don’t rush this step! A well-chilled dessert cup will have a much better texture and a more developed flavor profile. The patience pays off, just as it does with any great no-bake treat, like a classic No Bake Grasshopper Pie.
Avoid These Pitfalls
- Using Cold Cream Cheese: This is the number one cause of a lumpy cheesecake filling. If your cream cheese isn’t fully softened to room temperature, it will never beat into a smooth, creamy consistency. Be patient and let it sit on the counter for an hour or two.
- Over-Whipping the Cream: When whipping heavy cream, stop as soon as you have stiff peaks—that’s when the peak holds its shape when you lift the beaters. If you keep going, the fat will separate, and the cream will become grainy and buttery.
- Skipping the Chill Time: It’s tempting to dig in right away, but the chilling period is essential. It allows the cheesecake filling to firm up properly. If you skip it, you’ll have a dessert that’s more like a sweet soup than a set dessert cup.
Serving Ideas
These dessert cups are stunning all on their own, but a little garnish can make them feel extra special. Right before serving, you can add a final flourish to delight your guests (and yourself!).
A small dollop of fresh, unsweetened whipped cream on top provides a beautiful visual contrast and an extra layer of creamy texture.
For a pop of color and a hint of freshness, place a single, perfect mint sprig on top of each dessert. The green against the red strawberries is absolutely beautiful.
If you have any leftover graham cracker crumbs, a tiny sprinkle over the top adds a nice textural element and hints at the delicious crust waiting at the bottom. You could also add a few white chocolate curls or a light dusting of powdered sugar for an elegant finish.
If you tried this recipe and loved it, please leave a 5-star rating below. It helps us so much
Why is it essential for the cream cheese to be at room temperature?
Using room temperature cream cheese is the key to a lump-free, velvety smooth filling. If the cream cheese is cold, it will not beat properly and will result in a lumpy texture, which is the most common mistake when making this dessert.
Can I use other types of cookies for the crust or different berries for the topping?
Yes, this recipe is very flexible. You can substitute graham crackers with crushed shortbread cookies, vanilla wafers, or digestive biscuits. For the topping, raspberries, blueberries, blackberries, or a mix of all three work beautifully instead of strawberries.
How long do these dessert cups need to chill before serving?
For the best texture and flavor, the dessert cups must be refrigerated for at least 4 hours, or preferably overnight. This chilling time is crucial as it allows the filling to set and firm up properly while letting the flavors meld together.
What are some ways to enhance or vary the flavor of this dessert?
To elevate the flavor, you can add the zest of a lemon or lime to the cream cheese filling for extra freshness. You can also drizzle a balsamic glaze over the strawberries for a complex, tangy-sweet note, or sprinkle toasted nuts like almonds or pistachios on top for added texture.
No-Bake Strawberry Cheesecake Dessert Cups
Ingredients
Equipment
Method
- In a medium bowl, combine the graham cracker crumbs, 2 tablespoons of granulated sugar, and the melted butter. Stir with a fork until the mixture resembles wet sand.
- Firmly press about 2-3 tablespoons of the crust mixture into the bottom of each of your 8 serving glasses or jars. Use the back of a spoon to create an even layer. Place the cups in the refrigerator to set while you prepare the filling.
- In a large bowl, use an electric mixer to beat the softened cream cheese and ½ cup of granulated sugar on medium speed until completely smooth and free of lumps, scraping down the sides of the bowl as needed.
- Beat in the powdered sugar and vanilla extract until just combined.
- In a separate, chilled bowl, whip the cold heavy cream on high speed until stiff peaks form. Be careful not to over-whip.
- Gently fold about one-third of the whipped cream into the cream cheese mixture to lighten it. Then, add the remaining whipped cream and fold until evenly combined with no streaks.
- In another bowl, gently toss the sliced or diced strawberries with the remaining 2 tablespoons of granulated sugar and the fresh lemon juice. Let the mixture sit at room temperature for 15-20 minutes to macerate, allowing the berries to release their juices.
- Retrieve the cups from the refrigerator. Spoon or pipe the cheesecake filling evenly over the chilled crusts, filling each cup about two-thirds full.
- Top the cheesecake filling with the juicy strawberry mixture, including some of the syrup.
- Cover the dessert cups and refrigerate for at least 4 hours, or preferably overnight, to allow the filling to set completely.
