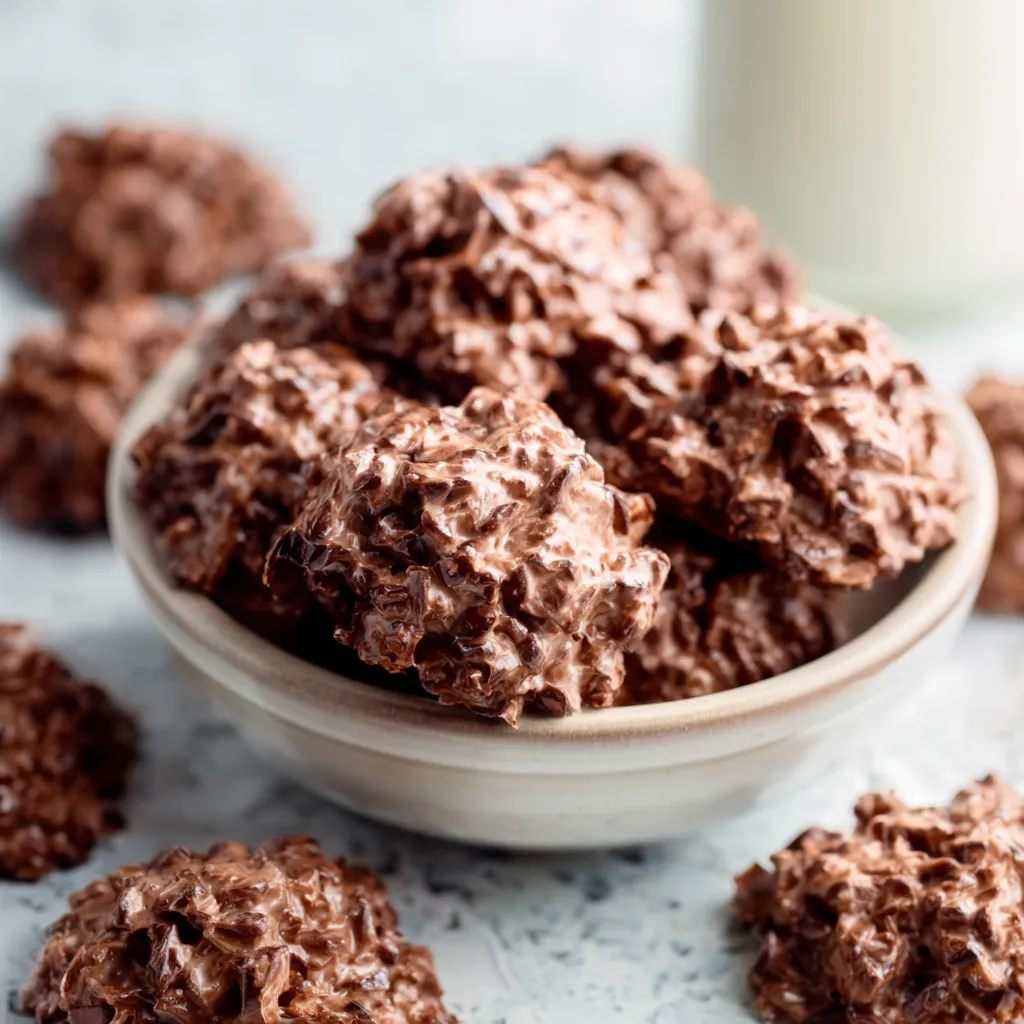
Let’s Gather Our Ingredients
What You’ll Need:
- Sweetened Shredded Coconut: 14 ounces (about 4 cups)
- Semi-Sweet Chocolate Chips: 12 ounces (about 2 cups)
- Milk Chocolate Chips: 6 ounces (about 1 cup) (Optional, for a sweeter cluster)
- Vegetable Shortening: 1 teaspoon (Helps with melting and smoothness)
- Pinch of Sea Salt: Enhances the chocolate flavor
Ingredient Notes & Substitutions:
- Coconut: I highly recommend sweetened shredded coconut for that classic flavor. If you only have unsweetened, you might want to add a tablespoon or two of powdered sugar to the melted chocolate.
- Chocolate: Feel free to experiment! Dark chocolate, milk chocolate, even white chocolate would work. You could also use chocolate bark. For a deep, intense flavor, try using a combination of semi-sweet and dark chocolate.
- Shortening: You can substitute coconut oil for the vegetable shortening. It will give a subtle coconut flavor boost! Just be sure it’s refined coconut oil, so it doesn’t impart too strong of a flavor.
- Nuts: Want to add some crunch? Chopped almonds, pecans, or walnuts would be delicious additions. Fold them in with the coconut before dipping.
Step-by-Step Instructions

Getting Started: Prep is Key
- Line a baking sheet with parchment paper or a silicone baking mat. This will prevent the clusters from sticking and make cleanup a breeze.
- Measure out your coconut and have it ready to go in a large bowl. Have your chocolate chips measured out as well.
Melting the Chocolate: The Heart of the Matter
- Microwave Method: Place the chocolate chips and shortening in a microwave-safe bowl. Microwave in 30-second intervals, stirring in between, until the chocolate is smooth and melted. Be careful not to overheat the chocolate, as it can seize up.
- Double Boiler Method: Alternatively, you can melt the chocolate in a double boiler. Fill a saucepan with about an inch of water and bring it to a simmer. Place a heat-safe bowl on top of the saucepan, making sure the bottom of the bowl doesn’t touch the water. Add the chocolate chips and shortening to the bowl and stir until melted and smooth.
Combining Coconut & Chocolate: The Magic Happens
- Pour the melted chocolate over the shredded coconut.
- Add a pinch of sea salt.
- Gently stir until the coconut is evenly coated with chocolate. Don’t overmix, you want to keep some texture.
Forming the Clusters: Making it Pretty
- Using a spoon or a small cookie scoop, drop rounded mounds of the chocolate-coconut mixture onto the prepared baking sheet. Aim for consistent sizes, but don’t worry about perfection – rustic is charming!
Chilling & Setting: Patience is a Virtue
- Place the baking sheet in the refrigerator or freezer to chill until the chocolate is firm. This usually takes about 20-30 minutes in the refrigerator or 10-15 minutes in the freezer.
Troubleshooting & Tips for Success
Chocolate Seizing? Don’t Panic!
If your chocolate seizes up (becomes thick and grainy), it’s usually because a drop of water got in. The good news is, you can often fix it! Try adding a teaspoon of vegetable oil or shortening and stirring vigorously until smooth. In some cases, adding a tablespoon of hot milk or cream can also help.
Clusters Too Soft?
If your clusters are too soft after chilling, it could be due to a couple of things. Either the chocolate wasn’t fully melted, or the ratio of chocolate to coconut is off. Next time, try adding a bit more chocolate or chilling them for a longer period.
Making Them Ahead of Time:
These clusters are perfect for making ahead! They store well in an airtight container at room temperature for up to a week, or in the refrigerator for up to two weeks. They also freeze well for longer storage.
Variations to Tempt Your Taste Buds
Dark Chocolate Decadence:
Use dark chocolate chips (60% cacao or higher) for a richer, more intense chocolate flavor. You can even drizzle some melted white chocolate over the finished clusters for a beautiful contrast.
Nutty Nirvana:
Add chopped almonds, pecans, or walnuts to the coconut-chocolate mixture for a satisfying crunch. Toasting the nuts beforehand will enhance their flavor even further.
Peppermint Perfection:
Crush some peppermint candies and sprinkle them over the clusters before the chocolate sets. This is especially festive during the holidays!
Spicy Kick:
Add a pinch of cayenne pepper to the melted chocolate for a subtle heat that complements the sweetness of the coconut. Start with a small amount and adjust to your liking.
Salted Caramel Swirl:
Drizzle melted caramel over the clusters before the chocolate sets. A sprinkle of sea salt will enhance the caramel flavor and create a delightful sweet-and-salty combination.
Serving Suggestions & Perfect Pairings
Elevate Your Dessert Platter:
Chocolate Coconut Clusters make a fantastic addition to any dessert platter. Their rustic charm and delicious flavor will impress your guests.
Homemade Gifts from the Heart:
Package these clusters in a decorative tin or jar and give them as homemade gifts. They’re perfect for birthdays, holidays, or just because!
Coffee Companion:
Enjoy a few clusters with your morning coffee or afternoon tea. The chocolate and coconut flavors pair perfectly with a warm beverage.
Ice Cream Topping:
Crumble the clusters over your favorite ice cream for an extra layer of texture and flavor. Vanilla, chocolate, or coconut ice cream would be especially delicious.
Movie Night Treat:
Skip the processed candy and enjoy a healthier (and tastier!) treat during your next movie night. These clusters are sure to satisfy your sweet cravings.
More Irresistible Chocolate Treats
If you’re a chocolate lover like me, you’re always on the lookout for new and exciting recipes. Why not try making some Chocolate Covered Cherry Brownie Bombs for a decadent treat? Or perhaps some elegant Chocolate Raspberry Truffles? For a simple and satisfying cookie, check out these Chocolate Thumbprint Cookies. Or these Chocolate Thumbprint Cookies. If you’re looking for something quick and easy, Rolo Pretzels are always a hit, and for the ultimate simplicity, you can’t beat 3-ingredient Fudge!
Storing Your Chocolate Coconut Clusters
Keep Them Fresh!
To maintain the best flavor and texture, store your Chocolate Coconut Clusters in an airtight container. A cool, dry place is ideal. Room temperature is perfectly fine for up to a week. If you want them to last longer, store them in the refrigerator for up to two weeks. For even longer storage, you can freeze them for up to 2 months. Just be sure to thaw them in the refrigerator before enjoying.
Why I Love This Recipe
Simplicity and Satisfaction
What I truly adore about this recipe is its simplicity. With just a few basic ingredients and minimal effort, you can create a treat that’s both satisfying and impressive. It’s the perfect solution for those moments when you crave something sweet but don’t want to spend hours in the kitchen.
A Crowd-Pleasing Favorite
Chocolate Coconut Clusters are always a hit with everyone, from kids to adults. The combination of chocolate and coconut is a classic for a reason – it’s simply irresistible. Whether you’re making them for a party, a gift, or just a personal indulgence, you can be sure they’ll disappear quickly.
Endless Possibilities
The variations you can create with this recipe are endless. Add nuts, spices, or dried fruit to customize them to your liking. Experiment with different types of chocolate to find your perfect flavor combination. The possibilities are limited only by your imagination.
Time to Indulge!
So there you have it – everything you need to create your own batch of irresistible Chocolate Coconut Clusters! I hope you enjoy making and eating these as much as I do. Happy baking!What can I use instead of vegetable shortening when melting the chocolate?
You can substitute refined coconut oil for the vegetable shortening. It will give a subtle coconut flavor boost.
My chocolate seized up while melting. How can I fix it?
Try adding a teaspoon of vegetable oil or shortening and stirring vigorously until smooth. In some cases, adding a tablespoon of hot milk or cream can also help.
How should I store the Chocolate Coconut Clusters to keep them fresh?
Store your Chocolate Coconut Clusters in an airtight container in a cool, dry place. They can be kept at room temperature for up to a week, in the refrigerator for up to two weeks, or frozen for up to 2 months. Thaw in the refrigerator before enjoying.
Can I add nuts to the Chocolate Coconut Clusters?
Yes, you can add chopped almonds, pecans, or walnuts to the coconut-chocolate mixture for a satisfying crunch. Consider toasting the nuts beforehand to enhance their flavor.
Irresistible Chocolate Coconut Clusters
Ingredients
Equipment
Method
- Line a baking sheet with parchment paper or a silicone baking mat.
- Measure out the coconut and chocolate chips and have them ready in separate bowls.
- Place the chocolate chips and shortening in a microwave-safe bowl or in a double boiler.
- If using the microwave, microwave in 30-second intervals, stirring in between, until the chocolate is smooth and melted. Be careful not to overheat the chocolate.
- If using a double boiler, fill a saucepan with about an inch of water and bring it to a simmer. Place a heat-safe bowl on top of the saucepan, making sure the bottom of the bowl doesn’t touch the water. Add the chocolate chips and shortening to the bowl and stir until melted and smooth.
- Pour the melted chocolate over the shredded coconut.
- Add a pinch of sea salt.
- Gently stir until the coconut is evenly coated with chocolate. Don’t overmix.
- Using a spoon or a small cookie scoop, drop rounded mounds of the chocolate-coconut mixture onto the prepared baking sheet.
- Place the baking sheet in the refrigerator or freezer to chill until the chocolate is firm. This usually takes about 20-30 minutes in the refrigerator or 10-15 minutes in the freezer.
- Once the clusters are firm, remove them from the baking sheet and store them in an airtight container.