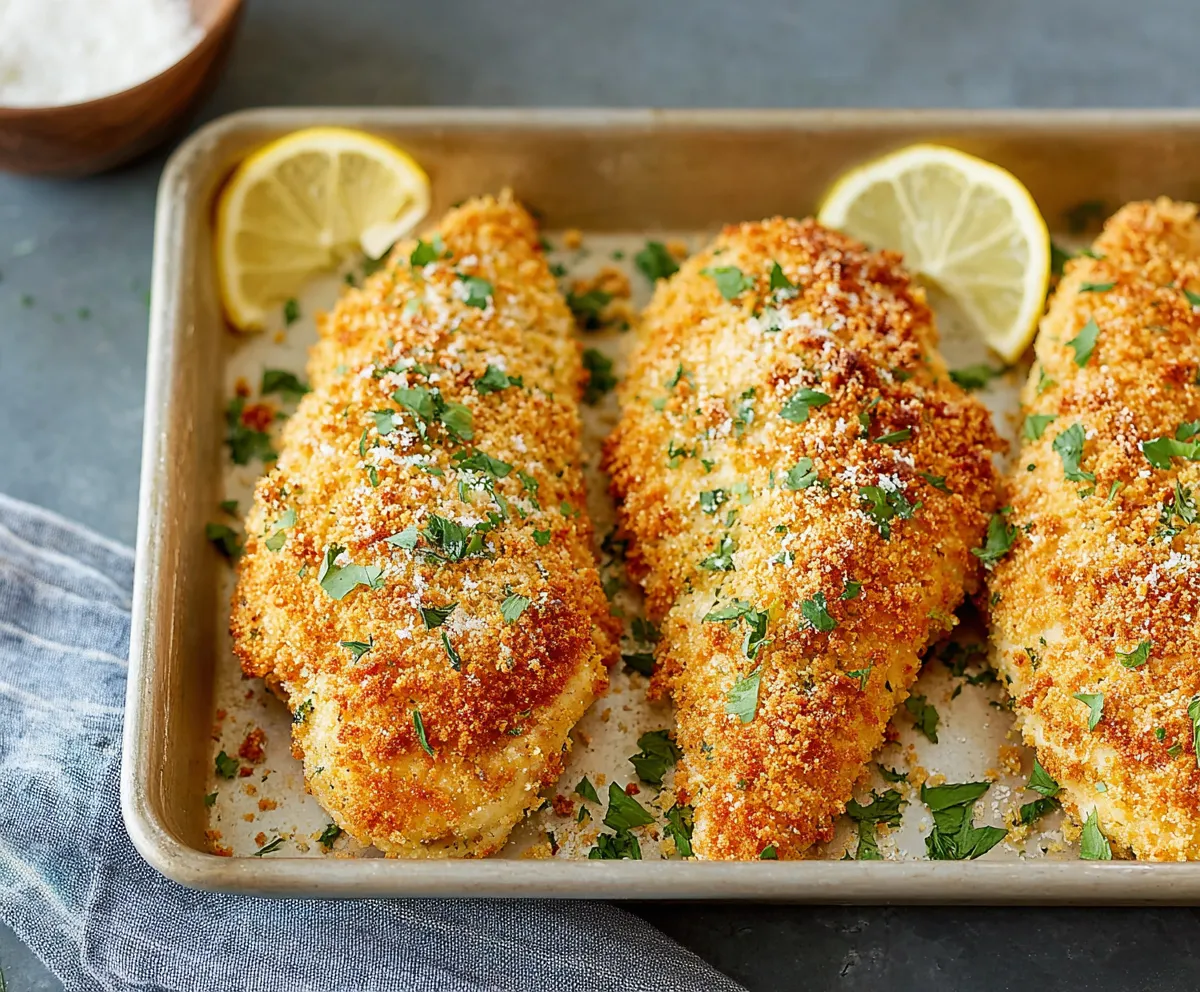
I’ll always remember the summer my cousin, Sarah, became obsessed with both pickling everything *and* coating everything in parmesan – her experiments were, uh, interesting, to say the least! But it did spark an idea that, after much tweaking, has led us to this absolutely addictive recipe for Crispy Dill Pickle Parmesan Chicken, a dish so good you’ll want to make it every week, and I promise, with my guidance, you absolutely can!
Why This Crispy Dill Pickle Parmesan Chicken Recipe is a Must-Try
Okay, friend, let’s be real. There are a million chicken recipes out there. So why should *this* one be the next to grace your dinner table? Because it’s not just another chicken recipe – it’s an experience. Think about it: the tangy zing of dill pickles, the salty, nutty goodness of parmesan, and the satisfying crunch of a perfectly crispy coating all wrapped around juicy, tender chicken. It’s a flavor explosion, and it’s surprisingly easy to achieve. Trust me, once you try it, you’ll be hooked!
What Makes This Chicken SO Crispy? The Secret’s Out!

We’re all after that perfect crispy chicken, right? Soggy chicken is nobody’s friend. So, let’s dive into the secrets behind the *ultimate* crispy coating:
- Panko Breadcrumbs: Forget regular breadcrumbs! Panko is the MVP here. These Japanese breadcrumbs are larger and airier, which means they get incredibly crispy when baked or fried.
- Parmesan Power: Not only does parmesan add amazing flavor, but it also helps create a beautiful golden-brown crust. The cheese melts and crisps up beautifully in the oven.
- Dill Pickle Brine: This is the game-changer! The acidity in the pickle brine tenderizes the chicken and infuses it with that unmistakable dill pickle flavor. Plus, the slight sugar content in some brines helps with browning.
- Dry Ingredients First: Make sure your chicken is nicely coated in the flour mixture before dipping it into the egg and then the panko mixture. This creates a barrier that helps the coating adhere and stay crispy.
- Don’t Overcrowd: Whether you’re baking or frying, give your chicken space! Overcrowding lowers the temperature of the cooking oil or baking sheet, leading to steamed, not crispy, chicken.
Ingredients You’ll Need for Crispy Dill Pickle Parmesan Chicken
Alright, gather ’round! Here’s your shopping list for creating this masterpiece:
- Chicken Breasts: About 2 pounds, boneless, skinless. You can also use chicken thighs if you prefer dark meat.
- Dill Pickle Brine: ½ cup. Don’t throw away that pickle juice! It’s liquid gold for this recipe.
- All-Purpose Flour: ½ cup. For that initial coating.
- Eggs: 2 large, lightly beaten. To help the breadcrumbs stick.
- Panko Breadcrumbs: 1 ½ cups. The key to ultimate crispiness.
- Grated Parmesan Cheese: ¾ cup. Freshly grated is always best for flavor.
- Dried Dill: 2 tablespoons. To boost that dill pickle flavor even more!
- Garlic Powder: 1 teaspoon. Because everything’s better with garlic.
- Onion Powder: 1 teaspoon. Adds a subtle sweetness.
- Salt and Black Pepper: To taste. Don’t be shy!
- Olive Oil (or Cooking Spray): For baking or frying.
Step-by-Step Instructions: Let’s Get Cooking!
Don’t worry, I’m here to guide you every step of the way. Here’s how to bring this Crispy Dill Pickle Parmesan Chicken to life:
Step 1: Marinate the Chicken
- Place the chicken breasts in a zip-top bag or a shallow dish.
- Pour the dill pickle brine over the chicken, making sure it’s well coated.
- Seal the bag or cover the dish and refrigerate for at least 30 minutes, or up to 2 hours. This is crucial for flavor and tenderness!
Step 2: Prepare the Coating
- In a shallow dish, combine the flour, salt, and pepper.
- In another shallow dish, place the beaten eggs.
- In a third shallow dish, mix together the panko breadcrumbs, parmesan cheese, dried dill, garlic powder, and onion powder. This is where the magic happens!
Step 3: Coat the Chicken
- Remove the chicken from the pickle brine and pat it dry with paper towels. This is important to help the coating adhere.
- Dredge each chicken breast in the flour mixture, making sure it’s completely coated.
- Dip the floured chicken into the beaten eggs, letting any excess drip off.
- Finally, coat the chicken in the panko breadcrumb mixture, pressing gently to ensure the breadcrumbs stick.
Step 4: Choose Your Cooking Method
You’ve got options! Baking and frying both yield delicious results. Here’s how to do both:
Baking Instructions:
- Preheat your oven to 400°F (200°C).
- Line a baking sheet with parchment paper and lightly spray with cooking spray.
- Place the coated chicken breasts on the prepared baking sheet, making sure they’re not touching.
- Drizzle a little olive oil over the chicken. This helps them get nice and golden brown.
- Bake for 20-25 minutes, or until the chicken is cooked through and the coating is golden brown and crispy. The internal temperature should reach 165°F (74°C).
Frying Instructions:
- Pour about ½ inch of olive oil (or your favorite cooking oil) into a large skillet.
- Heat the oil over medium-high heat until it’s shimmering but not smoking.
- Carefully place the coated chicken breasts into the hot oil, making sure not to overcrowd the pan.
- Fry for 4-5 minutes per side, or until the chicken is cooked through and the coating is golden brown and crispy.
- Remove the chicken from the skillet and place it on a wire rack to drain excess oil.
Step 5: Serve and Enjoy!
Let the chicken cool slightly before serving. Garnish with fresh dill, if desired. Enjoy your amazing Crispy Dill Pickle Parmesan Chicken!
Tips and Tricks for the Best Crispy Dill Pickle Parmesan Chicken
Want to take your Crispy Dill Pickle Parmesan Chicken to the next level? Here are some extra tips to help you nail it:
- Pound the Chicken: For even cooking, pound the chicken breasts to an even thickness (about ½ inch). This also helps tenderize the chicken.
- Don’t Skip the Resting Time: After cooking, let the chicken rest for a few minutes before cutting into it. This allows the juices to redistribute, resulting in more tender and flavorful chicken.
- Air Fryer Option: If you have an air fryer, you can definitely use it! Preheat your air fryer to 375°F (190°C) and cook the chicken for 12-15 minutes, flipping halfway through, until golden brown and cooked through.
- Add a Kick: Want a little heat? Add a pinch of red pepper flakes to the panko breadcrumb mixture.
- Make it Gluten-Free: Use gluten-free all-purpose flour and gluten-free panko breadcrumbs.
Serving Suggestions: What to Serve with Your Crispy Chicken
This Crispy Dill Pickle Parmesan Chicken is incredibly versatile! Here are some of my favorite ways to serve it:
- Classic Sides: Mashed potatoes, roasted vegetables (like broccoli, asparagus, or Brussels sprouts), and a simple salad are always a great choice.
- Comfort Food: Mac and cheese, creamy polenta, or even Garlic Parmesan Chicken Potatoes would be delicious.
- Sandwiches: Slice the chicken and serve it on a toasted bun with lettuce, tomato, and a drizzle of ranch dressing or dill pickle aioli.
- Salads: Top a bed of mixed greens with sliced Crispy Dill Pickle Parmesan Chicken, cherry tomatoes, cucumbers, and a light vinaigrette.
Variations and Substitutions: Make it Your Own!
Don’t be afraid to experiment! Here are some ideas to customize this recipe to your liking:
- Different Cheese: Try using a blend of parmesan and romano cheese for a bolder flavor.
- Spice it Up: Add a dash of hot sauce or a pinch of cayenne pepper to the pickle brine for a spicy kick.
- Herb Variations: Experiment with different herbs, such as parsley, thyme, or oregano, in the panko breadcrumb mixture.
- Pickle Power: For even MORE pickle flavor, finely chop some dill pickles and add them to the panko mixture.
Other Chicken Recipes You’ll Love
If you’re a chicken lover like me, you’ll definitely want to check out these other delicious recipes:
- Marry Me Chicken Pasta: A creamy, dreamy pasta dish that’s guaranteed to impress.
- Parmesan Chicken Meatloaf: A flavorful and healthier twist on a classic comfort food.
- Garlic Cheese Chicken Wraps: Quick, easy, and perfect for lunch or a light dinner.
- Garlic Parmesan Chicken Pasta: A simple yet satisfying pasta dish that’s ready in minutes.
- Looking for even *more* creamy chicken goodness? Don’t forget to try our Marry Me Chicken Pasta!
How to Store and Reheat Leftover Chicken
If you happen to have any leftovers (which is unlikely!), here’s how to store and reheat them:
- Storage: Store the cooked chicken in an airtight container in the refrigerator for up to 3-4 days.
- Reheating: For the best results, reheat the chicken in the oven at 350°F (175°C) for 10-15 minutes, or until heated through. You can also reheat it in the air fryer for a few minutes. Avoid microwaving, as it can make the chicken soggy.
Troubleshooting: Common Problems and Solutions
Sometimes, things don’t go exactly as planned. Here are some common problems and how to fix them:
- Chicken is Dry: Make sure you’re not overcooking the chicken. Use a meat thermometer to ensure it reaches an internal temperature of 165°F (74°C). Marinating in pickle brine helps keep it moist.
- Coating is Falling Off: Make sure you pat the chicken dry before coating it and press the breadcrumbs firmly onto the chicken.
- Chicken is Not Crispy: Use panko breadcrumbs, don’t overcrowd the pan, and make sure the oil (if frying) or oven is hot enough.
Final Thoughts: Enjoy Your Crispy Creation!
There you have it! Everything you need to make the most amazing Crispy Dill Pickle Parmesan Chicken. Don’t be afraid to get creative and put your own spin on it. Happy cooking, my friend!
What makes this Crispy Dill Pickle Parmesan Chicken recipe different from other chicken recipes?
This recipe offers a unique flavor combination with the tangy zing of dill pickles, the salty, nutty flavor of parmesan, and a crispy coating, all around juicy, tender chicken. It’s described as a flavor explosion that’s surprisingly easy to make.
What are the key ingredients to ensure the chicken is extra crispy?
The key ingredients for achieving optimal crispiness are panko breadcrumbs, parmesan cheese, and dill pickle brine. The brine tenderizes the chicken and helps with browning, while the panko breadcrumbs and parmesan create a golden-brown, crispy crust.
Can I bake or fry the chicken, and if so, what are the recommended steps for each method?
Yes, you can bake or fry the chicken. For baking, preheat the oven to 400°F (200°C), bake for 20-25 minutes, drizzling with olive oil. For frying, heat about ½ inch of oil in a skillet over medium-high heat and fry for 4-5 minutes per side.
How should I store and reheat any leftover Crispy Dill Pickle Parmesan Chicken?
Store leftover chicken in an airtight container in the refrigerator for up to 3-4 days. Reheat in the oven at 350°F (175°C) for 10-15 minutes or in an air fryer. Microwaving is not recommended as it can make the chicken soggy.
Crispy Dill Pickle Parmesan Chicken
Ingredients
Equipment
Method
- Place the chicken breasts in a zip-top bag or a shallow dish.
- Pour the dill pickle brine over the chicken, making sure it’s well coated.
- Seal the bag or cover the dish and refrigerate for at least 30 minutes, or up to 2 hours.
- In a shallow dish, combine the flour, salt, and pepper.
- In another shallow dish, place the beaten eggs.
- In a third shallow dish, mix together the panko breadcrumbs, parmesan cheese, dried dill, garlic powder, and onion powder.
- Remove the chicken from the pickle brine and pat it dry with paper towels.
- Dredge each chicken breast in the flour mixture, making sure it’s completely coated.
- Dip the floured chicken into the beaten eggs, letting any excess drip off.
- Coat the chicken in the panko breadcrumb mixture, pressing gently to ensure the breadcrumbs stick.
- Preheat oven to 400°F (200°C) if baking. Line a baking sheet with parchment paper and lightly spray with cooking spray. Place the coated chicken breasts on the prepared baking sheet, making sure they’re not touching. Drizzle a little olive oil over the chicken. Bake for 20-25 minutes, or until the chicken is cooked through and the coating is golden brown and crispy. The internal temperature should reach 165°F (74°C).
- Alternatively, pour about ½ inch of olive oil (or your favorite cooking oil) into a large skillet and heat over medium-high heat. Carefully place the coated chicken breasts into the hot oil, making sure not to overcrowd the pan. Fry for 4-5 minutes per side, or until the chicken is cooked through and the coating is golden brown and crispy. Remove the chicken from the skillet and place it on a wire rack to drain excess oil.
- Let the chicken cool slightly before serving. Garnish with fresh dill, if desired.