Let’s Gather Our Holiday Helpers: Your Ingredients
Before we dive in, let’s get all our ingredients lined up. Think of it as our kitchen “mise en place,” a fancy way of saying “getting our act together” so the whole process feels smooth and joyful. The beauty of this recipe is its simplicity—we’re using classic deviled egg ingredients and just giving them a festive pop of color and some fun decorations.
For the Creamy Deviled Eggs
- 12 large eggs: The star of our show! I find that eggs that are a week or so old are often easier to peel than super fresh ones.
- 1/2 cup mayonnaise: Use a good quality, full-fat mayonnaise for the richest, creamiest filling. This is the foundation of our flavor, so don’t skimp here!
- 1 tablespoon Dijon mustard: This adds a wonderful, tangy depth that cuts through the richness of the yolks and mayo. You can use yellow mustard, but Dijon gives it a more refined flavor.
- 1 tablespoon sweet pickle relish (or dill relish): This is for a little pop of sweetness and texture. If you prefer a more savory egg, feel free to use dill relish or even finely minced pickles.
- 1/4 teaspoon salt: Or to taste. Always taste your filling!
- 1/8 teaspoon black pepper: Freshly ground is always best for that extra punch.
- Green food coloring: Gel food coloring is my absolute favorite for this. It provides a vibrant, deep green without adding extra liquid that could make your filling too thin. A little goes a very long way!
For the Festive Decorations
- Small piece of yellow or red bell pepper: We’ll use this to cut out a tiny star for the top of each tree. It’s the perfect tree-topper!
- Finely chopped fresh parsley or chives: This can act as a lovely green “garland” or be sprinkled on the platter for garnish.
- Sprinkles or nonpareils: Red, white, and multi-colored ones work beautifully as tiny “ornaments” on our trees.
- Paprika: A light dusting adds a touch of color and classic flavor, like a sprinkle of holiday magic.
The Secret to Perfectly Peelable Hard-Boiled Eggs

Okay, let’s have a real talk. Is there anything more frustrating in the kitchen than battling with a hard-boiled egg that refuses to peel cleanly, taking half the precious egg white with it? It’s the worst! Over the years, I’ve tried every trick in the book, and I want to share the method that gives me consistent, smooth, easy-to-peel eggs every single time. This will change your deviled egg game forever.
The magic is in the steam! Steaming the eggs, rather than boiling them submerged in water, makes the membrane separate from the shell like a dream. Here’s how you do it:
- Place a steamer basket in a large pot. Add about an inch of water, just enough so it sits below the bottom of the basket.
- Bring the water to a rolling boil over high heat.
- Gently, using tongs or a slotted spoon, place your cold eggs straight from the fridge into the steamer basket. Don’t worry about them cracking; the steam is much gentler than boiling water.
- Cover the pot, reduce the heat to medium-high (you want to maintain a strong steam), and set a timer for 13 minutes for perfect, firm, bright-yellow yolks.
- While the eggs are steaming, prepare an ice bath. Fill a large bowl with ice and cold water.
- As soon as the timer goes off, immediately transfer the steamed eggs into the ice bath. Let them chill for at least 15 minutes. This rapid cooling stops the cooking process and causes the egg white to contract, pulling away from the shell and making them incredibly easy to peel.
When you’re ready to peel, gently tap the egg on the counter all over to create a network of fine cracks. Start peeling from the wider end, where the air pocket is, and try to get under that thin membrane. The shell should slip right off. Voila! Perfect, un-pockmarked eggs ready for their festive transformation.
Let’s Build Our Edible Forest: Step-by-Step Instructions
Now for the fun part! We have our perfectly cooked eggs and our ingredients are ready to go. Let’s turn them into the most talked-about appetizer of the season. Grab an apron, put on some festive music, and let’s get cooking together.
Step 1: Prepare the Egg Whites and Yolks
- Once your hard-boiled eggs are peeled, carefully slice each one in half lengthwise.
- Gently pop the cooked yolks out of the whites and place them in a medium-sized mixing bowl.
- Arrange the empty egg white halves on your serving platter. This is your canvas! I like to trim a tiny, paper-thin slice off the bottom of each white to create a flat base so they don’t wobble around. It’s a small step that makes a huge difference.
Step 2: Create the Creamy Filling
- Using the back of a fork, mash the egg yolks until they are a fine, crumbly powder. For an ultra-smooth, silky filling (which I highly recommend for piping), press the yolks through a fine-mesh sieve into your bowl. It takes an extra minute, but the luxurious texture is so worth it.
- To the mashed yolks, add the mayonnaise, Dijon mustard, sweet pickle relish, salt, and pepper.
- Stir everything together with a spatula or spoon until it’s completely smooth and creamy. Don’t be shy—give it a taste! Does it need a pinch more salt? A little more tang? Adjust it now until you absolutely love it. This is your masterpiece, after all.
Step 3: Tint the Filling a Festive Green
- Now, let’s make our “trees.” Add a very small drop of green gel food coloring to the yolk mixture.
- Stir until the color is evenly distributed. It’s always better to start with less and add more. Keep adding tiny drops of coloring until you reach a beautiful, Christmas-tree green. Remember that the color can deepen slightly as it sits.
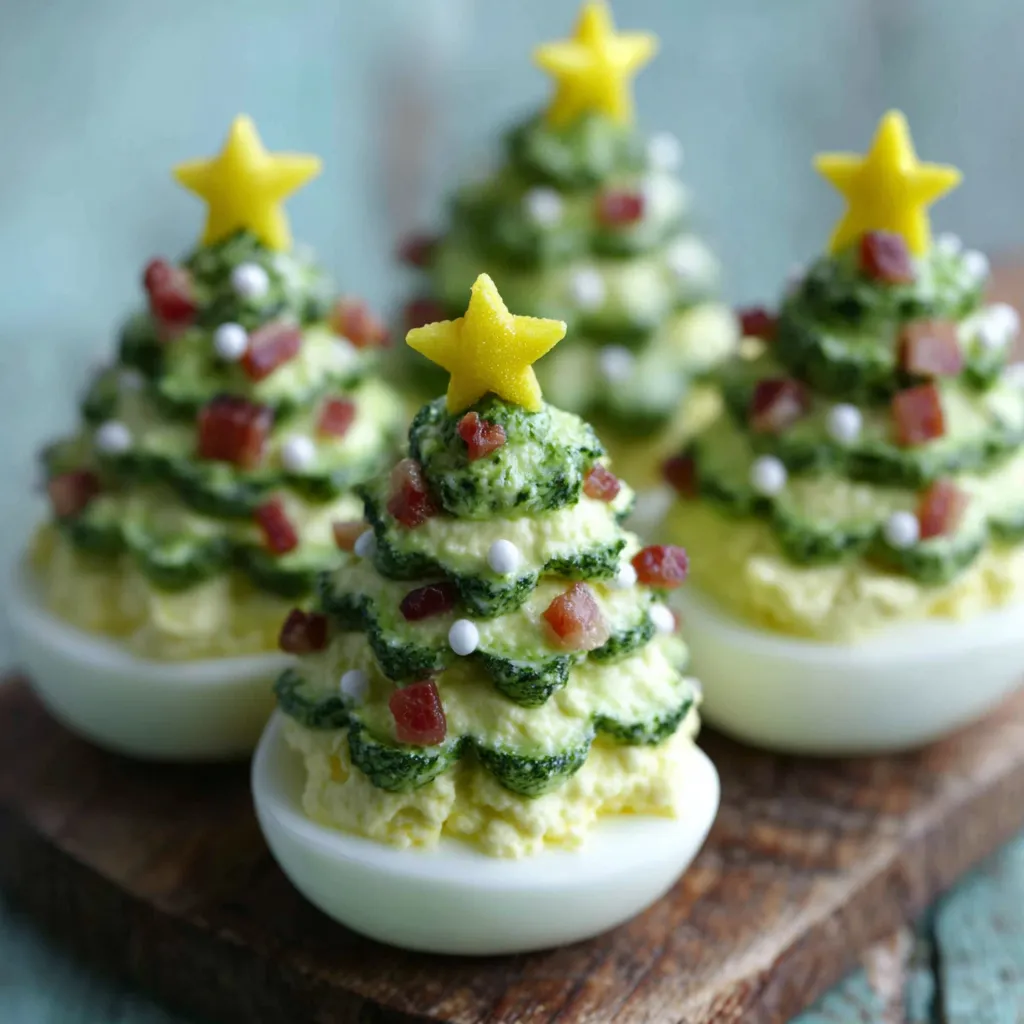
Step 4: Pipe Your Christmas Trees
- Prepare your piping bag. A star tip (like a Wilton 1M or 2D) is perfect for creating that classic Christmas tree texture with defined “branches.” If you don’t have one, don’t panic! You can simply snip the corner off a sturdy zip-top bag for a smooth, cone-shaped tree.
- Spoon the green egg yolk filling into your piping bag, pushing it down towards the tip to remove any air bubbles.
- Hold the piping bag vertically over the center of an egg white half. Starting from the base, apply steady pressure and pipe a swirl, moving upwards and making the swirl slightly smaller as you go up to create a cone or tree shape. Release the pressure and pull the bag away quickly to create a nice peak at the top. Repeat for all the egg white halves.
Step 5: Decorate Your Masterpieces!
- This is where your creativity shines! While the filling is still soft, it’s time to decorate.
- First, the tree topper. Finely dice your red or yellow bell pepper. It’s easier to cut a tiny star from a small, flat square of pepper. Use the tip of a sharp paring knife to carefully cut out tiny star shapes and gently place one on top of each tree.
- Next, the ornaments. Carefully place your sprinkles or nonpareils onto the sides of the green filling. A pair of tweezers can be your best friend here for precise placement!
- Finally, for a finishing touch, give the entire platter a very light dusting of paprika. It adds a lovely warmth and color contrast. You can also sprinkle some fresh, chopped parsley around the base of the eggs on the platter.
My Favorite Tips for Dazzling Deviled Egg Trees
Over the years of making these for holiday parties, I’ve picked up a few little tricks that can help you customize your eggs and ensure they are absolutely perfect every time.
- Make-Ahead Magic: You can absolutely do most of the prep work in advance to save time on a busy holiday. Hard-boil and peel the eggs up to two days ahead and store them in an airtight container in the fridge. You can also make the filling a day in advance, but here’s the key: store the green filling in an airtight container with a piece of plastic wrap pressed directly onto the surface to prevent a “skin” from forming. Keep the empty egg whites separate. When you’re ready to serve, just give the filling a quick stir and pipe away!
- No Piping Bag? No Problem! If you find yourself without a piping bag, you have options. As mentioned, a zip-top bag with the corner snipped works well. For a more rustic, textured look, you can even use two small spoons to carefully mound the filling into the egg whites, shaping it into a cone with the backs of the spoons.
- Flavor Variations: Feel free to get creative with the filling! Add a dash of hot sauce for a little kick, a sprinkle of smoked paprika for depth, or even some finely crumbled bacon for a savory crunch. You could also tint the filling with natural colorings, like a tiny bit of spirulina powder or spinach juice, if you prefer to avoid artificial dyes.
- Ornament Ideas: The sky’s the limit for your tree decorations! Finely diced pimentos, capers, tiny bits of black olive, or even different colored sesame seeds can all be used as delicious and beautiful “ornaments.”
- Transporting Your Trees: Taking these to a party? The biggest challenge is preventing them from sliding around. A deviled egg carrier is a fantastic investment if you make them often. In a pinch, you can line a container with paper towels and nestle the eggs in snugly, or place a small dollop of the leftover filling on the bottom of each egg to “glue” it to the platter.
Answering Your Christmas Kitchen Questions (FAQ)
I get asked a few common questions every time I bring these to a gathering, so I thought I’d answer them for you right here!
How far in advance can I assemble the Christmas Tree Deviled Eggs?
I recommend assembling them no more than 4-6 hours before serving for the best freshness and appearance. The filling can start to dry out a little on the surface if left in the fridge uncovered for too long after piping.
My filling seems too thin to pipe properly. What did I do wrong?
This usually happens from adding too much liquid. It could be from relish that wasn’t drained well or using a liquid food coloring instead of a gel. To fix it, you can try thickening it by mashing in an extra hard-boiled egg yolk. If you don’t have one, chilling the filling in the fridge for 30 minutes can also
What is the recommended method for making easy-to-peel hard-boiled eggs for this recipe?
The article recommends steaming the eggs rather than boiling them. Place the eggs in a steamer basket over an inch of boiling water for 13 minutes, then immediately transfer them to an ice bath for at least 15 minutes. This process makes the shells much easier to peel cleanly.
Can I prepare these Christmas tree deviled eggs ahead of time?
Yes, you can do most of the prep in advance. You can hard-boil and peel the eggs up to two days ahead. The filling can be made a day in advance, but it should be stored in an airtight container with plastic wrap pressed directly onto the surface to prevent a skin from forming. It is best to assemble the eggs on the day of serving.
I don’t have a piping bag. How can I create the tree shape?
If you don’t have a piping bag, you can use a sturdy zip-top bag and snip the corner off to pipe the filling. For a more rustic look, you can also use two small spoons to carefully mound and shape the green filling into a cone on top of the egg whites.
What type of food coloring is best for the green filling, and why?
The recipe recommends using a gel food coloring. Gel coloring provides a vibrant, deep green without adding extra liquid to the filling, which could make it too thin to pipe properly.
Easy Christmas Tree Deviled Eggs
Ingredients
Equipment
Method
- Prepare the eggs: Place a steamer basket in a large pot and add about an inch of water. Bring to a rolling boil.
- Carefully place cold eggs into the steamer basket. Cover the pot, reduce heat to medium-high, and steam for 13 minutes.
- While eggs steam, prepare an ice bath by filling a large bowl with ice and cold water.
- Once cooked, immediately transfer the eggs to the ice bath and let them chill for at least 15 minutes to stop the cooking and make peeling easier.
- Peel the cooled eggs. Slice each egg in half lengthwise.
- Gently remove the yolks and place them in a medium mixing bowl. Arrange the empty egg white halves on a serving platter. Trim a tiny slice from the bottom of each white to create a stable base.
- Create the filling: Mash the egg yolks with a fork until they are a fine powder. For an extra smooth texture, press the yolks through a fine-mesh sieve.
- Add mayonnaise, Dijon mustard, sweet pickle relish, salt, and pepper to the mashed yolks. Stir until completely smooth and creamy. Taste and adjust seasoning if needed.
- Tint the filling: Add a small drop of green gel food coloring to the yolk mixture. Stir until evenly colored, adding more tiny drops until you achieve a desired Christmas-tree green.
- Pipe the trees: Transfer the green filling to a piping bag fitted with a star tip. Hold the bag vertically over an egg white half and pipe a swirl, starting wide at the base and getting smaller as you move up to form a cone shape.
- Repeat the piping process for all 24 egg white halves.
- Decorate the trees: Carefully cut tiny star shapes from the piece of bell pepper and place one on top of each piped tree.
- Carefully place sprinkles or nonpareils onto the sides of the filling to look like ornaments.
- Finish with a light dusting of paprika over the entire platter and garnish with chopped fresh parsley, if desired. Serve chilled.
Notes
No Piping Bag: If you don’t have a piping bag, you can use a sturdy zip-top bag with the corner snipped off, or simply use two small spoons to mound the filling into a tree shape.
Flavor Variations: Add a dash of hot sauce for a kick, smoked paprika for depth, or finely crumbled bacon for a savory crunch. For natural coloring, a small amount of spinach juice or spirulina powder can be used.
Transporting: To prevent sliding, use a dedicated deviled egg carrier. Alternatively, line a container with paper towels and nestle the eggs in snugly, or place a tiny dollop of leftover filling on the bottom of each egg to ‘glue’ it to the platter.
