Warm, buttery rolls give way with the gentlest tug, revealing a molten core of savory chicken, sharp cheddar, and smoky bacon, all held together by the creamy tang of ranch. This isn’t just a sandwich; it’s an interactive, shareable experience that has rightfully taken over game days, potlucks, and weeknight dinners everywhere. It’s the kind of food that makes everyone lean in a little closer, reaching for that next perfect, cheese-stretched bite before they’re all gone.
Get ready to create the most talked-about dish at your next gathering, a tray of golden-topped sliders that are impossibly easy to make yet deliver an explosion of comforting, crave-worthy flavors. We’re talking about a simple assembly that transforms into a gooey, glorious, pull-apart masterpiece, brushed with a garlic-herb butter that crisps the tops to perfection. This is the ultimate crowd-pleaser, guaranteed to disappear in minutes.
Reasons to Make This
- Effortlessly Impressive: These sliders look like you spent hours in the kitchen, but they come together in under 30 minutes, making you look like a culinary hero with minimal effort.
- The Ultimate Flavor Trio: Chicken, bacon, and ranch are a legendary combination for a reason. This recipe balances the smoky, savory, and tangy notes perfectly in every single bite.
- Perfectly Shareable: Designed for pulling apart, this is the ideal dish for parties, game nights, or any casual get-together where guests can serve themselves. No fussy plating required!
Grocery List
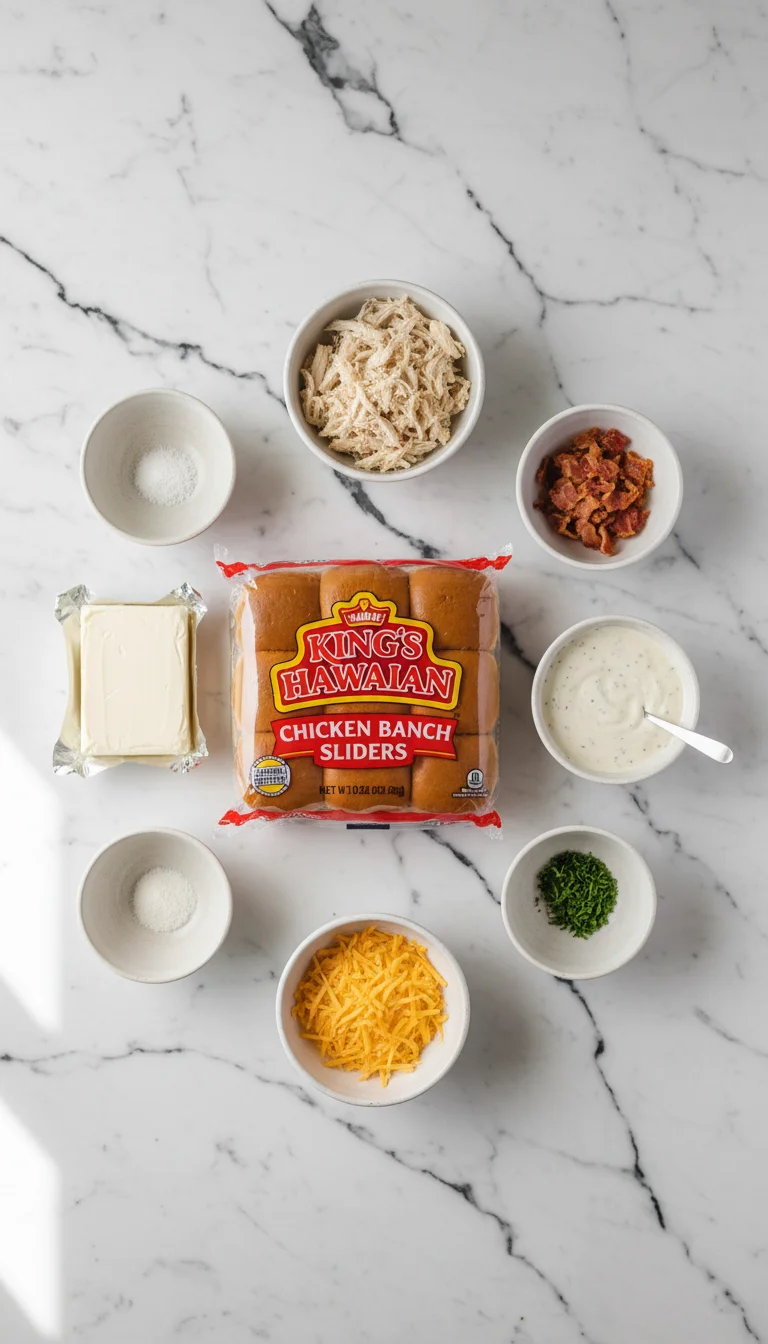
The beauty of this recipe lies in its simplicity. We’re using straightforward, easy-to-find ingredients to create something truly spectacular. Here’s exactly what you’ll need to grab.
- Hawaiian Sweet Rolls: (The non-negotiable star. Their slight sweetness and pillowy softness are the perfect contrast to the savory filling.)
- Shredded Cooked Chicken: (A rotisserie chicken is your best friend here! It’s a massive time-saver and comes perfectly seasoned and moist.)
- Cooked Bacon: (Crumbled into delicious, smoky bits that add texture and a salty punch.)
- Shredded Cheddar Cheese: (For that glorious, gooey cheese pull. Grating your own from a block will give you the best melt.)
- Ranch Dressing: (Use a good quality, creamy ranch dressing as the binder and primary flavor driver.)
- Cream Cheese: (Softened to room temperature, this adds an extra layer of creaminess and richness that takes the filling over the top.)
- Unsalted Butter: (Melted for the essential buttery topping that makes the rolls golden and delicious.)
- Garlic Powder: (Infuses the butter topping with a gentle, aromatic garlic flavor.)
- Dried Parsley: (For a pop of color and a hint of herby freshness in the butter topping.)
- Green Onions: (Optional, but thinly sliced green onions add a mild, fresh bite to the filling.)
Pantry Alternatives
Don’t have everything on hand? No problem at all! This recipe is wonderfully flexible.
- Rolls: While Hawaiian rolls are classic, any pack of soft dinner rolls or slider buns that are connected will work. Brioche sliders are also a fantastic, buttery alternative.
- Chicken: No rotisserie chicken? You can easily use any leftover cooked chicken, or quickly poach or bake a couple of chicken breasts and shred them yourself.
- Cheese: Feel free to mix it up! A Colby Jack blend, Monterey Jack, or even Provolone would be delicious. For a little kick, try Pepper Jack.
- Ranch: If you’re out of bottled ranch, a packet of dry ranch seasoning mixed with a little mayonnaise and milk (or sour cream) works in a pinch. The flavor base is very similar to what you find in our popular Cheesy Crack Chicken Dip Bacon Ranch.
Fun Variations to Try
Once you master the basic recipe, it becomes a fantastic canvas for your own creativity. Think of it as a starting point for all sorts of delicious slider adventures.
One of the best things about sliders is how adaptable they are. If you enjoy this chicken version, you should definitely explore other classics like these incredible Hot Ham And Cheese Sliders or even some hearty Pull Apart Cheeseburger Sliders for your next get-together.
For a spicy kick, finely dice a jalapeño (seeds removed for less heat) and mix it directly into the chicken filling. The little bursts of heat are a wonderful contrast to the creamy ranch and rich cheese.
Change up the flavor profile entirely by swapping the ranch dressing for barbecue sauce. This simple switch transforms them into a completely different, but equally delicious, meal. It’s a quick way to make something similar to these fan-favorite Bbq Chicken Sliders.
For a tangy, fiery twist, substitute the ranch with buffalo sauce and a little blue cheese dressing. This gives you the amazing flavor of Buffalo Chicken Sliders with the same easy, pull-apart method. This style of dish is always a hit, much like this incredible Cheesy Pull Apart Pizza Bread.
Let’s Get Cooking
Alright, let’s turn that simple grocery list into a tray of irresistible, golden-brown perfection. Follow these steps, and you can’t go wrong.
Step 1: Preheat and Prepare the Pan
First things first, get your oven preheating to 350°F (175°C). This ensures it’s nice and hot when your sliders are ready to bake, which is key for getting that perfect golden top.
Lightly grease a 9×13 inch baking dish with butter or non-stick spray. This small step prevents the bottoms of the rolls from sticking and helps them get a little bit crispy.
Step 2: Prepare the Rolls
Take your pack of Hawaiian rolls and, without separating them, use a long serrated bread knife to slice the entire slab in half horizontally. You should have a single top “sheet” of rolls and a single bottom “sheet.”
Carefully place the entire bottom slab of rolls into your prepared baking dish. Set the top slab aside for just a moment.
Step 3: Mix the Chicken Filling
In a medium-sized mixing bowl, combine your shredded chicken, crumbled bacon, softened cream cheese, ranch dressing, and about half of your shredded cheddar cheese. If you’re using them, stir in the sliced green onions now.
Mix everything together until it’s well-combined and creamy. Try not to overmix, as you want to keep some of the texture from the shredded chicken.
Step 4: Assemble the Sliders
Spoon the chicken mixture evenly over the bottom slab of rolls in the baking dish. Use a spatula to spread it all the way to the edges, ensuring every slider gets a generous amount of filling.
Sprinkle the remaining shredded cheddar cheese over the top of the chicken mixture. This extra layer of cheese is what creates that incredible, gooey cheese pull when you pull them apart.
Now, carefully place the top slab of rolls back on, lining it up with the bottom. Your giant sandwich is now assembled and ready for its glorious butter bath.
Step 5: Prepare the Garlic Butter Topping
In a small, microwave-safe bowl, melt your unsalted butter. Once melted, stir in the garlic powder and dried parsley. Mix it well to distribute the seasonings throughout the butter.
This simple topping is what takes the sliders from great to absolutely unforgettable. It seeps into the rolls and creates a savory, crispy, golden-brown crust that is simply divine.
Step 6: Brush and Bake
Using a pastry brush, generously brush the garlic butter mixture all over the tops and sides of the rolls. Don’t be shy here! Make sure every nook and cranny is coated in that delicious butter.
Cover the baking dish loosely with aluminum foil. This is a crucial step that allows the sliders to heat through and the cheese to melt completely without the tops burning.
Bake in your preheated oven for 15-20 minutes.
Step 7: The Final Golden Touch
After 15-20 minutes, carefully remove the foil from the baking dish. Place the sliders back into the oven, uncovered, and bake for another 3-5 minutes.
This final, uncovered bake is just to toast the tops of the rolls until they are beautifully golden brown and slightly crisp. Keep a close eye on them during this step, as they can go from golden to burnt very quickly!
Step 8: Rest and Serve
Once they’re perfectly golden, remove the sliders from the oven. Let them rest in the pan for just a couple of minutes. This helps the filling set up slightly, making them a little less messy to pull apart.
Serve them immediately, right from the baking dish, and watch as everyone eagerly pulls their own perfect, cheesy slider from the pack.
Expert Tips for Success
- Grate Your Own Cheese: Pre-shredded cheese is coated in anti-caking agents that prevent it from melting as smoothly. For the ultimate gooey cheese pull, always buy a block of cheddar and grate it yourself.
- Don’t Skip the Foil: Covering the sliders with foil for the initial bake is essential. It traps steam, which helps melt the cheese and warm the filling evenly without burning the delicate sweet rolls.
- Room Temperature Cream Cheese: Make sure your cream cheese is fully softened before mixing the filling. Cold cream cheese will leave you with lumps instead of a smooth, creamy base.
- Use a Serrated Knife: A long, sharp serrated bread knife is the best tool for slicing the slab of rolls in half cleanly without squishing them.
Complete the Meal
While these Pull-Apart Chicken Bacon Ranch Sliders are certainly hearty enough to be a meal on their own, they also play very well with others. Turning them into a full spread for a party or a balanced weeknight dinner is incredibly easy.
For a classic, casual pairing, you can’t go wrong with a side of crunchy potato chips or a bowl of crisp, cool coleslaw. The contrast in textures is absolutely perfect.
If you’re serving them for dinner, a simple side salad with a light vinaigrette is a great way to add some freshness and cut through the richness of the sliders. A Caesar salad would also be a fantastic choice.
For a game day spread, serve them alongside other easy appetizers. Think celery and carrot sticks with extra ranch for dipping, a bowl of pickles, or some loaded potato skins.
On a cooler evening, a cup of simple tomato soup makes for an incredibly comforting and satisfying meal. Dipping the buttery, cheesy sliders into the warm soup is a next-level experience.
Know someone who loves Pull-Apart Chicken Bacon Ranch Sliders? Share this recipe with them
What can I use if I don’t have Hawaiian rolls?
While Hawaiian rolls are recommended, the recipe is flexible. You can use any pack of soft, connected dinner rolls or slider buns. Buttery brioche sliders are also mentioned as a fantastic alternative.
How do I keep the tops of the sliders from burning while the inside gets hot?
The key is to cover the baking dish loosely with aluminum foil for the initial 15-20 minutes of baking. This traps steam, which heats the filling and melts the cheese evenly without browning the tops too quickly. The foil is then removed for the last 3-5 minutes to toast the rolls to a perfect golden brown.
Are there any suggestions for making these sliders spicy?
Yes, for a spicy kick, you can finely dice a jalapeño and mix it into the chicken filling. For a different flavor profile, you can also substitute the ranch dressing with buffalo sauce and a little blue cheese dressing to create a fiery, tangy twist.


Viral Pull-Apart Chicken Bacon Ranch Sliders
Ingredients
Equipment
Method
- Preheat your oven to 350°F (175°C). Lightly grease a 9×13 inch baking dish.
- Without separating the rolls, use a long serrated knife to slice the entire slab in half horizontally, creating a top and bottom sheet. Place the bottom sheet in the prepared dish.
- In a medium mixing bowl, combine the shredded chicken, crumbled bacon, softened cream cheese, ranch dressing, and 1 cup of the shredded cheddar cheese. Stir in the sliced green onions if using. Mix until well-combined.
- Spoon the chicken mixture evenly over the bottom slab of rolls, spreading it to the edges.
- Sprinkle the remaining 1 cup of shredded cheddar cheese over the chicken mixture.
- Carefully place the top slab of rolls back on, lining it up with the bottom.
- In a small bowl, whisk together the melted butter, garlic powder, and dried parsley.
- Using a pastry brush, generously brush the garlic butter mixture all over the tops and sides of the rolls, ensuring full coverage.
- Cover the baking dish loosely with aluminum foil. Bake for 15-20 minutes, until the sliders are heated through and the cheese is fully melted.
- Carefully remove the aluminum foil. Return the dish to the oven and bake uncovered for another 3-5 minutes, or until the tops are golden brown and slightly crisp.
- Remove from the oven and let the sliders rest for 2-3 minutes before serving. Serve warm directly from the dish.
