Some dishes are a quiet hum in the kitchen, a gentle background note to your day, but corned beef hash is a declaration. It announces itself with a confident sizzle the moment it hits the hot pan, a percussive rhythm that promises something deeply satisfying is on its way. This isn’t just a recipe for using up leftovers; it’s a reason to make corned beef in the first place, a culinary encore that often outshines the main performance with its rugged charm and irresistible texture.
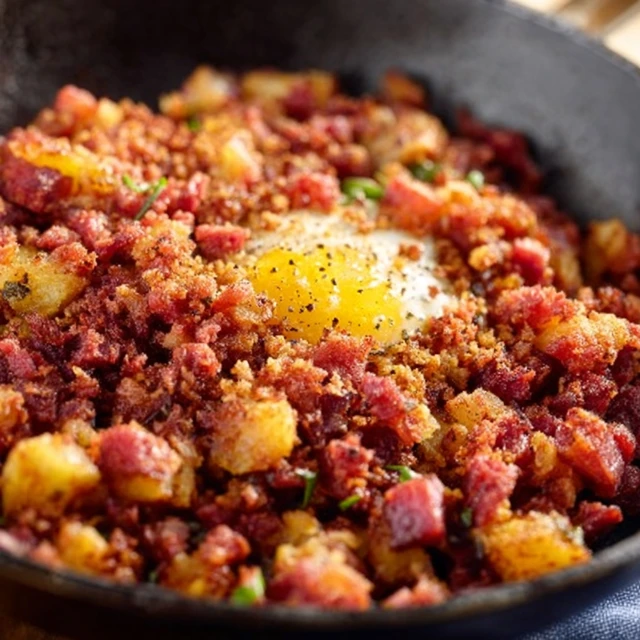
What we’re creating here is the pinnacle of hash: a sprawling, golden-brown cake with a crust so crispy it shatters under your fork, giving way to a tender, fluffy interior of salty corned beef, soft potatoes, and sweet, caramelized onions. Every bite is a perfect contrast of textures and savory, comforting flavors. This is the kind of breakfast that turns a regular weekend morning into a bona fide event, a dish that makes you want to gather everyone around the table and celebrate the simple joy of a truly great meal.
The Crispy Corned Beef Hash Difference
- The Two-Texture Technique: We don’t just toss and stir. This method involves an initial sauté to build flavor, followed by a “press and crisp” stage where the hash is left undisturbed to form a magnificent, uninterrupted golden crust.
- Cold Ingredients are Key: Using chilled, cooked corned beef and potatoes is non-negotiable. This prevents them from turning into a mushy paste and ensures each dice holds its shape, contributing to the final perfect texture.
- Maximum Flavor, Minimum Grease: By using a combination of butter and oil and rendering any fat from the corned beef, we achieve a deeply browned, savory crust that’s incredibly crisp, not greasy or heavy.
The Building Blocks

The magic of this dish lies in its simplicity, but using the right components makes all the difference between a good hash and a truly unforgettable one. Think of this as assembling an all-star team where every player has a crucial role.
- 2 lbs cooked corned beef: (Why: This is the heart of the dish. It needs to be cold from the refrigerator to dice cleanly. Leftovers from a Crispy Oven Roasted Corned Beef And Cabbage are absolutely perfect here.)
- 1.5 lbs cooked potatoes: (Why: Russets or Yukon Golds, also chilled. Their starchy texture is essential for binding the hash together and achieving a fluffy interior.)
- 1 large yellow onion: (Why: Finely diced, it provides a sweet, aromatic foundation that balances the saltiness of the beef.)
- 2 tablespoons unsalted butter: (Why: For rich flavor and browning.)
- 1 tablespoon olive oil: (Why: When combined with butter, it raises the smoke point, preventing the butter from burning while the crust forms.)
- 1 tablespoon Worcestershire sauce: (Why: This is the secret weapon. It adds a deep, savory umami kick that elevates the entire dish.)
- 1/4 cup fresh parsley: (Why: Finely chopped, it adds a burst of fresh, herbaceous brightness to cut through the richness.)
- Kosher salt and freshly ground black pepper: (Why: To taste. Remember the corned beef is already salty, so season gradually.)
- 4 to 8 large eggs: (Why: Optional, for serving. A runny yolk acts as a luxurious, built-in sauce.)
Swaps & Alternatives
Don’t have everything on hand? No problem. A great hash is adaptable.
- For the Potatoes: Cooked and chilled sweet potatoes will give the hash a lovely sweet and savory profile. Diced, cooked parsnips or carrots can also be added for complexity.
- For the Onion: Two large shallots will provide a milder, slightly more delicate flavor. The white and light green parts of a leek would also be delicious.
- For the Meat: While it won’t be “corned beef” hash, you can absolutely make a fantastic version with leftover pot roast, brisket, or even pastrami for a smoky, deli-style twist.
- For the Fat: If you have bacon fat saved, use it instead of the butter and oil. It will add an incredible layer of smoky flavor that pairs beautifully with the beef.
Gourmet Variations
Once you’ve mastered the basic technique, you can start playing with flavors to make this dish your own. These little additions can take your hash from brunch classic to gourmet centerpiece.
A fantastic and colorful addition is finely diced bell pepper. Add about a half cup of red or green bell pepper to the pan along with the onions. They’ll soften and add a subtle sweetness that complements the savory beef.
For those who enjoy a bit of heat, a finely minced jalapeño or a generous pinch of red pepper flakes, added with the aromatics, will give the hash a gentle, warming kick that wakes up the palate.
Introduce some herbs for a more complex flavor profile. A teaspoon of fresh thyme leaves or finely chopped rosemary added with the onions will infuse the entire dish with a wonderful, earthy aroma.
And for the ultimate indulgence, transform it into a cheesy hash. In the last two minutes of cooking, sprinkle a cup of shredded sharp cheddar, Gruyère, or Monterey Jack cheese over the top and let it melt into a gooey, irresistible blanket.
How to Make Crispy Corned Beef Hash

The journey to the perfect crust is a lesson in patience. The total time will be about 30-35 minutes, but most of that is hands-off crisping time. Trust the process, and resist the urge to peek too early!
1. Prepare Your Ingredients
First, focus on your main components. Take your cold cooked corned beef and cold cooked potatoes and dice them into uniform, 1/4- to 1/2-inch cubes. Uniformity is key for even cooking and a hash that holds together. Finely dice your yellow onion and chop your parsley. Having everything prepped and ready to go makes the cooking process smooth and seamless.2. Sauté the Aromatics
Place a large, 12-inch non-stick or well-seasoned cast-iron skillet over medium heat. Add the butter and olive oil. Once the butter is melted and foaming, add the diced onion. Sauté, stirring occasionally, for about 5-7 minutes, until the onion is soft, translucent, and just beginning to turn golden. This step builds the foundational layer of flavor for the entire dish.3. Combine the Hash
Add the diced corned beef and potatoes to the skillet with the softened onions. Gently stir everything together to combine. Drizzle the Worcestershire sauce over the mixture, then sprinkle in the chopped fresh parsley, a pinch of salt, and a generous amount of freshly ground black pepper. Stir until every piece is evenly coated and the ingredients are well-distributed.4. The Critical Crisp-Up
This is the most important step. Using a sturdy spatula, press the hash mixture down firmly and evenly across the entire surface of the skillet. You want to create a compact “cake.” Now, reduce the heat to medium-low and letWhat is the secret to making the corned beef hash extra crispy?
The key is a two-part technique. First, sauté the ingredients to build flavor. Then, press the mixture firmly into the pan to form a compact ‘cake’ and let it cook undisturbed on medium-low heat. This ‘press and crisp’ method creates a single, uninterrupted golden crust without the hash becoming greasy.
Why do the corned beef and potatoes need to be cold before cooking?
Using chilled, cooked corned beef and potatoes is essential to prevent them from turning into a mushy paste in the pan. Cold ingredients hold their diced shape, which is crucial for achieving the perfect final texture of a tender interior with distinct pieces of meat and potato.
Can I make this recipe with other types of meat besides corned beef?
Yes, the recipe is very adaptable. While it won’t technically be ‘corned beef’ hash, you can make a fantastic version using leftovers like pot roast, brisket, or even pastrami for a smoky, deli-style flavor.
What are some ways to add extra flavor to this hash?
You can easily customize the hash for more flavor. For sweetness, add diced bell peppers with the onions. For a bit of heat, mix in a minced jalapeño or red pepper flakes. For an earthy aroma, add fresh thyme or rosemary. You can also melt shredded cheese like cheddar or Gruyère over the top during the last few minutes of cooking.

Crispy Corned Beef Hash
Ingredients
Equipment
Method
- Prepare your ingredients: Ensure your cooked corned beef and potatoes are cold, then dice them into uniform 1/4- to 1/2-inch cubes. Finely dice the yellow onion and chop the parsley.
- Sauté the aromatics: Place a large 12-inch non-stick or well-seasoned cast-iron skillet over medium heat. Add the butter and olive oil. Once the butter is melted and foaming, add the diced onion and sauté for 5-7 minutes, until soft and translucent.
- Combine the hash: Add the diced corned beef and potatoes to the skillet. Drizzle with Worcestershire sauce, then sprinkle with the chopped parsley, a pinch of salt, and a generous amount of black pepper. Gently stir until all ingredients are well-distributed.
- The critical crisp-up: Using a sturdy spatula, press the hash mixture down firmly into an even, compact layer. Reduce the heat to medium-low. Cook undisturbed for 15-20 minutes, until a deep, golden-brown crust forms on the bottom. Resist the urge to stir.
- Prepare the eggs: While the hash is crisping, cook 4 to 8 eggs to your preference. Fried sunny-side up or poached eggs with runny yolks are ideal.
- Serve: To serve, you can either carefully flip the entire hash onto a large plate or cut it into wedges and serve directly from the skillet. Top each portion with one or two cooked eggs and garnish with a little extra fresh parsley. Serve immediately.
Notes
– Meat: Leftover pot roast, brisket, or pastrami can be used for a different flavor profile.
– Potatoes: Cooked sweet potatoes, parsnips, or carrots can be substituted for a sweeter hash.
– Aromatics: Add 1/2 cup of diced bell pepper or a minced jalapeño along with the onions for extra flavor or heat. A teaspoon of fresh thyme or rosemary also adds a wonderful earthy aroma.
– Indulgence: Sprinkle 1 cup of shredded sharp cheddar or Gruyère cheese over the top during the last 2 minutes of cooking and let it melt.
