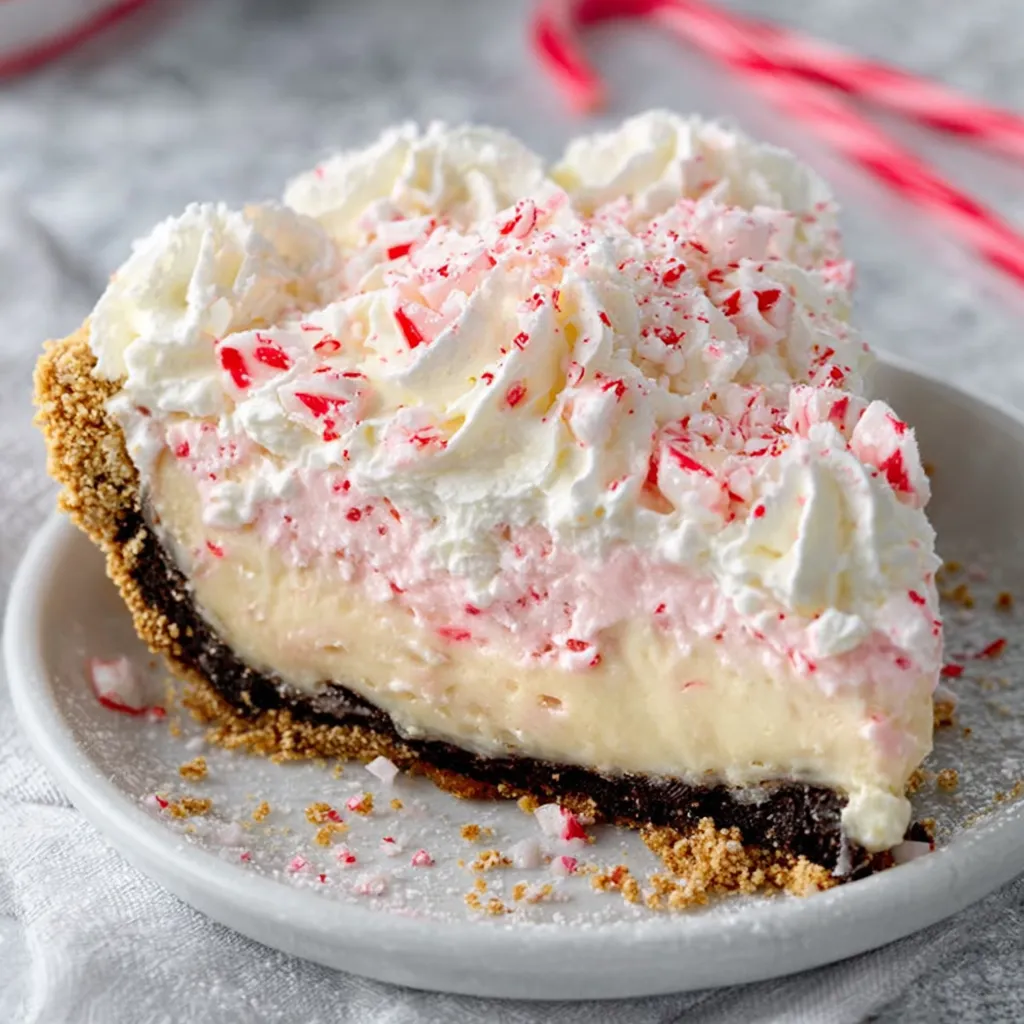
Ingredients
Crust
- 1 ½ cups chocolate cookie crumbs (about 24 chocolate wafer cookies)
- 5 tablespoons unsalted butter, melted
Filling
- 8 ounces cream cheese, softened
- 1 (14 ounce) can sweetened condensed milk
- 1 teaspoon peppermint extract
- 1 cup heavy cream
- ½ cup crushed peppermint candies, divided
- Optional: Red food coloring (for a pink hue)
Topping
- Chocolate shavings or curls
- Additional crushed peppermint candies
Let’s Talk Peppermint Perfection: Why This Pie Rocks
 Okay, friend, let’s be honest: during the holidays, we’re all stretched thin! Between shopping, decorating, and attending every festive gathering, who has time for complicated baking projects? That’s where this Christmas Peppermint Pie swoops in to save the day. It’s truly a no-bake wonder, meaning you can whip it up with minimal fuss and maximum flavor!
What I especially love about this pie is how adaptable it is. Not a huge fan of chocolate? Use a graham cracker crust! Want a more intense peppermint flavor? Add a little extra extract! The possibilities are endless, and that’s what makes cooking so much fun. I’m all about making recipes my own, and I encourage you to do the same!
Okay, friend, let’s be honest: during the holidays, we’re all stretched thin! Between shopping, decorating, and attending every festive gathering, who has time for complicated baking projects? That’s where this Christmas Peppermint Pie swoops in to save the day. It’s truly a no-bake wonder, meaning you can whip it up with minimal fuss and maximum flavor!
What I especially love about this pie is how adaptable it is. Not a huge fan of chocolate? Use a graham cracker crust! Want a more intense peppermint flavor? Add a little extra extract! The possibilities are endless, and that’s what makes cooking so much fun. I’m all about making recipes my own, and I encourage you to do the same!
Essential Tools of the Trade
Before we dive into the step-by-step instructions, let’s gather our tools. You’ll need:- A 9-inch pie plate
- A food processor (or a zip-top bag and rolling pin) for crushing the cookies
- A mixing bowl
- An electric mixer (handheld or stand)
- Measuring cups and spoons
- A rubber spatula
Step-by-Step Instructions: Pie-Making Magic
-
Prepare the Crust
Place the chocolate wafer cookies in a food processor and pulse until finely ground. Alternatively, place the cookies in a zip-top bag and crush them with a rolling pin.
In a medium bowl, combine the cookie crumbs and melted butter. Press the mixture evenly into the bottom and up the sides of the pie plate to form the crust. Place the crust in the refrigerator to chill while you prepare the filling.
-
Make the Filling
In a large mixing bowl, beat the softened cream cheese with an electric mixer until smooth and creamy. Gradually add the sweetened condensed milk and peppermint extract, mixing until well combined.
In a separate bowl, whip the heavy cream with an electric mixer until stiff peaks form. Gently fold the whipped cream into the cream cheese mixture.
If desired, add a few drops of red food coloring to tint the filling a festive pink. Gently fold in half of the crushed peppermint candies.
-
Assemble the Pie
Pour the filling into the prepared chocolate crust, spreading it evenly.
Sprinkle the remaining crushed peppermint candies over the top of the pie. Add chocolate shavings for an extra touch of elegance.
-
Chill and Serve
Cover the pie with plastic wrap and refrigerate for at least 4 hours, or preferably overnight, to allow the filling to set completely.
Before serving, garnish with additional chocolate shavings and crushed peppermint candies, if desired. Slice and enjoy!
Troubleshooting Tips & Tricks (Because We All Make Mistakes!)
- Crust Crumbling? If your crust is too dry and crumbly, add a little more melted butter, a tablespoon at a time, until it holds together when pressed.
- Filling Too Runny? Make sure your cream cheese is fully softened before mixing. Chilling the pie for a longer period will also help the filling set properly. If, after several hours of chilling, the pie is still too runny, you may have over-whipped the heavy cream. Next time, stop whipping as soon as stiff peaks form.
- Peppermint Flavor Too Strong? Start with a smaller amount of peppermint extract and taste as you go, adding more only if needed. Remember, a little goes a long way!
Variations to Make It Your Own
- Chocolate Lover’s Dream: Add a layer of melted chocolate ganache (melted chocolate and heavy cream) on top of the filling before chilling.
- Nutty Delight: Sprinkle chopped pecans or walnuts on top of the pie for added texture and flavor.
- Mini Pies: Make individual Christmas Peppermint Pies by using mini graham cracker crusts. Perfect for portion control!
- Crust Alternatives: As mentioned before, graham cracker crust is a wonderful substitute for chocolate. You can also experiment with Oreo crust, or even a homemade shortbread crust.
Making it Ahead and Storing Leftovers
This Christmas Peppermint Pie is a fantastic make-ahead dessert! You can assemble it up to 2 days in advance and store it in the refrigerator, tightly covered. In fact, I actually recommend making it at least a day ahead of time to allow the flavors to meld together beautifully. Leftovers can be stored in the refrigerator, covered, for up to 3 days. The pie may soften slightly over time, but it will still taste delicious!Complement Your Christmas Feast
This Christmas Peppermint Pie is a showstopper on its own, but it pairs beautifully with other holiday treats! If you are looking for a sweet and salty combination, consider serving this pie with Christmas Crack. Or perhaps you want to add some more textures with your desserts, if so, why not create some Christmas Tree Cake Truffles or even some Snowman Truffles? For a lighter, fresher element to balance the richness, the Christmas Salad is a fantastic choice. And, of course, no holiday gathering is complete without a batch of Christmas Puppy Chow.Final Thoughts: Spreading Holiday Cheer, One Pie at a Time
There you have it – a ridiculously easy and incredibly delicious Christmas Peppermint Pie recipe that’s guaranteed to become a holiday favorite. Remember, cooking is all about having fun and experimenting, so don’t be afraid to put your own spin on this recipe. And most importantly, enjoy the process of creating something special to share with your loved ones. Happy baking (or rather, no-baking!), and may your holidays be filled with joy, laughter, and plenty of peppermint!Can I make this Christmas Peppermint Pie ahead of time?
Yes, this pie is a fantastic make-ahead dessert! You can assemble it up to 2 days in advance and store it in the refrigerator, tightly covered. It is recommended to make it at least a day ahead of time to allow the flavors to meld together.
What can I do if my pie filling is too runny?
Make sure your cream cheese is fully softened before mixing. Chilling the pie for a longer period will also help the filling set properly. If it is still too runny, you may have over-whipped the heavy cream.
What are some variations I can try with this Christmas Peppermint Pie recipe?
You can add a layer of melted chocolate ganache, sprinkle chopped pecans or walnuts on top, make mini pies using mini graham cracker crusts, or use a graham cracker, Oreo, or shortbread crust instead of chocolate.
What can I do if the crust is too crumbly?
If your crust is too dry and crumbly, add a little more melted butter, a tablespoon at a time, until it holds together when pressed.
Quick Christmas Peppermint Pie
Ingredients
Equipment
Method
- Prepare the Crust: Place the chocolate wafer cookies in a food processor and pulse until finely ground. Alternatively, place the cookies in a zip-top bag and crush them with a rolling pin.
- In a medium bowl, combine the cookie crumbs and melted butter. Press the mixture evenly into the bottom and up the sides of the pie plate to form the crust. Place the crust in the refrigerator to chill while you prepare the filling.
- Make the Filling: In a large mixing bowl, beat the softened cream cheese with an electric mixer until smooth and creamy. Gradually add the sweetened condensed milk and peppermint extract, mixing until well combined.
- In a separate bowl, whip the heavy cream with an electric mixer until stiff peaks form. Gently fold the whipped cream into the cream cheese mixture.
- If desired, add a few drops of red food coloring to tint the filling a festive pink. Gently fold in half of the crushed peppermint candies.
- Assemble the Pie: Pour the filling into the prepared chocolate crust, spreading it evenly.
- Sprinkle the remaining crushed peppermint candies over the top of the pie. Add chocolate shavings for an extra touch of elegance.
- Chill and Serve: Cover the pie with plastic wrap and refrigerate for at least 4 hours, or preferably overnight, to allow the filling to set completely.
- Before serving, garnish with additional chocolate shavings and crushed peppermint candies, if desired. Slice and enjoy!