The Secret Snowfall: Unveiling the Science of Truffle Perfection
The key to crafting impeccable Snowman Truffles lies in understanding the science of chocolate, fat, and temperature. Oreo Truffles, at their core, are a simple mixture of crushed cookies and cream cheese. The fat content in both ingredients plays a crucial role. The cream cheese provides moisture and binding power, while the Oreo filling adds extra fat and sweetness. Too much moisture and your truffles will be sticky and difficult to coat. Too little, and they’ll be dry and crumbly. Chocolate, particularly white chocolate used for the snowman’s exterior, is a polymorphic substance, meaning it can crystallize in different forms. The goal is to achieve a stable beta crystal form, which gives chocolate its snap, shine, and smooth texture. This is achieved through tempering, a process of carefully heating and cooling the chocolate. Untempered chocolate will result in a dull, streaky, and soft coating. Think of it like this: tempered chocolate is a well-organized army of molecules standing at attention, while untempered chocolate is a chaotic crowd. Finally, temperature is paramount. The warmer your truffle filling, the more likely the chocolate coating will melt and slide off. This is especially true when dealing with Cute Desserts made by little hands during Kids Baking sessions.From Our Kitchen to Yours: The Ultimate Snowman Truffle Recipe
 Here’s a recipe designed to take the guesswork out of creating these delightful Holiday Party Food staples:
Ingredients:
- 1 package (14.3 oz) Oreo cookies
- 8 ounces cream cheese, softened
- 12 ounces white chocolate, finely chopped
- Orange sprinkles or candies for noses
- Mini chocolate chips or melted dark chocolate for eyes and buttons
- Pretzel sticks, broken in half, for arms
- Optional: Shredded coconut for decoration
Equipment:
- Food processor (optional, but recommended)
- Mixing bowl
- Baking sheet lined with parchment paper
- Double boiler or microwave-safe bowl
- Fork or dipping tools
Instructions:
- Prepare the Truffle Filling: In a food processor, pulse the Oreo cookies until they are finely crushed. Alternatively, place the cookies in a large zip-top bag and crush them with a rolling pin.
- Combine Ingredients: In a mixing bowl, combine the crushed Oreos and softened cream cheese. Mix well until a smooth dough forms.
- Chill the Dough: Cover the bowl with plastic wrap and refrigerate for at least 30 minutes. This firms up the dough and makes it easier to roll.
- Shape the Snowmen: Remove the dough from the refrigerator. Roll the dough into balls, about 1 inch in diameter. Place the balls on the prepared baking sheet. For each snowman, you’ll need three balls of slightly different sizes (large, medium, and small). Gently press the balls together to form a snowman shape.
- Chill the Snowmen: Return the baking sheet to the refrigerator for another 30 minutes to firm up the snowmen completely. This is a crucial step!
- Melt the White Chocolate: Melt the white chocolate using a double boiler or in the microwave. If microwaving, heat in 30-second intervals, stirring in between, until smooth. Be careful not to overheat.
- Temper (Optional, but Recommended): To temper the chocolate, melt approximately 2/3 of the chocolate completely. Remove from heat and add the remaining 1/3 of chopped chocolate. Stir until all the chocolate is melted and the mixture is smooth. This seeding method helps to create stable crystals.
- Coat the Snowmen: Dip each snowman into the melted white chocolate, ensuring it is fully coated. Use a fork or dipping tool to lift the snowman out of the chocolate and tap off any excess. Place the coated snowman back on the parchment-lined baking sheet.
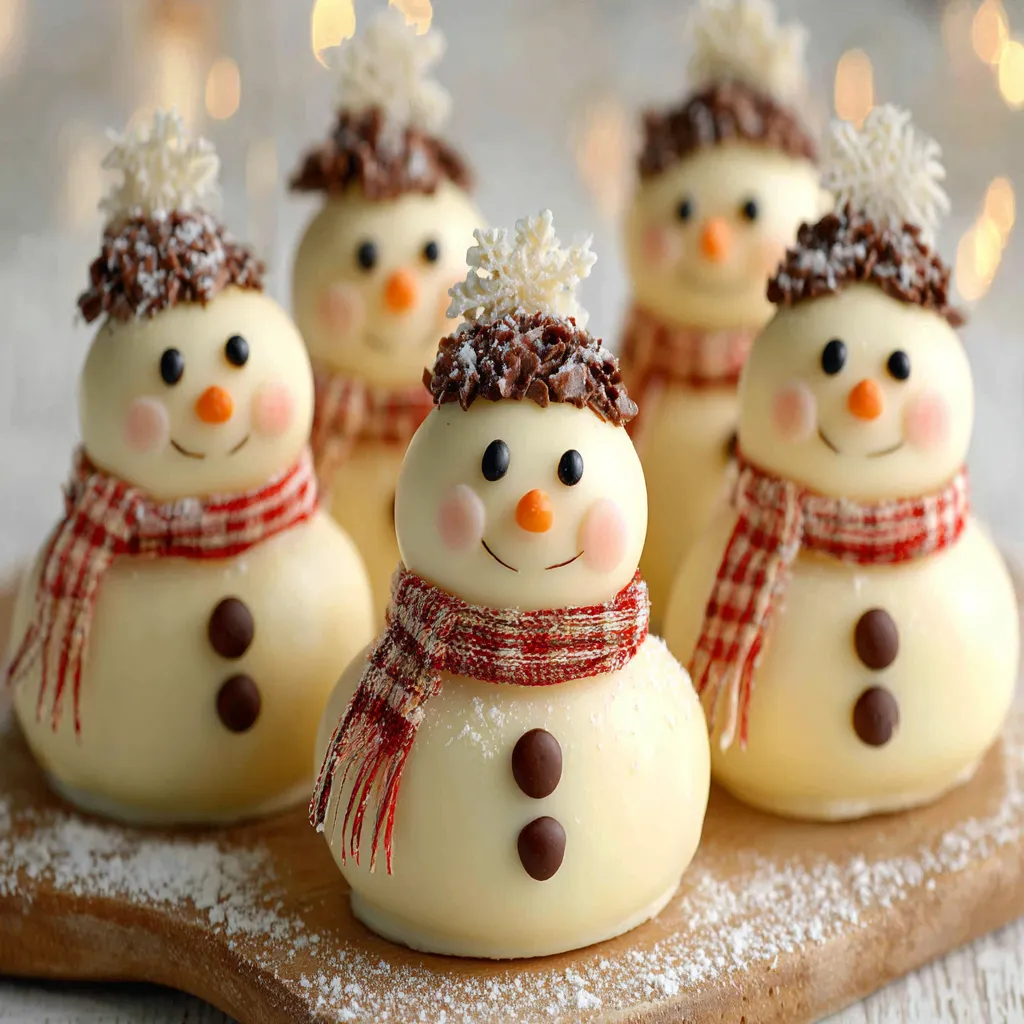
- Decorate Immediately: While the chocolate is still wet, add the orange sprinkles/candies for the nose, mini chocolate chips for the eyes and buttons, and pretzel stick halves for the arms. If using shredded coconut, sprinkle it over the base of the snowman.
- Set the Chocolate: Return the baking sheet to the refrigerator for 15-20 minutes, or until the chocolate is set.
- Serve and Enjoy: Once the chocolate has set, the Snowman Truffles are ready to serve and enjoy! Store in an airtight container in the refrigerator.
My Snowman Saga: A Culinary Investigation
The Initial Avalanche: My First Few Attempts
My first few attempts were a disaster. I envisioned pristine white snowmen gracing my holiday table, but instead, I ended up with melty, lopsided blobs that looked more like they had survived an avalanche than a snowstorm. Like many of you, I initially thought that simply melting white chocolate and dipping the truffles would suffice. Wrong! The chocolate was dull, streaky, and melted at the slightest touch. The truffle filling was also too soft, causing the snowmen to droop and lose their shape. The arms and noses kept falling off! I even tried to create some Grinch Oreo Truffles at the same time and those almost suffered the same fate!The Cream Cheese Conundrum: Finding the Right Balance
Then, I realized the cream cheese was the culprit. I was using it straight from the fridge, which made the mixture too wet and cold. I experimented with different ratios of cream cheese to Oreo crumbs and discovered that using *softened* cream cheese and chilling the dough thoroughly before rolling was crucial. Less cream cheese also resulted in a firmer truffle that held its shape better. I even tried adding a tablespoon of powdered sugar to absorb some of the excess moisture, which helped considerably. I also noticed a lot of people use similar techniques to make Sweetened Condensed Milk Snowballs, but I wanted something with a little more structure.The Chocolate Temper Tantrum: Mastering the Melt
Next, I tackled the chocolate. I researched tempering and discovered the importance of stable beta crystals. I tried the seeding method, adding chopped chocolate to melted chocolate to create the right crystal structure. This made a world of difference! The chocolate coating was shiny, snapped beautifully, and didn’t melt as easily. I also learned that using high-quality white chocolate is essential. Cheaper brands often contain more wax and less cocoa butter, which makes them difficult to temper and results in a less stable coating. This is also a similar lesson I learned while making Candy Cane Cookies, the quality of the ingredients really does matter.The Decoration Dilemma: Keeping Everything in Place
Finally, the decorations! I struggled to keep the arms and noses attached. The key was to add them *immediately* after dipping the snowmen in chocolate, while the chocolate was still wet. This acted like glue, holding everything in place. I also found that using melted dark chocolate to pipe on the eyes and buttons was more effective than trying to stick on mini chocolate chips directly. For the arms, using broken pretzel sticks worked well and added a nice salty crunch. I even considered adding Rolo Pretzels as little hats, but decided to keep it simple.The Eureka Moment: Chilling is Key
The “Aha!” moment came when I realized that chilling the snowmen *twice* – once after shaping and again after coating – was the ultimate key to success. The first chill firmed up the dough, preventing the snowmen from collapsing. The second chill set the chocolate quickly, preventing it from melting and running. This method also helped to prevent the decorations from sliding off. I almost gave up and just made Strawberry Santa Treats instead!The Foolproof Frosty Formula: Your Step-by-Step Guide to Snowman Truffle Triumph
Here’s the definitive technique, refined through trial and error, to ensure your Snowman Truffles are a festive success:- Use Softened Cream Cheese: Ensure your cream cheese is properly softened to room temperature for a smooth, easy-to-mix truffle filling.
- Chill the Dough (First Time): After mixing the Oreo crumbs and cream cheese, chill the dough for at least 30 minutes to firm it up and make it easier to roll.
- Shape Carefully: Gently roll the dough into balls of varying sizes and carefully press them together to form the snowman shape.
- Chill the Snowmen (Second Time): This is crucial! Chill the shaped snowmen for another 30 minutes to ensure they are firm before dipping.
- Temper the Chocolate (Optional, but Recommended): Temper your white chocolate to achieve a shiny, stable coating that won’t melt easily.
- Dip and Decorate Quickly: Dip each snowman in the melted chocolate and immediately add the decorations while the chocolate is still wet.
- Final Chill: Chill the coated and decorated snowmen for 15-20 minutes to set the chocolate completely.
- Store Properly: Store the finished Snowman Truffles in an airtight container in the refrigerator to maintain their shape and prevent them from melting. You can even add some Reindeer Food Christmas Treat to the container for extra flair.
Why is tempering chocolate important for Snowman Truffles?
Tempering the white chocolate is crucial to achieve a stable beta crystal form, which gives the chocolate its snap, shine, smooth texture and prevents it from melting easily. Untempered chocolate results in a dull, streaky, and soft coating.
What is the key to preventing the Snowman Truffles from being a melty mess?
Chilling the snowmen twice is key. Chill the dough after mixing and shaping, and then again after coating them in chocolate. This firms the dough and sets the chocolate properly.
What should I do if my cream cheese is making the truffle mixture too wet?
Ensure you are using softened cream cheese instead of cold, straight-from-the-fridge cream cheese. You can also try adding a tablespoon of powdered sugar to the mixture to absorb some of the excess moisture.
How can I get the decorations to stay on the Snowman Truffles?
Add the decorations immediately after dipping the snowmen in chocolate, while the chocolate is still wet. The wet chocolate acts like glue, holding everything in place.
Snowman Truffles: Ultimate Easy Recipe
Ingredients
Equipment
Method
- Prepare the Truffle Filling: In a food processor, pulse the Oreo cookies until they are finely crushed. Alternatively, place the cookies in a large zip-top bag and crush them with a rolling pin.
- Combine Ingredients: In a mixing bowl, combine the crushed Oreos and softened cream cheese. Mix well until a smooth dough forms.
- Chill the Dough: Cover the bowl with plastic wrap and refrigerate for at least 30 minutes. This firms up the dough and makes it easier to roll.
- Shape the Snowmen: Remove the dough from the refrigerator. Roll the dough into balls, about 1 inch in diameter. Place the balls on the prepared baking sheet. For each snowman, you’ll need three balls of slightly different sizes (large, medium, and small). Gently press the balls together to form a snowman shape.
- Chill the Snowmen: Return the baking sheet to the refrigerator for another 30 minutes to firm up the snowmen completely. This is a crucial step!
- Melt the White Chocolate: Melt the white chocolate using a double boiler or in the microwave. If microwaving, heat in 30-second intervals, stirring in between, until smooth. Be careful not to overheat.
- Temper (Optional, but Recommended): To temper the chocolate, melt approximately 2/3 of the chocolate completely. Remove from heat and add the remaining 1/3 of chopped chocolate. Stir until all the chocolate is melted and the mixture is smooth. This seeding method helps to create stable crystals.
- Coat the Snowmen: Dip each snowman into the melted white chocolate, ensuring it is fully coated. Use a fork or dipping tool to lift the snowman out of the chocolate and tap off any excess. Place the coated snowman back on the parchment-lined baking sheet.
- Decorate Immediately: While the chocolate is still wet, add the orange sprinkles/candies for the nose, mini chocolate chips for the eyes and buttons, and pretzel stick halves for the arms. If using shredded coconut, sprinkle it over the base of the snowman.
- Set the Chocolate: Return the baking sheet to the refrigerator for 15-20 minutes, or until the chocolate is set.
- Serve and Enjoy: Once the chocolate has set, the Snowman Truffles are ready to serve and enjoy! Store in an airtight container in the refrigerator.
