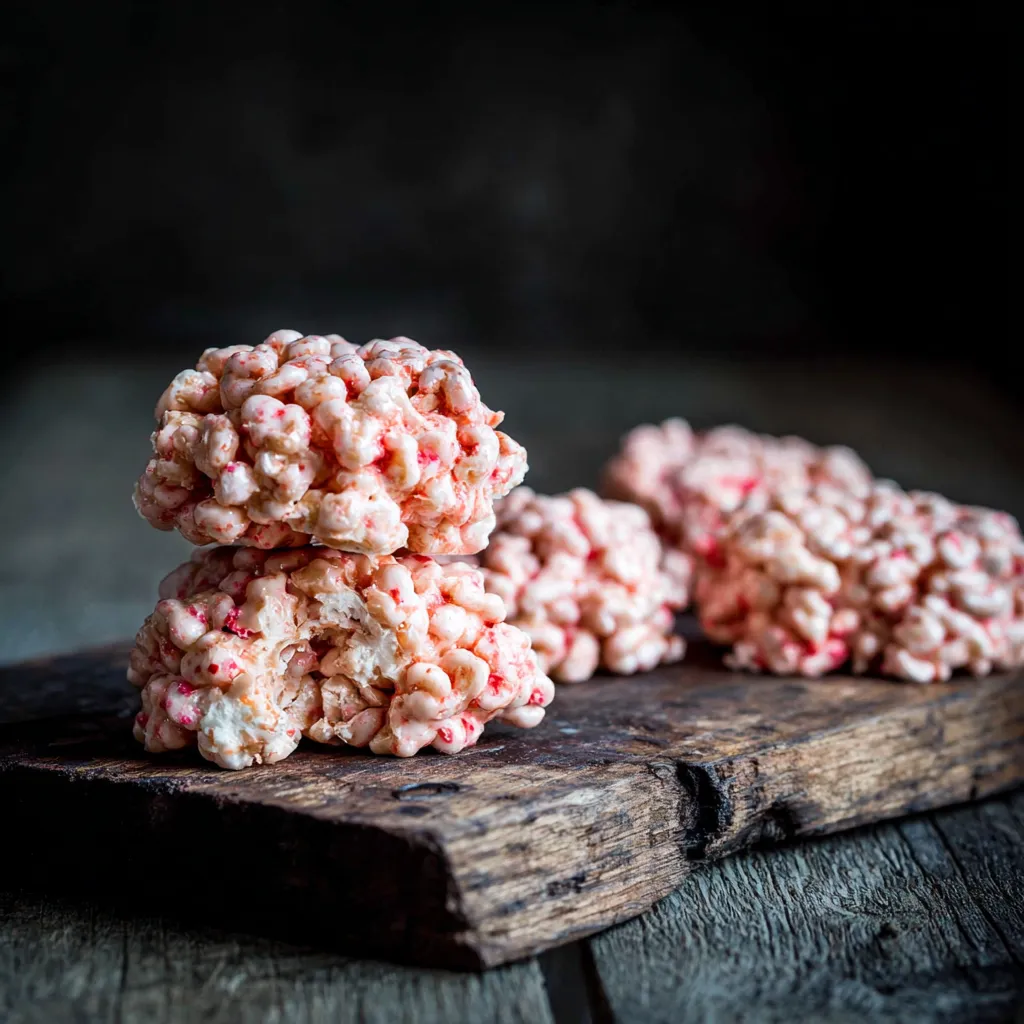
Halloween parties are just around the corner, and you’re probably searching for that one show-stopping treat that’s both spooky and delicious. Forget the same old candy apples – we’re diving headfirst into the delightfully unsettling world of Spooky Marshmallow Rice Bubbles Halloween Brains! Imagine serving up edible brains made from everyone’s favorite crispy treat. I’m here to show you how easy it is to create these fun and unforgettable snacks that will be the talk of the party, guaranteed!
Gathering Your Macabre Ingredients

Before we get started, let’s gather all the supplies needed to make these spooky treats. Don’t worry, most of these you probably already have in your pantry!
For the Brains:
- Rice Bubbles Cereal: 6 cups. The crispier the better!
- Marshmallows: 10 oz (about 40 large or 400 mini). The star of the show!
- Butter: 4 tablespoons. Unsalted gives you more control over the sweetness.
- Pink or Red Food Coloring: Gel food coloring works best for vibrant color.
- Vanilla Extract: 1 teaspoon. Adds a touch of warmth.
For the “Blood” Drizzle (Optional):
- Strawberry Jam or Raspberry Preserves: 1/4 cup. For that realistic, gory look.
- Water: 1 teaspoon. To thin the jam for easy drizzling.
Equipment:
- Large Pot: For melting the marshmallows and butter.
- Spatula or Wooden Spoon: For stirring everything together.
- Baking Sheet: To place the formed brains on to cool.
- Parchment Paper or Silicone Mat: To prevent sticking.
- Latex gloves (Optional): to keep your hands clean and prevent sticking
Let’s Talk Brainy Prep: Before You Begin
Okay, before we even turn on the stove, let’s get prepped! This makes the whole process smoother and less stressful (because who needs stress when you’re making brain treats?).
- Measure Out Everything: Seriously, measure out your Rice Bubbles, marshmallows, and have your food coloring ready to go. It’s a game changer!
- Prep Your Baking Sheet: Line your baking sheet with parchment paper or a silicone mat. Trust me, you’ll thank me later.
- Optional Glove Up: If you don’t like sticky fingers, grab some latex gloves. They’ll be your best friend when shaping the brains.
Step-by-Step to Spooky Brains
Ready to transform simple ingredients into edible brains? Let’s do this!
Melting the Marshmallow Magic:
- In a large pot, melt the butter over low heat. Make sure it doesn’t brown!
- Add the marshmallows and stir constantly until completely melted and smooth. This might take a few minutes, so be patient.
- Remove the pot from the heat.
Coloring the Brain Matter:
- Add the vanilla extract and a few drops of pink or red food coloring. Start with a little and add more until you reach your desired brainy hue. Remember, you can always add more, but you can’t take it away!
Mixing the Crispy Goodness:
- Pour the Rice Bubbles cereal into the marshmallow mixture and gently fold until evenly coated. Be thorough, but gentle! We want to coat every piece of cereal, but we don’t want to crush them.
Shaping the Brains:
- While the mixture is still warm (but cool enough to handle!), scoop out portions and shape them into brain-like forms. Use your hands (gloves recommended!) to create hemispheres and indentations for that realistic look. Don’t worry about perfection; brains aren’t perfectly symmetrical anyway!
- Place the formed brains onto the prepared baking sheet.
The “Blood” Drizzle (Optional):
- In a small bowl, mix the strawberry jam or raspberry preserves with the water until smooth.
- Drizzle the thinned jam over the brains to create a “bloody” effect. You can use a spoon or a piping bag for more precision.
Setting Up Shop:
- Let the brains cool and set completely before serving. This usually takes about 30 minutes to an hour.
Tips and Tricks for Brainy Success
Even though this recipe is super simple, here are some tips to make sure yours are a total hit:
- Don’t Overcook the Marshmallows: Burnt marshmallows are sad marshmallows! Keep the heat low and stir constantly.
- Work Quickly: The marshmallow mixture will start to set as it cools, so shape the brains while it’s still pliable.
- Embrace Imperfection: Brains aren’t perfect, so don’t stress about making them look identical. A little variation adds to the spooky realism!
- Additions: You can add mini chocolate chips for a little extra flavor or use different food colorings for a more vibrant look.
- Storage: Store the brains in an airtight container at room temperature. They’re best eaten within a few days.
Variations for the Adventurous Chef
Feeling creative? Here are some ideas to spice up your brain treats:
- Different Cereals: Experiment with other crispy rice cereals, like Cocoa Krispies, for a different flavor and color.
- Extracts: Try almond or peppermint extract for a unique twist.
- Candy Add-Ins: Mix in gummy worms or candy eyeballs for an extra creepy effect.
- Dye Alternatives: Consider using beetroot powder for a natural red dye.
Serving Suggestions Fit for a Ghoul
Presentation is key! Here are some fun ways to serve your Spooky Marshmallow Rice Bubbles Halloween Brains:
- On a Platter: Arrange the brains on a platter lined with spooky decorations like fake spiderwebs or plastic spiders.
- In a Bowl: Serve them in a bowl with a sign that says “Brain Food.”
- Individual Servings: Wrap each brain in clear cellophane and tie with a ribbon for a party favor.
Why These Brains are Better Than the Rest
Let’s face it, there are a lot of Halloween treat recipes out there. So, what makes these Spooky Marshmallow Rice Bubbles Halloween Brains so special? Well, besides being incredibly easy to make, they’re also:
- Kid-Friendly: They’re a fun and interactive activity to do with kids.
- Customizable: You can easily adjust the colors, flavors, and decorations to suit your preferences.
- A Conversation Starter: They’re a unique and memorable treat that will get everyone talking.
- Delicious: Who doesn’t love a good Rice Bubbles treat?
Other Spooky Recipes to Try
If you’re in the Halloween spirit, be sure to check out some of my other favorite spooky recipes! For a cozy fall dessert, you can’t go wrong with COZY APPLE CRISP or its crunchier sibling, CRUNCHY APPLE CRISP. And if you’re looking for something with a little spice, you might like PUMPKIN SPICE COOKIE PERFECTION. Don’t forget the CHEWY PUMPKIN COOKIES and BROWN BUTTER PUMPKIN COOKIES for more fall fun. Of course, if you are leaning into a dessert with a unique twist, be sure to check out CHURRO CHEESECAKE DREAM for inspiration!
Now Go Forth and Create!
There you have it! Everything you need to create the most spooktacular Spooky Marshmallow Rice Bubbles Halloween Brains the world has ever seen. I know you can do it! Have fun, get creative, and enjoy the spooky season. I can’t wait to hear how yours turn out! Happy Halloween!
What ingredients do I need to make the ‘blood’ drizzle for the brains?
You’ll need 1/4 cup of strawberry jam or raspberry preserves and 1 teaspoon of water to thin it out.
What are some tips for making sure my marshmallow mixture turns out well?
Don’t overcook the marshmallows, work quickly while the mixture is pliable, and don’t worry too much about perfect brain shapes!
Can I use something other than Rice Bubbles cereal for this recipe?
Yes! The article suggests experimenting with other crispy rice cereals like Cocoa Krispies for a different flavor and color.
How should I store the finished Halloween Brains?
Store the brains in an airtight container at room temperature. They are best eaten within a few days.
Spooky Marshmallow Rice Bubbles Halloween Brains
Ingredients
Equipment
Method
- Line a baking sheet with parchment paper or a silicone mat.
- In a large pot, melt the butter over low heat.
- Add the marshmallows and stir constantly until completely melted and smooth. Do not brown.
- Remove the pot from the heat.
- Add the vanilla extract and a few drops of pink or red food coloring. Stir until you reach your desired brainy hue.
- Pour the Rice Bubbles cereal into the marshmallow mixture and gently fold until evenly coated.
- While the mixture is still warm (but cool enough to handle!), scoop out portions and shape them into brain-like forms. Use your hands (gloves recommended!) to create hemispheres and indentations for that realistic look.
- Place the formed brains onto the prepared baking sheet.
- In a small bowl, mix the strawberry jam or raspberry preserves with the water until smooth.
- Drizzle the thinned jam over the brains to create a “bloody” effect. You can use a spoon or a piping bag for more precision.
- Let the brains cool and set completely before serving. This usually takes about 30 minutes to an hour.


