Let’s Gather Our Ingredients
For the Chocolate Cookies:
- 1 cup (2 sticks) unsalted butter, softened
- 3/4 cup granulated sugar
- 1/2 cup packed light brown sugar
- 2 large eggs
- 1 teaspoon vanilla extract
- 2 cups all-purpose flour
- 3/4 cup unsweetened cocoa powder
- 1 teaspoon baking soda
- 1/2 teaspoon salt
For the Filling (Options):
- Chocolate ganache: equal parts heavy cream and chocolate chips, melted
- Raspberry jam: your favorite brand
- Peanut butter cups: Mini peanut butter cups, halved
- Caramel: Store-bought caramel squares or homemade caramel sauce
Optional Toppings:
- Sprinkles
- Chopped nuts
- Sea salt
- Shredded coconut
The Secret to Perfect Chocolate Thumbprint Cookies
 Okay, bestie, let’s talk thumbprint cookies! These little gems are easier than you think, but there are a few things to keep in mind to get that perfect texture and avoid any cookie catastrophes. First, softened butter is key! Not melted, but *softened*. You want it to be easily creamed with the sugar. Think about leaving it out for about an hour before you start. Also, don’t overmix the dough once you add the flour. Overmixing develops the gluten, which can lead to tough cookies. We want tender, fudgy cookies, not hockey pucks! Finally, chill the dough! This is super important. It helps prevent the cookies from spreading too much in the oven and also intensifies the chocolate flavor. Trust me on this one.
Step-by-Step Instructions: Baking Bliss
Step 1: Creaming the Butter and Sugar
- In a large bowl, cream together the softened butter, granulated sugar, and brown sugar until light and fluffy. This usually takes about 3-5 minutes with an electric mixer. You can also do this by hand, but be prepared for a little arm workout!
Step 2: Adding the Wet Ingredients
- Beat in the eggs one at a time, then stir in the vanilla extract. Make sure each egg is fully incorporated before adding the next.
Step 3: Combining the Dry Ingredients
- In a separate bowl, whisk together the flour, cocoa powder, baking soda, and salt. Whisking helps to distribute the ingredients evenly, which is especially important for the baking soda.
Step 4: Bringing It All Together
- Gradually add the dry ingredients to the wet ingredients, mixing on low speed until just combined. Be careful not to overmix! The dough will be thick.
Step 5: Chilling the Dough
- Cover the dough with plastic wrap and chill in the refrigerator for at least 30 minutes. You can chill it for longer, even overnight, which will help develop the flavors even more!
Step 6: Shaping the Cookies
- Preheat your oven to 350°F (175°C). Line baking sheets with parchment paper. This will prevent the cookies from sticking and make cleanup a breeze.
- Roll the dough into 1-inch balls. Place them on the prepared baking sheets, leaving about 2 inches between each cookie.
Step 7: Making the Thumbprint
- Use your thumb or the back of a small spoon to make an indentation in the center of each cookie. If the dough cracks a little, don’t worry! Just gently smooth the edges with your fingers.
Step 8: Baking Time!
- Bake for 10-12 minutes, or until the edges are set and the centers are slightly soft. Be careful not to overbake them, or they’ll be dry.
Step 9: Cooling and Filling
- Let the cookies cool on the baking sheets for a few minutes before transferring them to a wire rack to cool completely.
- Once the cookies are cool, fill the thumbprint indentations with your favorite filling. For chocolate ganache, melt equal parts heavy cream and chocolate chips in the microwave or over a double boiler until smooth. For raspberry jam, simply spoon a small amount into each thumbprint. Mini peanut butter cups add a unique twist!
Step 10: Adding the Finishing Touches
- Sprinkle with your favorite toppings, such as sprinkles, chopped nuts, or sea salt. Get creative and have fun with it!
Troubleshooting Your Thumbprint Triumph
Sometimes, things don’t go exactly as planned. Don’t worry, it happens to the best of us! Here are a few common issues and how to fix them:- Cookies are spreading too much: The dough wasn’t chilled enough. Chill it for longer next time. You might also be using too much butter, or your oven temperature might be too low.
- Cookies are too dry: You overbaked them. Reduce the baking time slightly next time.
- Cookies are cracking too much: The dough is too dry. Make sure you’re measuring your flour correctly (spoon it into the measuring cup and level it off) and don’t overmix the dough.
- Filling is running: Make sure your cookies are completely cool before filling them. If you’re using chocolate ganache, let it cool slightly before filling the cookies, so it’s not too runny.
Creative Filling Variations to Wow Your Crowd
Let’s get those creative juices flowing, shall we? While chocolate ganache and raspberry jam are classic choices, don’t be afraid to experiment!- Peanut Butter Bliss: Mix peanut butter with a little powdered sugar and milk until smooth and creamy.
- Salted Caramel Swirl: Use store-bought caramel squares, melted and swirled with a pinch of sea salt.
- Lemon Curd Delight: A tangy lemon curd adds a bright and refreshing twist.
- Nutella Dream: Need I say more?
- Espresso Infusion: Mix instant espresso powder into your chocolate ganache for a mocha flavor.
Storing Your Chocolate Thumbprint Cookies
To keep your Chocolate Thumbprint Cookies fresh and delicious, store them in an airtight container at room temperature for up to 3-4 days. If you’re making them ahead of time, you can freeze the unbaked dough for up to 2 months. Just thaw it in the refrigerator overnight before baking. You can also freeze the baked cookies, but they may not be as fresh after thawing.Time to Get Baking!
So, there you have it! Everything you need to bake the perfect Chocolate Thumbprint Cookies. Grab your ingredients, preheat your oven, and get ready to create some delicious memories. These cookies are perfect for holidays, parties, or just a simple afternoon treat. And remember, baking is all about having fun and experimenting! Don’t be afraid to put your own spin on this recipe and make it your own. Happy baking, my friend!Why is it important to chill the dough before baking the chocolate thumbprint cookies?
Chilling the dough prevents the cookies from spreading too much in the oven and intensifies the chocolate flavor.
What’s the best way to prevent the chocolate thumbprint cookies from becoming too dry?
Avoid overbaking the cookies. Bake them until the edges are set and the centers are slightly soft.
What can I do if my chocolate thumbprint cookies are spreading too much while baking?
The dough probably wasn’t chilled enough. Chill it for a longer period next time. It could also be due to too much butter or a low oven temperature.
How should I store these chocolate thumbprint cookies to maintain their freshness?
Store them in an airtight container at room temperature for up to 3-4 days. You can also freeze the unbaked dough for up to 2 months.
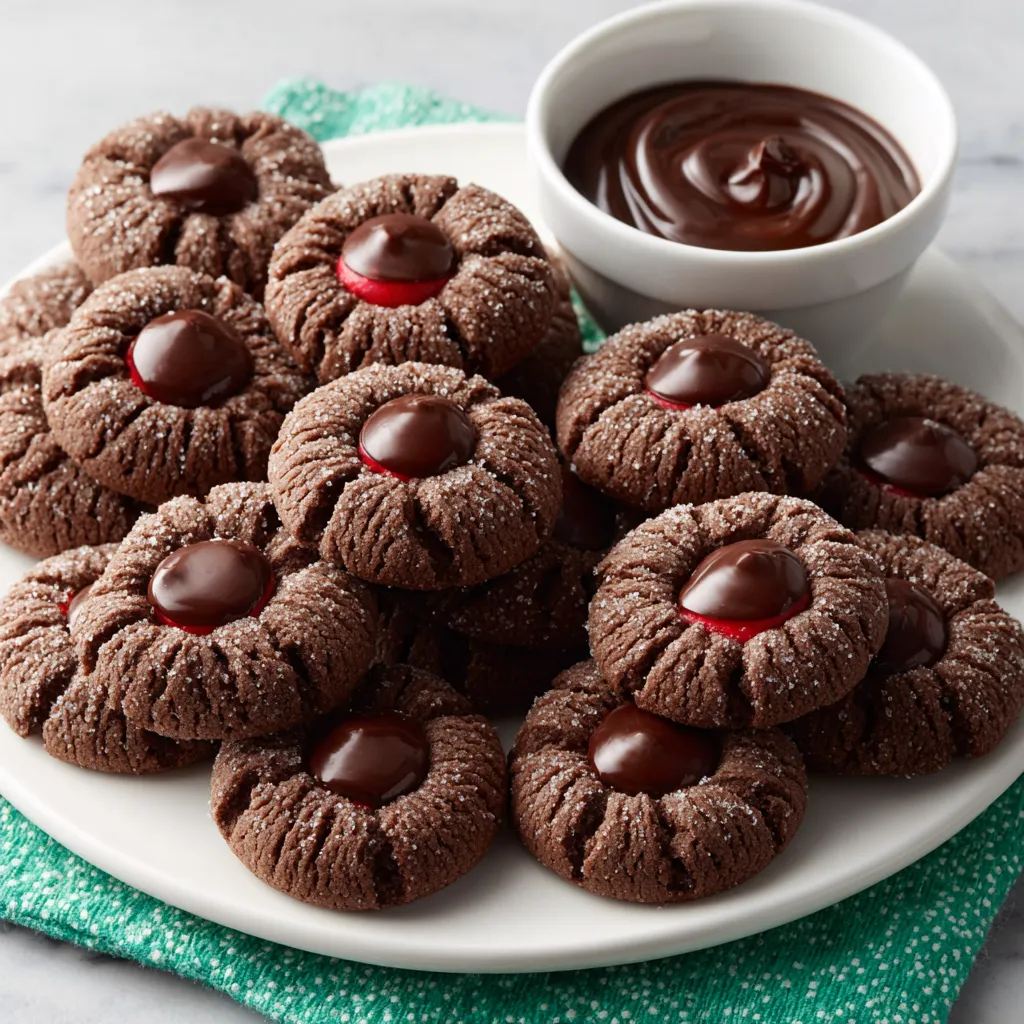
Perfect Chocolate Thumbprint Cookies
These decadent chocolate thumbprint cookies are a rich, fudgy treat with a perfectly indented center ready for your favorite fillings and toppings. With a deep chocolate aroma filling your kitchen, these cookies transform your home into a cozy bakery, perfect for any occasion.
Ingredients
Equipment
Method
- In a large bowl, cream together the softened butter, granulated sugar, and brown sugar until light and fluffy (3-5 minutes with an electric mixer).
- Beat in the eggs one at a time, then stir in the vanilla extract. Make sure each egg is fully incorporated before adding the next.
- In a separate bowl, whisk together the flour, cocoa powder, baking soda, and salt.
- Gradually add the dry ingredients to the wet ingredients, mixing on low speed until just combined. Be careful not to overmix! The dough will be thick.
- Cover the dough with plastic wrap and chill in the refrigerator for at least 30 minutes (or longer, even overnight).
- Preheat your oven to 350°F (175°C). Line baking sheets with parchment paper.
- Roll the dough into 1-inch balls. Place them on the prepared baking sheets, leaving about 2 inches between each cookie.
- Use your thumb or the back of a small spoon to make an indentation in the center of each cookie. Smooth any cracks with your fingers.
- Bake for 10-12 minutes, or until the edges are set and the centers are slightly soft. Be careful not to overbake them.
- Let the cookies cool on the baking sheets for a few minutes before transferring them to a wire rack to cool completely.
- Once the cookies are cool, fill the thumbprint indentations with your favorite filling (melted chocolate ganache, raspberry jam, peanut butter cups, or caramel).
- Sprinkle with your favorite toppings, such as sprinkles, chopped nuts, or sea salt.
Notes
Store cookies in an airtight container at room temperature for up to 3-4 days. Unbaked dough can be frozen for up to 2 months; thaw overnight in the refrigerator before baking. For variations, try fillings like peanut butter, salted caramel, lemon curd, Nutella, or espresso-infused ganache. If cookies are spreading too much, chill the dough for longer. If cookies are too dry, reduce the baking time. If cookies are cracking, make sure to measure flour correctly and don’t overmix the dough. Ensure cookies are fully cooled before filling.