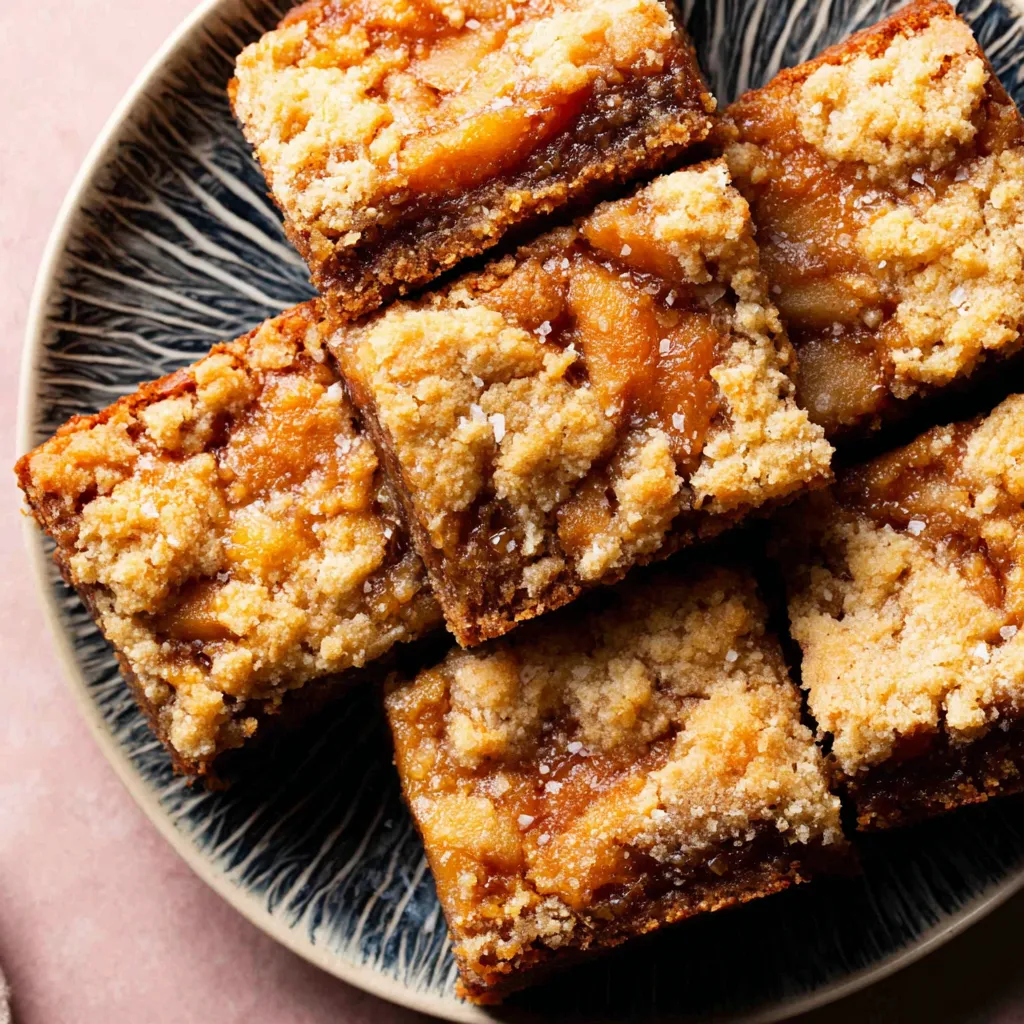
There’s something about the crisp air of autumn that always makes me crave the comforting flavors of apples and caramel, and a recent trip to a local orchard, overflowing with golden, juicy apples, sparked the memory of my grandma’s legendary apple desserts. That’s where the idea for these utterly irresistible Salted Caramel Apple Bars came to life, combining those nostalgic tastes into one delightful treat. I promise you, these easy apple pie bars will be the star of your fall baking, a guaranteed crowd-pleaser, and a delicious way to celebrate the season!
Get Ready for the Best Salted Caramel Apple Bars of Your Life
Okay, my friend, let’s talk about these Salted Caramel Apple Bars. We’re not just making any apple dessert here; we’re creating a symphony of flavors and textures that will have everyone begging for seconds. Think of it: a buttery, crumbly crust, a tender apple filling bursting with cinnamon and spice, and a generous drizzle of homemade salted caramel. Oh, and did I mention how perfect these golden apple pie bars are for fall baking?
I know, I know, sometimes baking can seem intimidating, but trust me on this one. This recipe is surprisingly easy, even for beginner bakers. I’ve broken it down into simple steps, so you can confidently whip up a batch of these beauties. We’re talking about a perfect Thanksgiving dessert or just a cozy treat for a chilly autumn evening. These Salted Caramel Apple Bars for Fall! are more than just a recipe; they’re an experience.
What Makes These Salted Caramel Apple Bars So Special?

So, what sets these bars apart from the sea of apple desserts out there? It’s all about the details! Here’s a breakdown:
- The Crust: We’re going for a buttery, slightly sweet shortbread-like crust that provides the perfect base for all the goodness to come. It’s easy to make, and we’re going to partially bake it to prevent a soggy bottom – a crucial step!
- The Apple Filling: Forget bland apple fillings! We’re using a combination of apples (more on that below!) cooked with warm spices like cinnamon, nutmeg, and a hint of ginger. The key is to cook the apples until they are tender but still hold their shape.
- The Salted Caramel: Ah, the star of the show! We’re making a homemade salted caramel sauce that is rich, decadent, and perfectly balanced with a touch of salt. Don’t be scared of making caramel; I’ll walk you through it!
- The Combination: The magic happens when these three elements come together. The buttery crust, the spiced apples, and the gooey salted caramel create an irresistible combination of flavors and textures that will leave you wanting more.
Choosing the Right Apples for Your Apple Pie Bars
The type of apples you use can significantly impact the flavor and texture of your Salted Caramel Apple Bars. Here are some of my favorites:
- Granny Smith: These tart apples hold their shape well during baking and provide a nice contrast to the sweetness of the caramel.
- Honeycrisp: These apples are sweet, crisp, and juicy, making them a great all-around choice.
- Gala: These apples are sweet and slightly tart with a firm texture, perfect for baking.
- Fuji: Another sweet and crisp apple that works well in baked goods.
I often like to use a combination of two or three different types of apples for a more complex flavor profile. Experiment and see what you like best!
Remember, the goal is to use apples that hold their shape and don’t turn to mush during baking. Overripe apples are a no-go for this recipe.
Making the Buttery Crust: Step-by-Step
Let’s start with the foundation of our Salted Caramel Apple Bars: the buttery crust. Here’s what you’ll need:
- 1 ½ cups all-purpose flour
- ½ cup granulated sugar
- ½ teaspoon salt
- ½ cup (1 stick) cold unsalted butter, cut into cubes
- 1 large egg yolk
- 2-3 tablespoons ice water
Instructions:
- In a large bowl, whisk together the flour, sugar, and salt.
- Cut in the cold butter using a pastry blender or your fingertips until the mixture resembles coarse crumbs.
- In a small bowl, whisk together the egg yolk and 2 tablespoons of ice water.
- Gradually add the egg yolk mixture to the flour mixture, mixing until the dough just comes together. If the dough is too dry, add the remaining tablespoon of ice water.
- Form the dough into a disc, wrap it in plastic wrap, and chill for at least 30 minutes.
- Preheat oven to 350°F (175°C).
- Roll out the dough on a lightly floured surface to fit a 9×13 inch baking pan.
- Transfer the dough to the pan and press it evenly into the bottom and up the sides.
- Prick the bottom of the crust with a fork to prevent it from puffing up during baking.
- Bake for 15-20 minutes, or until lightly golden brown. Let cool slightly.
Troubleshooting:
- Dough is too dry: Add ice water, one tablespoon at a time, until the dough comes together.
- Dough is too sticky: Add a little flour.
- Crust is shrinking during baking: Make sure the dough is well-chilled and that you’ve pricked the bottom with a fork. You can also try using pie weights or dried beans to weigh down the crust during baking.
Preparing the Spiced Apple Filling
Now for the heart of our Salted Caramel Apple Bars: the apple filling! Here’s what you’ll need:
- 6-8 medium apples, peeled, cored, and sliced
- ½ cup granulated sugar
- 2 tablespoons all-purpose flour
- 1 teaspoon ground cinnamon
- ½ teaspoon ground nutmeg
- ¼ teaspoon ground ginger
- 2 tablespoons lemon juice
- 2 tablespoons butter, cut into small pieces
Instructions:
- In a large bowl, combine the sliced apples, sugar, flour, cinnamon, nutmeg, ginger, and lemon juice. Toss to coat.
- Pour the apple mixture over the partially baked crust.
- Dot the top with the butter pieces.
Tips for Success:
- Don’t overcrowd the filling. You want a generous layer of apples, but not so much that they spill over the sides of the crust.
- The lemon juice helps to prevent the apples from browning and adds a touch of brightness to the filling.
- The butter pieces add richness and flavor to the filling.
Making the Homemade Salted Caramel Sauce
Okay, this is where the magic truly happens! Don’t be intimidated by making caramel. It’s easier than you think, and the result is so worth it. Here’s what you’ll need for our golden apple pie bars with gooey salted caramel drizzle:
- 1 cup granulated sugar
- 6 tablespoons (¾ stick) unsalted butter, cut into pieces
- ½ cup heavy cream
- 1 teaspoon vanilla extract
- ½ – 1 teaspoon sea salt, or to taste
Instructions:
- In a medium saucepan, melt the sugar over medium heat, stirring constantly with a heat-resistant spatula.
- Continue to cook, stirring occasionally, until the sugar is melted and amber in color.
- Remove from heat and immediately add the butter, stirring until melted and smooth.
- Slowly pour in the heavy cream, stirring constantly. The mixture will bubble up vigorously.
- Return the saucepan to medium heat and cook, stirring constantly, until the caramel is smooth and thickened, about 1-2 minutes.
- Remove from heat and stir in the vanilla extract and salt.
- Let cool slightly before drizzling over the apple filling.
Caramel Troubleshooting:
- Caramel is grainy: This can happen if the sugar crystallizes. Try adding a tablespoon of lemon juice or corn syrup to the sugar at the beginning.
- Caramel is too thick: Add a tablespoon of heavy cream at a time until you reach the desired consistency.
- Caramel is too thin: Simmer the caramel for a few more minutes until it thickens.
- Burnt Caramel: There’s unfortunately no coming back from truly burnt caramel. Start over and watch it closely!
Safety First! Caramel is HOT! Be extremely careful when working with it to avoid burns.
Baking and Assembling Your Salted Caramel Apple Bars
We’re almost there! Here’s how to finish these beauties:
- Preheat oven to 350°F (175°C).
- Drizzle the homemade salted caramel sauce evenly over the apple filling.
- Bake for 30-35 minutes, or until the apples are tender and the caramel is bubbly.
- Let cool completely in the pan before cutting into bars.
Tips for Cutting:
- Use a sharp knife to cut the bars.
- For clean cuts, dip the knife in hot water and wipe it clean between each cut.
- Chilling the bars slightly before cutting can also make them easier to slice.
Optional Toppings and Variations
Want to take these Salted Caramel Apple Bars to the next level? Here are a few ideas:
- Streusel Topping: Add a crumbly streusel topping made with flour, butter, sugar, and oats for extra texture and flavor.
- Chopped Nuts: Sprinkle chopped pecans or walnuts over the caramel before baking.
- Chocolate Drizzle: Drizzle melted chocolate over the cooled bars for a decadent twist.
- Ice Cream: Serve warm bars with a scoop of vanilla ice cream for the ultimate indulgence.
These Irresistible Salted Caramel Apple Bars for Fall! are incredibly versatile, so feel free to get creative and experiment with different flavors and toppings!
Storing Your Salted Caramel Apple Bars
These bars are best enjoyed within a few days of baking. Store them in an airtight container at room temperature or in the refrigerator. They can also be frozen for up to 2 months.
To reheat, warm them in the oven at 350°F (175°C) for a few minutes or microwave them briefly.
Other Delicious Fall Baking Recipes to Try
If you’re craving more fall-inspired desserts, be sure to check out these recipes:
- Caramel Apple Cheesecake Bars: Another fantastic twist on classic apple pie!
- Apple Crisp Mini Cheesecakes: Individual portions of pure fall bliss.
- Salted Caramel Apple Bars: In case you missed the link above!
- Salted Caramel Apple Pie Cheesecake: The ultimate dessert mashup!
- Caramel Apple Cheesecake Bars: A crowd-pleasing favorite for any occasion.
- Apple Pumpkin Streusel Muffins: Perfect for breakfast or a mid-afternoon snack.
Why This Recipe is Perfect for Thanksgiving Desserts
When you think of Thanksgiving desserts, pie is one of the first things that comes to mind. These easy apple pie bars are a wonderful, easier-to-serve alternative to a traditional apple pie. With the addition of the homemade salted caramel, it elevates the classic flavor into something truly special. Plus, they can be made ahead of time, freeing you up to focus on other Thanksgiving preparations. It’s a win-win!
Final Thoughts: Enjoy the Process!
Baking should be fun and relaxing, not stressful. Don’t be afraid to experiment, make mistakes, and learn from them. The most important ingredient in any recipe is love. So, gather your ingredients, put on some music, and enjoy the process of creating these delicious Salted Caramel Apple Bars. And remember, these are perfect Thanksgiving desserts or fall baking treats. Enjoy!
What types of apples are recommended for these Salted Caramel Apple Bars?
The recipe suggests using Granny Smith, Honeycrisp, Gala, or Fuji apples. A combination of two or three different types can also be used for a more complex flavor. The important thing is to choose apples that hold their shape during baking.
What is the key to preventing a soggy crust in these apple bars?
The key is to partially bake the crust before adding the apple filling. This helps to ensure that the crust remains firm and doesn’t become soggy from the moisture of the apples.
I’m intimidated by making caramel. What are some common problems and solutions?
Common problems include grainy caramel (try adding lemon juice or corn syrup), caramel that’s too thick (add heavy cream), and caramel that’s too thin (simmer longer). Burnt caramel cannot be saved and must be discarded.
How should I store the Salted Caramel Apple Bars?
The bars are best enjoyed within a few days. Store them in an airtight container at room temperature or in the refrigerator. They can also be frozen for up to 2 months. Reheat in the oven or microwave.
Irresistible Salted Caramel Apple Bars
Ingredients
Equipment
Method
- **Make the Buttery Crust:**
- In a large bowl, whisk together the flour, sugar, and salt.
- Cut in the cold butter using a pastry blender or your fingertips until the mixture resembles coarse crumbs.
- In a small bowl, whisk together the egg yolk and 2 tablespoons of ice water.
- Gradually add the egg yolk mixture to the flour mixture, mixing until the dough just comes together. If the dough is too dry, add the remaining tablespoon of ice water.
- Form the dough into a disc, wrap it in plastic wrap, and chill for at least 30 minutes.
- Preheat oven to 350°F (175°C).
- Roll out the dough on a lightly floured surface to fit a 9×13 inch baking pan.
- Transfer the dough to the pan and press it evenly into the bottom and up the sides.
- Prick the bottom of the crust with a fork to prevent it from puffing up during baking.
- Bake for 15-20 minutes, or until lightly golden brown. Let cool slightly.
- **Prepare the Spiced Apple Filling:**
- In a large bowl, combine the sliced apples, sugar, flour, cinnamon, nutmeg, ginger, and lemon juice. Toss to coat.
- Pour the apple mixture over the partially baked crust.
- Dot the top with the butter pieces.
- **Make the Homemade Salted Caramel Sauce:**
- In a medium saucepan, melt the sugar over medium heat, stirring constantly with a heat-resistant spatula.
- Continue to cook, stirring occasionally, until the sugar is melted and amber in color.
- Remove from heat and immediately add the butter, stirring until melted and smooth.
- Slowly pour in the heavy cream, stirring constantly. The mixture will bubble up vigorously.
- Return the saucepan to medium heat and cook, stirring constantly, until the caramel is smooth and thickened, about 1-2 minutes.
- Remove from heat and stir in the vanilla extract and salt.
- Let cool slightly before drizzling over the apple filling.
- **Bake and Assemble the Bars:**
- Preheat oven to 350°F (175°C).
- Drizzle the homemade salted caramel sauce evenly over the apple filling.
- Bake for 30-35 minutes, or until the apples are tender and the caramel is bubbly.
- Let cool completely in the pan before cutting into bars.
- Use a sharp knife to cut the bars. For clean cuts, dip the knife in hot water and wipe it clean between each cut.