The Science of Sweet and Salty Bonds
The magic behind a successful chocolate pretzel wreath lies in understanding the interactions between its core components: pretzels, chocolate, and decorations. Pretzels provide a structural base and a salty counterpoint to the sweetness of the chocolate. The type of chocolate you use drastically affects the final product’s shine, snap, and melting properties. Real chocolate, with cocoa butter, tempers beautifully, creating a glossy, stable finish. Compound chocolate (also known as confectionery coating or melting wafers), which substitutes vegetable oil for cocoa butter, melts easily but lacks the same depth of flavor and doesn’t require tempering. Decorations, such as sprinkles and candies, adhere best when the chocolate is still molten. Furthermore, moisture is the enemy! Any water present during the chocolate melting process can cause the chocolate to seize, resulting in a grainy, unusable mess. Think of it like this: the salt from the pretzels pulls out the subtle sweetness within the chocolate, creating a symphony of flavor on your taste buds.The Ultimate Chocolate Pretzel Wreath Recipe
 This recipe aims to give you a foolproof guide to creating a stunning and delicious chocolate pretzel wreath. It focuses on using quality ingredients and precise techniques to ensure a perfect result every time.
Ingredients:
- 16 oz Mini Pretzels (round or traditional shape)
- 16 oz High-Quality Chocolate (dark, milk, or white – choose your preference!), finely chopped
- 1 tbsp Vegetable Shortening (optional, for smoother melting)
- Assorted Sprinkles, Candies, and Decorations (red and green M&Ms, crushed peppermint, edible glitter, etc.)
Equipment:
- Baking Sheets lined with parchment paper
- Double Boiler or Microwave-Safe Bowl
- Spatula
- Piping Bags or Ziplock Bags (optional, for drizzling)
Instructions:
- Prepare Your Workspace: Line baking sheets with parchment paper. Set out your decorations in small bowls for easy access.
- Melt the Chocolate:
- Double Boiler Method: Fill a saucepan with about an inch of water and bring to a simmer. Place a heatproof bowl on top of the saucepan, ensuring the bottom of the bowl doesn’t touch the water. Add the chopped chocolate and vegetable shortening (if using) to the bowl. Stir gently until the chocolate is completely melted and smooth.
- Microwave Method: Place the chopped chocolate and vegetable shortening (if using) in a microwave-safe bowl. Microwave in 30-second intervals, stirring after each interval, until the chocolate is almost melted. Stir until completely smooth. Be careful not to overheat the chocolate.
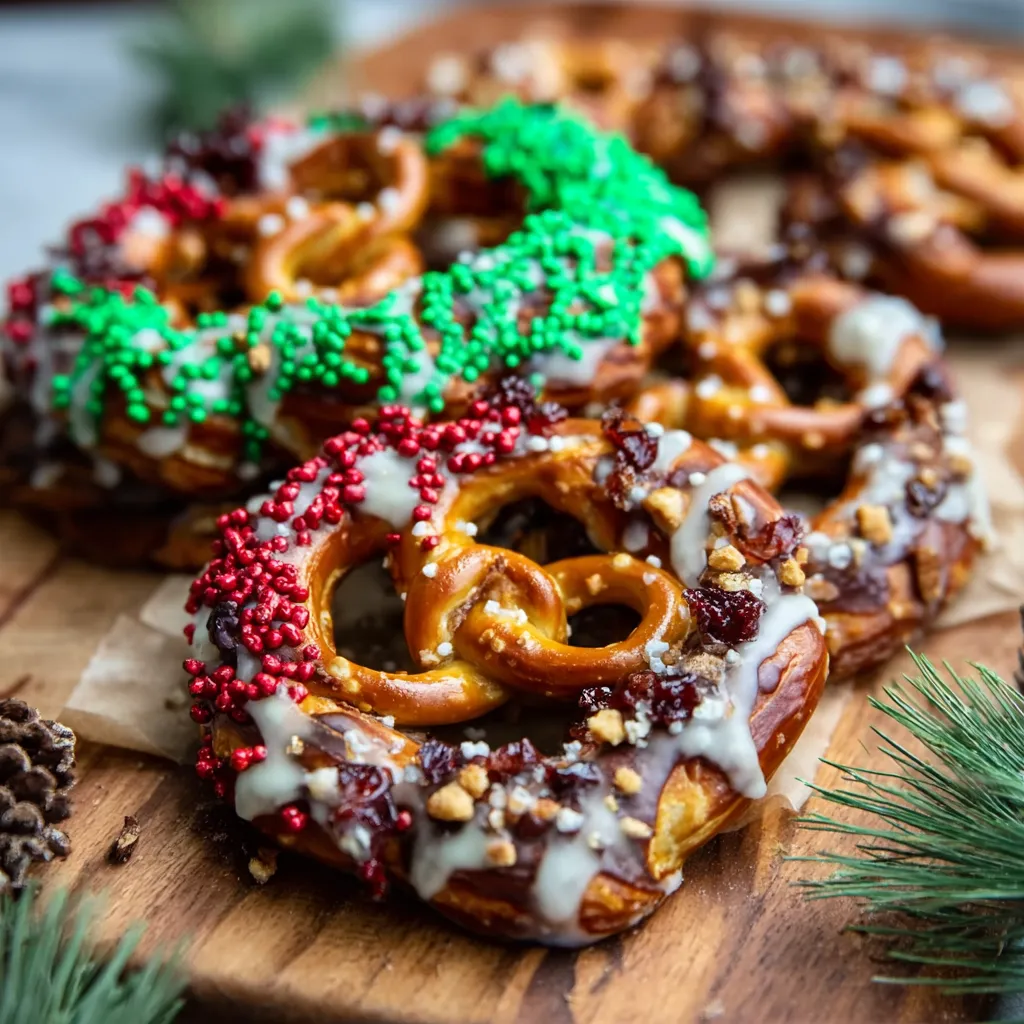
- Assemble the Wreath: Working quickly, dip each pretzel individually into the melted chocolate, ensuring it’s fully coated. Place the chocolate-covered pretzel onto the prepared baking sheet. Arrange the dipped pretzels in a circular wreath shape. You can overlap them slightly for added stability.
- Decorate: While the chocolate is still wet, immediately decorate the wreath with your chosen sprinkles, candies, and other decorations. Gently press the decorations into the chocolate to ensure they adhere well. If you like to bake other fun treats, consider making Chocolate Thumbprint Cookies while the pretzel wreath sets.
- Chill and Set: Place the baking sheet in the refrigerator for at least 30 minutes, or until the chocolate is completely set and firm.
- Optional Drizzle: Once the chocolate has set, you can add an extra touch of elegance by drizzling melted chocolate of a different color over the wreath. To do this, melt a small amount of chocolate and transfer it to a piping bag or ziplock bag. Snip off a tiny corner of the bag and drizzle the chocolate over the wreath in a decorative pattern. Let the drizzle set before serving.
- Serve and Enjoy: Carefully remove the pretzel wreath from the baking sheet and transfer it to a serving platter. Break off pieces to enjoy! This is also a great treat to make with your kids!
My Adventures in Wreath-Making: A Culinary Investigation
My first few attempts at crafting the perfect chocolate pretzel wreath were… less than stellar. I faced a myriad of issues, from chocolate that refused to cooperate to a pretzel structure that resembled more of a lopsided blob than a festive wreath. But, like any good culinary scientist, I persevered, meticulously documenting each failure and tweaking my approach until I cracked the code.The Great Chocolate Catastrophe
Like many of you, I initially thought any chocolate would do. My first batch involved using an old bag of semi-sweet chocolate chips I found lurking in the back of my pantry. Big mistake. The chocolate melted unevenly, became grainy, and refused to set properly. The resulting wreath looked dull and unappetizing. The ‘Aha!’ moment came when I realized the importance of using high-quality chocolate with a good cocoa butter content. Switching to a premium dark chocolate made all the difference, providing a smooth, glossy finish and a rich, decadent flavor. I also learned the crucial role of proper melting technique; slow and steady wins the race, whether using a double boiler or the microwave. Also, while you’re at it, consider baking a Chocolate Yule Log to share with your friends and family!Pretzel Peril: The Crumbling Foundation
The structural integrity of the wreath depends entirely on the pretzels. My early attempts involved haphazardly dipping the pretzels and sticking them together in a chaotic fashion. The result? A fragile wreath that crumbled at the slightest touch. I learned that the key is to overlap the pretzels slightly and arrange them in a tight, interlocking pattern. This creates a solid foundation that can withstand the weight of the chocolate and decorations. Also, make sure you use fresh pretzels, stale ones tend to be more brittle.Decoration Debacle: A Sticky Situation
Achieving that picture-perfect decorated wreath proved more challenging than anticipated. I initially tried applying the sprinkles after the chocolate had already begun to set, resulting in a sparse and uneven distribution. The trick, I discovered, is to decorate the wreath immediately after dipping each pretzel, while the chocolate is still wet. This ensures that the sprinkles and candies adhere firmly to the surface. I also experimented with different types of decorations, from classic sprinkles to crushed peppermint and edible glitter. Ultimately, I found that a combination of textures and colors creates the most visually appealing result. You could even prepare some Christmas Puppy Chow and use a few pieces of the puppy chow to decorate your pretzel wreath.The Foolproof Pretzel Wreath Technique: A Step-by-Step Guide
After numerous experiments and a fair share of mishaps, I’ve distilled the art of chocolate pretzel wreath making into a simple, foolproof technique. Follow these steps, and you’ll be well on your way to creating a stunning and delicious centerpiece for your holiday table.- Choose High-Quality Chocolate: Opt for a chocolate with a high cocoa butter content for a smooth, glossy finish.
- Melt the Chocolate Properly: Use a double boiler or microwave in short intervals, stirring frequently to prevent burning. Avoid getting any water into the chocolate.
- Dip and Arrange Methodically: Dip each pretzel individually and arrange them in a tight, overlapping circle on parchment paper.
- Decorate Immediately: Apply sprinkles, candies, and other decorations while the chocolate is still wet to ensure they adhere properly.
- Chill Thoroughly: Refrigerate the wreath for at least 30 minutes to allow the chocolate to set completely.
- Add a Final Flourish: Drizzle with melted chocolate of a different color for an extra touch of elegance. Try to make some Snowman Truffles to go along with your drizzled pretzel wreath.
What type of chocolate is best to use for a glossy, stable finish on a chocolate pretzel wreath?
High-quality chocolate with cocoa butter, which can be tempered, is best for a glossy, stable finish. Avoid using compound chocolate (confectionery coating) as it lacks the same depth of flavor and doesn’t require tempering.
Why is it important to decorate the pretzel wreath immediately after dipping the pretzels in chocolate?
Decorating while the chocolate is still wet ensures that sprinkles, candies, and other decorations adhere firmly to the surface. If the chocolate sets first, the decorations may not stick properly, resulting in a sparse and uneven distribution.
What is the key to creating a structurally sound pretzel wreath?
The key to a structurally sound wreath is to overlap the pretzels slightly and arrange them in a tight, interlocking pattern. Also, be sure to use fresh pretzels instead of stale ones.
What can cause chocolate to seize and become grainy when melting it for the pretzel wreath?
Any water present during the chocolate melting process can cause the chocolate to seize, resulting in a grainy, unusable mess. It’s crucial to avoid getting any water into the chocolate while melting it.
Irresistible Chocolate Pretzel Wreaths
Ingredients
Equipment
Method
- Prepare Your Workspace: Line baking sheets with parchment paper. Set out your decorations in small bowls for easy access.
- Melt the Chocolate: Double Boiler Method: Fill a saucepan with about an inch of water and bring to a simmer. Place a heatproof bowl on top of the saucepan, ensuring the bottom of the bowl doesn’t touch the water. Add the chopped chocolate and vegetable shortening (if using) to the bowl. Stir gently until the chocolate is completely melted and smooth. Microwave Method: Place the chopped chocolate and vegetable shortening (if using) in a microwave-safe bowl. Microwave in 30-second intervals, stirring after each interval, until the chocolate is almost melted. Stir until completely smooth. Be careful not to overheat the chocolate.
- Assemble the Wreath: Working quickly, dip each pretzel individually into the melted chocolate, ensuring it’s fully coated. Place the chocolate-covered pretzel onto the prepared baking sheet. Arrange the dipped pretzels in a circular wreath shape. You can overlap them slightly for added stability.
- Decorate: While the chocolate is still wet, immediately decorate the wreath with your chosen sprinkles, candies, and other decorations. Gently press the decorations into the chocolate to ensure they adhere well.
- Chill and Set: Place the baking sheet in the refrigerator for at least 30 minutes, or until the chocolate is completely set and firm.
- Optional Drizzle: Once the chocolate has set, you can add an extra touch of elegance by drizzling melted chocolate of a different color over the wreath. To do this, melt a small amount of chocolate and transfer it to a piping bag or ziplock bag. Snip off a tiny corner of the bag and drizzle the chocolate over the wreath in a decorative pattern. Let the drizzle set before serving.
- Serve and Enjoy: Carefully remove the pretzel wreath from the baking sheet and transfer it to a serving platter. Break off pieces to enjoy!