Deconstructing Deliciousness: The Science of Butter Mochi
Butter mochi, at its heart, is a fascinating study in starch gelatinization and retrogradation. The primary ingredient, mochiko (sweet rice flour), is almost pure starch. When mixed with liquid and heated, the starch granules absorb the water and swell, a process called gelatinization. This creates the initial soft, almost pudding-like texture. The butter, sugar, and eggs contribute to flavor, richness, and structure. But the real magic happens as the mochi cools. As it cools, the starch molecules begin to realign and recrystallize – retrogradation. This is what gives butter mochi its signature chewiness. The balance of ingredients and the baking process all play a critical role in controlling the extent of retrogradation, ultimately determining the final texture. Too much retrogradation, and you have a tough, rubbery mochi. Not enough, and it’s mushy. The addition of coconut milk and the right oven temperature also help to create the wonderful crust and distinct flavor.The Ultimate Hawaiian Butter Mochi Recipe
 This recipe incorporates learnings from countless batches and is virtually foolproof.
Ingredients:
- 1 box (16 ounces) Mochiko (sweet rice flour)
- 2 cups granulated sugar
- 1 teaspoon baking powder
- 1/2 teaspoon salt
- 2 cups milk
- 1 (13.5 ounce) can coconut milk (full fat)
- 4 large eggs, lightly beaten
- 1 cup (2 sticks) unsalted butter, melted and slightly cooled
- 1 teaspoon vanilla extract
Equipment:
- 9×13 inch baking pan
- Mixing bowls
- Whisk
- Measuring cups and spoons
Instructions:
- Preheat your oven to 350°F (175°C). Grease a 9×13 inch baking pan generously. This is crucial to prevent sticking!
- In a large bowl, whisk together the mochiko, sugar, baking powder, and salt. Make sure there are no lumps of mochiko.
- In a separate bowl, whisk together the milk, coconut milk, and eggs.
- Gradually pour the wet ingredients into the dry ingredients, whisking until just combined. Be careful not to overmix. Overmixing can lead to a tougher mochi.
- Add the melted butter and vanilla extract to the batter. Whisk until the butter is fully incorporated. The batter will be quite liquid.
- Pour the batter into the prepared baking pan.
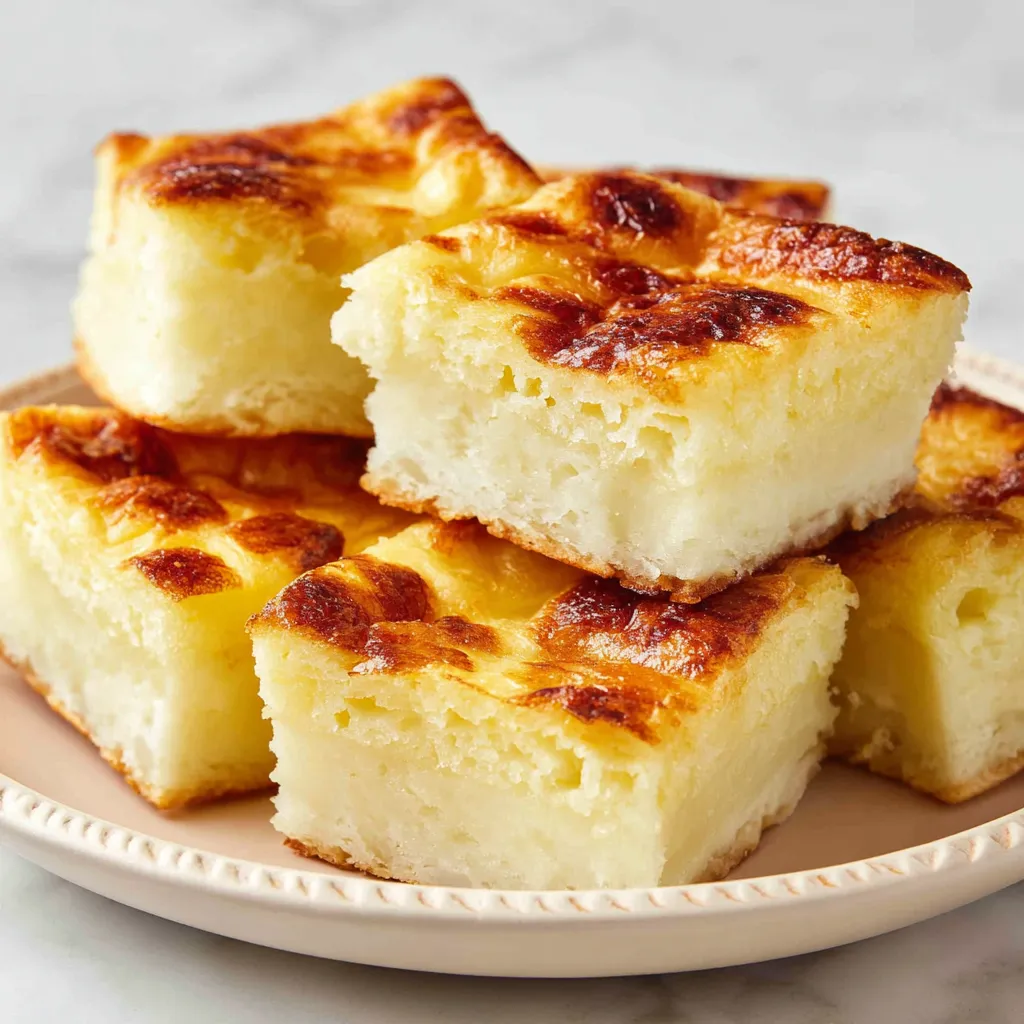
- Bake for 50-60 minutes, or until the top is golden brown and a toothpick inserted into the center comes out clean (or with a few moist crumbs). The baking time can vary depending on your oven, so keep an eye on it.
- Let the butter mochi cool completely in the pan before cutting into squares. This is essential for the texture to develop properly. Resist the urge to cut into it while it’s warm!
- Dust with powdered sugar (optional) before serving.
Confessions of a Mochi Maniac: My Butter Mochi Investigation
My first few attempts were a disaster. Honestly, they ranged from gummy pucks to soupy messes. Like many of you, I initially thought butter mochi was just another simple bake. I was so, so wrong. I dug into the science, the ratios, the oven temperatures, and the ingredient variations. Here’s what I learned:The Great Mochiko Mystery
Initially, I didn’t realize the quality of mochiko mattered so much. I bought the cheapest brand I could find. Big mistake. The texture was grainy and the flavor was off. I switched to a higher-quality brand of mochiko, and the difference was night and day. The texture became smoother, and the flavor was noticeably better. It made me wonder if some of the other Hawaiian-inspired recipes, like Pineapple Teriyaki Chicken Wings, require the same level of ingredient scrutiny.The Coconut Milk Conundrum
I experimented with different types of coconut milk – light, regular, and even cream of coconut. Light coconut milk resulted in a mochi that lacked richness. Cream of coconut, while decadent, made the mochi too sweet and heavy. Full-fat coconut milk was the Goldilocks solution – it provided the perfect balance of flavor and moisture. This parallels with Teriyaki Chicken, where the right balance of sweet and savory ingredients is also key.The Temperature Tango
The baking temperature was another critical factor. I started with the standard 350°F (175°C), but the mochi was often undercooked in the center. I tried increasing the temperature to 375°F (190°C), but the top would brown too quickly before the center was set. Then, I had an “Aha!” moment: I realized that my oven wasn’t properly calibrated. Using an oven thermometer, I discovered that my oven was consistently running about 25 degrees cooler than the set temperature. Once I adjusted accordingly, the mochi baked perfectly evenly. Now I always bake it at 350, but I know my oven is really at 325. It reminds me of the precision needed for recipes like Sheet Pan Hawaiian Chicken, where even cooking is essential.The Cooling Craze
I initially thought cooling the mochi was just a matter of convenience. I was wrong. Cooling allows the starches to fully set and the flavors to meld. Cutting into the mochi while it’s still warm results in a gummy, almost sticky texture. Patience is key! And just as you let it cool, you would let the Crockpot Teriyaki Chicken rest before serving for optimum tenderness.Butter Mochi Bliss: The Foolproof Technique
After countless experiments, I’ve distilled the process into a simple, foolproof technique:- Use high-quality mochiko. It makes a world of difference in texture and flavor.
- Don’t overmix the batter. Overmixing develops gluten (even though mochiko is gluten-free), leading to a tougher mochi.
- Use full-fat coconut milk. It provides the perfect balance of flavor and moisture.
- Calibrate your oven. An oven thermometer is your best friend.
- Bake until golden brown and a toothpick comes out clean (or with a few moist crumbs). Don’t be afraid to let it brown.
- Cool completely before cutting. Patience is key for the perfect texture.
What is mochiko, and why is its quality important for butter mochi?
Mochiko is sweet rice flour, the primary ingredient in butter mochi. High-quality mochiko is crucial because it significantly impacts the texture and flavor of the final product. Using a cheaper brand can result in a grainy texture and an off flavor.
Why is it important to let the butter mochi cool completely before cutting it?
Cooling allows the starches to fully set and the flavors to meld. Cutting into the mochi while it’s still warm results in a gummy, almost sticky texture.
What type of coconut milk is recommended for the best butter mochi, and why?
Full-fat coconut milk is recommended. Light coconut milk results in a mochi that lacks richness, while cream of coconut can make it too sweet and heavy. Full-fat coconut milk provides the perfect balance of flavor and moisture.
Why is it important to avoid overmixing the batter?
Overmixing can develop gluten (even though mochiko is gluten-free), which leads to a tougher mochi. The batter should be whisked until just combined.
Hawaiian Butter Mochi
Ingredients
Equipment
Method
- Preheat your oven to 350°F (175°C). Grease a 9×13 inch baking pan generously to prevent sticking.
- In a large bowl, whisk together the mochiko, sugar, baking powder, and salt. Ensure there are no lumps of mochiko.
- In a separate bowl, whisk together the milk, coconut milk, and eggs.
- Gradually pour the wet ingredients into the dry ingredients, whisking until just combined. Be careful not to overmix.
- Add the melted butter and vanilla extract to the batter. Whisk until the butter is fully incorporated. The batter will be quite liquid.
- Pour the batter into the prepared baking pan.
- Bake for 50-60 minutes, or until the top is golden brown and a toothpick inserted into the center comes out clean (or with a few moist crumbs).
- Let the butter mochi cool completely in the pan before cutting into squares. This is essential for the texture to develop properly.
- Dust with powdered sugar (optional) before serving.