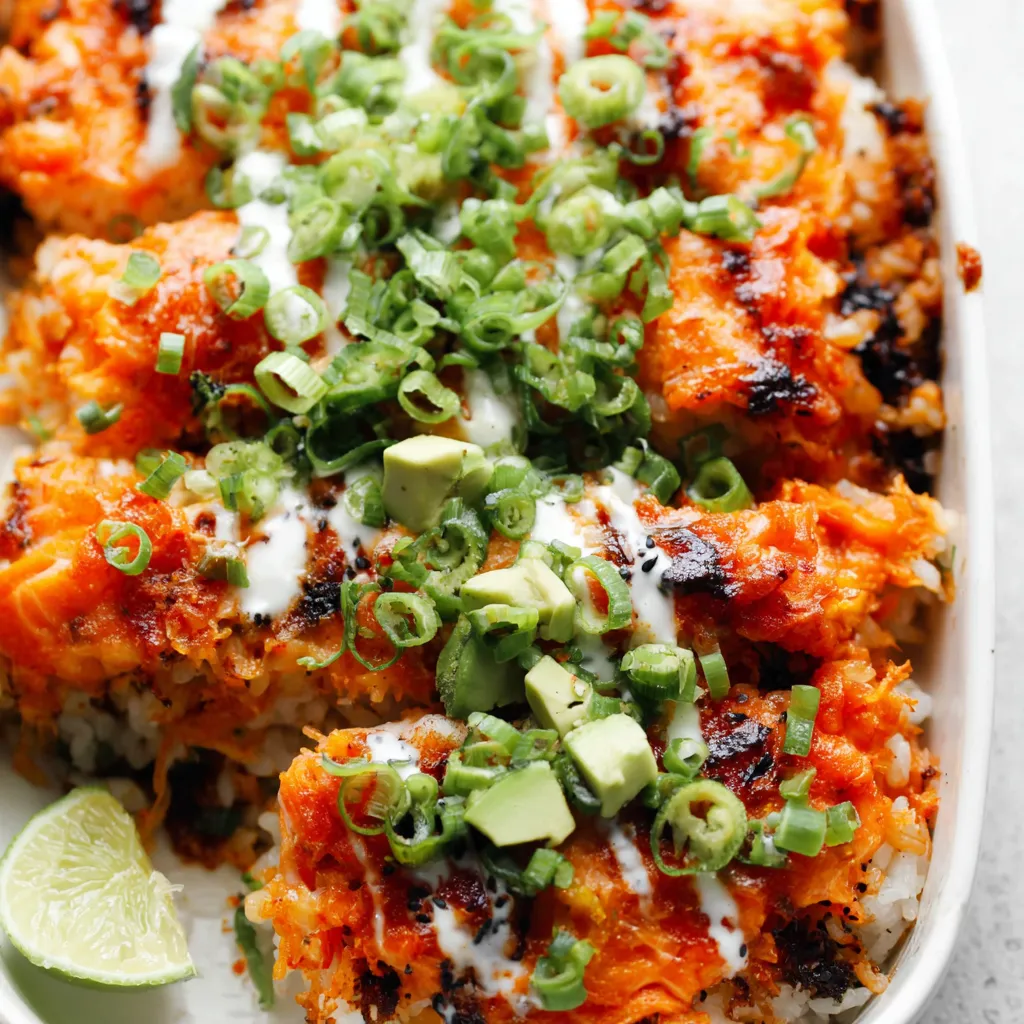
Craving sushi but don’t want the hassle of rolling? This Salmon Sushi Bake delivers all the familiar flavors of your favorite sushi rolls in an easy-to-assemble, crowd-pleasing bake. Prepare to be amazed at how simple and satisfying this dish is – I promise you’ll be making it again and again!
The Star Players: Ingredients You’ll Need
For the Sushi Rice:
- 2 cups sushi rice
- 2 ¼ cups water
- ¼ cup rice vinegar
- 2 tablespoons sugar
- 1 teaspoon salt
For the Salmon Topping:
- 1 pound salmon fillet, skin removed
- 2 tablespoons mayonnaise
- 1 tablespoon sriracha (adjust to your spice preference)
- 1 tablespoon soy sauce
- 1 teaspoon sesame oil
- 1 green onion, thinly sliced
For Assembly and Garnish:
- Nori seaweed sheets, cut into strips or small squares
- Avocado, sliced (optional)
- Sesame seeds (optional)
- Spicy mayo (optional, for drizzling)
- Eel sauce (optional, for drizzling)
- Crushed wasabi peas (optional)
Let’s Get Baking: Step-by-Step Instructions

Step 1: Cook the Perfect Sushi Rice
- Rinse the sushi rice under cold water until the water runs clear. This usually takes about 3-4 rinses. Don’t skip this! It removes excess starch and prevents sticky, gummy rice.
- Combine the rinsed rice and water in a pot. Bring to a boil, then reduce heat to low, cover, and simmer for 18-20 minutes, or until all the water is absorbed.
- While the rice is cooking, prepare the sushi vinegar mixture. In a small bowl, whisk together the rice vinegar, sugar, and salt until the sugar and salt are dissolved.
- Once the rice is cooked, remove it from the heat and let it sit, covered, for 10 minutes.
- Transfer the rice to a large bowl and gently fold in the sushi vinegar mixture. Be careful not to mash the rice. Allow the rice to cool slightly while you prepare the salmon.
Step 2: Prepare the Salmon Topping
- Preheat your oven to 400°F (200°C).
- Cut the salmon fillet into small, bite-sized pieces.
- In a bowl, combine the salmon with mayonnaise, sriracha, soy sauce, and sesame oil. Mix well to coat the salmon evenly.
Step 3: Assemble Your Sushi Bake Masterpiece
- Lightly grease a 9×13 inch baking dish.
- Spread the cooked sushi rice evenly in the bottom of the dish. You can use a rice paddle or a spatula to gently press it down.
- Spread the salmon mixture evenly over the rice.
- Bake for 12-15 minutes, or until the salmon is cooked through and slightly browned on top.
Step 4: The Grand Finale: Garnishing and Serving
- Remove the sushi bake from the oven and let it cool slightly before serving.
- Garnish with nori seaweed strips, sliced avocado (if using), sesame seeds, spicy mayo, and eel sauce. Get creative! This is where you can really customize it to your liking.
- Serve immediately and enjoy!
Troubleshooting Tips for a Perfect Bake
Sometimes things don’t go exactly as planned, but don’t worry, I’ve got you covered!
- Rice is too sticky: Make sure you rinse the rice thoroughly before cooking. You can also try using slightly less water.
- Salmon is dry: Don’t overbake the salmon! It should be cooked through but still moist. You can also add a little more mayonnaise to the mixture.
- Bake is too bland: Adjust the amount of sriracha and soy sauce to your liking. A drizzle of eel sauce adds a wonderful sweetness and umami.
- Nori seaweed is soggy: Add the nori strips right before serving to prevent them from getting soggy.
Spice It Up: Variations and Additions
Want to add your own personal touch? Here are a few ideas to get you started:
- Crab Sushi Bake: Substitute imitation crab meat for the salmon for a different flavor profile.
- Shrimp Sushi Bake: Use cooked shrimp instead of salmon.
- Vegetarian Sushi Bake: Use cooked tofu or vegetables like mushrooms and carrots.
- Add crunch: Mix in some tempura flakes or crushed wasabi peas for extra crunch.
- Consider pairing your Salmon Sushi Bake with a refreshing Asian Cucumber Salad for a complete and balanced meal.
Why This Recipe Rocks: The Benefits of Baking
Okay, so you might be wondering why bake sushi instead of making traditional rolls? Let me tell you, there are some serious perks:
- It’s WAY easier: No need to fuss with rolling mats and perfectly shaped rolls. Just layer, bake, and enjoy!
- It’s faster: This recipe comes together in under an hour, making it perfect for busy weeknights.
- It’s perfect for potlucks: The sushi bake is easy to transport and serve, making it a great option for parties and gatherings.
- It’s customizable: You can easily adapt the recipe to your own taste preferences.
Level Up Your Sushi Game: Essential Tips for Success
Want to make sure your Salmon Sushi Bake is a total knockout? Here are a few more tips to keep in mind:
- Use high-quality ingredients: Fresh salmon and good-quality sushi rice will make a big difference in the final flavor.
- Don’t overcook the rice: Overcooked rice will be mushy and unpleasant. Follow the cooking instructions carefully.
- Let the rice cool slightly: This will prevent the salmon from cooking unevenly.
- Don’t be afraid to experiment: Try different toppings and garnishes to find your perfect combination.
Serving Suggestions: Complete the Meal
While the Salmon Sushi Bake is delicious on its own, it’s even better when paired with a few complementary dishes:
- Miso soup: A classic Japanese side dish that’s warm, comforting, and full of umami flavor.
- Edamame: A healthy and delicious snack that’s perfect for sharing.
- Seaweed salad: A refreshing and flavorful salad that’s packed with nutrients.
- You could even try making a Cucumber California Roll on the side for a complete sushi experience!
Storing Leftovers: Keep the Deliciousness Going
If you have any leftovers (which is unlikely!), you can store them in an airtight container in the refrigerator for up to 2 days. Reheat gently in the microwave or oven before serving.
Final Thoughts: Dive into the Deliciousness
This Salmon Sushi Bake is a game-changer! It’s the perfect way to enjoy the flavors of sushi without all the fuss. So gather your ingredients, preheat your oven, and get ready to create a dish that will impress your friends and family. Happy baking!
Why is it important to rinse the sushi rice before cooking?
Rinsing the sushi rice removes excess starch, which prevents the rice from becoming sticky and gummy.
How do I prevent the nori seaweed from getting soggy?
Add the nori strips right before serving to prevent them from becoming soggy.
What can I do if my salmon sushi bake tastes too bland?
Adjust the amount of sriracha and soy sauce in the salmon mixture to your liking. A drizzle of eel sauce can also add sweetness and umami.
How long can I store leftover salmon sushi bake?
You can store leftovers in an airtight container in the refrigerator for up to 2 days. Reheat gently in the microwave or oven before serving.
Easy Salmon Sushi Bake
Ingredients
Equipment
Method
- Rinse the sushi rice under cold water until the water runs clear (about 3-4 rinses).
- Combine the rinsed rice and water in a pot. Bring to a boil, then reduce heat to low, cover, and simmer for 18-20 minutes, or until all the water is absorbed.
- While the rice is cooking, prepare the sushi vinegar mixture. In a small bowl, whisk together the rice vinegar, sugar, and salt until the sugar and salt are dissolved.
- Once the rice is cooked, remove it from the heat and let it sit, covered, for 10 minutes.
- Transfer the rice to a large bowl and gently fold in the sushi vinegar mixture. Allow the rice to cool slightly while you prepare the salmon.
- Preheat your oven to 400°F (200°C).
- Cut the salmon fillet into small, bite-sized pieces.
- In a bowl, combine the salmon with mayonnaise, sriracha, soy sauce, and sesame oil. Mix well to coat the salmon evenly.
- Lightly grease a 9×13 inch baking dish.
- Spread the cooked sushi rice evenly in the bottom of the dish. You can use a rice paddle or a spatula to gently press it down.
- Spread the salmon mixture evenly over the rice.
- Bake for 12-15 minutes, or until the salmon is cooked through and slightly browned on top.
- Remove the sushi bake from the oven and let it cool slightly before serving.
- Garnish with nori seaweed strips, sliced avocado (if using), sesame seeds, spicy mayo, and eel sauce.