Let’s Gather Our Ingredients
For the Cherry Filling:
- 4 cups fresh or frozen (thawed) pitted cherries
- 1/2 cup granulated sugar
- 1/4 cup cornstarch
- 1 tablespoon lemon juice
- 1/2 teaspoon almond extract (optional, but highly recommended!)
- Pinch of salt
For the Hand Pies:
- 2 sheets (14.1 oz each) puff pastry, thawed
- 1 large egg, beaten (for egg wash)
- 2 tablespoons granulated sugar, for sprinkling
Essential Equipment

- Large saucepan
- Small bowl
- Rolling pin
- Pizza cutter or knife
- Baking sheets
- Parchment paper
- Cookie cutters (various shapes) or a sharp knife
Step-by-Step Instructions: From Prep to Perfection
Making the Cherry Filling:
- Combine Ingredients: In a large saucepan, combine the cherries, sugar, cornstarch, lemon juice, almond extract (if using), and salt.
- Cook the Filling: Cook over medium heat, stirring constantly, until the mixture thickens and the cherries release their juices, about 5-7 minutes. It should resemble a thick jam.
- Cool Completely: Remove from heat and let the filling cool completely. This is crucial! Warm filling will melt the puff pastry and create a soggy mess. I usually pop it in the fridge to speed things up.
Assembling the Cherry Hand Pies:
- Preheat and Prep: Preheat your oven to 400°F (200°C). Line two baking sheets with parchment paper.
- Roll Out the Pastry: Lightly flour your work surface. Gently unfold one sheet of puff pastry. If it’s sticky, dust with a little more flour. Roll it out slightly to even it out, but don’t make it too thin!
- Cut Out Shapes: Use cookie cutters or a sharp knife to cut out desired shapes from the puff pastry. I love using heart shapes for a sweet touch, but circles, squares, or even stars work great.
- Fill the Pies: Place half of the cut-out shapes on the prepared baking sheets. Spoon about 1-2 tablespoons of the cooled cherry filling onto the center of each pastry shape, leaving a small border around the edge. Be careful not to overfill them, or the filling will ooze out during baking.
- Top with Pastry: Gently place the remaining pastry shapes on top of the filling, creating little “sandwiches.”
- Seal the Edges: Press the edges of the pastry together with a fork to seal. This not only looks pretty but also prevents the filling from escaping. For extra security, you can lightly brush the edges with a little water before sealing.
- Egg Wash and Sugar: In a small bowl, whisk the egg. Brush the tops of the hand pies with the egg wash. This will give them a beautiful golden sheen. Sprinkle generously with granulated sugar for a touch of sparkle and extra sweetness.
- Bake: Bake for 15-20 minutes, or until the hand pies are golden brown and the filling is bubbly. Keep a close eye on them, as baking times can vary depending on your oven.
- Cool and Enjoy: Let the hand pies cool on the baking sheets for a few minutes before transferring them to a wire rack to cool completely. This prevents them from getting soggy on the bottom. Serve warm or at room temperature and enjoy these delightful handheld sweets!
Troubleshooting Tips and Tricks
- Puff Pastry Problems: Puff pastry can be a bit temperamental. If it gets too warm, it will become sticky and difficult to work with. If this happens, pop it back in the fridge for a few minutes to chill. Also, avoid over-handling the pastry, as this can also make it tough.
- Filling Leakage: Sealing the edges well is key to preventing filling leakage. If you find that your filling is still oozing out, try chilling the filled hand pies in the fridge for 15 minutes before baking. This will help the pastry firm up and seal better.
- Browning Too Quickly: If your hand pies are browning too quickly, you can tent them with foil during the last few minutes of baking.
- Don’t Skip the Cooling Step: I know it’s tempting to dig in right away, but letting the filling cool completely before assembling the hand pies and allowing the baked pies to cool slightly before serving is essential. It prevents a soggy crust and makes them easier to handle.
Flavor Variations and Creative Twists
Beyond Basic Cherry:
- Spiced Cherry: Add a pinch of cinnamon, nutmeg, or ginger to the cherry filling for a warm, comforting flavor.
- Cherry Almond: Enhance the almond flavor by adding a few drops of almond extract to the egg wash. You could even sprinkle slivered almonds on top before baking.
- Chocolate Cherry: Fold mini chocolate chips into the cherry filling for a decadent treat.
- Other Fruit Combinations: Get creative and experiment with other fruit combinations! Try adding blueberries, raspberries, or peaches to the cherry filling.
Serving Suggestions:
- With Ice Cream: Serve warm Cherry Hand Pies with a scoop of vanilla ice cream or whipped cream for an extra special dessert.
- Dust with Powdered Sugar: For a simple and elegant touch, dust the cooled hand pies with powdered sugar.
- Make a Glaze: Whisk together powdered sugar and a little milk or lemon juice to create a simple glaze. Drizzle over the cooled hand pies.
The Beauty of Puff Pastry
Puff pastry is truly a baker’s best friend. It’s readily available in the freezer section of most grocery stores, and it’s incredibly versatile. It’s the perfect base for these delightful Fruit Pies. The flaky, buttery layers create a wonderful contrast to the sweet and juicy cherry filling. Plus, it makes these Mini Desserts feel extra special.Perfect for Any Occasion
These Cherry Hand Pies are ideal for so many occasions. They’re perfect for summer desserts, picnics, potlucks, or even a simple weeknight treat. Their portable nature makes them great Handheld Sweets for on-the-go snacking. Plus, they’re always a crowd-pleaser!Other Delicious Treats You Might Enjoy
If you love baking with fruit, be sure to check out my recipe for Apple Fritters! They’re another fantastic way to use seasonal fruit and create a delicious treat. For a fun twist on a classic dessert, try my Apple Pie Cheesecake Bites. Or, if you’re in the mood for something different, my Cinnamon Roll Cookies are always a hit. And if you’re looking for more apple goodness, don’t miss my Muffin Tin Apple Pies or Apple Crumb Cake. For another cherry treat, you might like Cherry Cookies.Storing Your Cherry Hand Pies
These Cherry Hand Pies are best enjoyed fresh, but they can be stored in an airtight container at room temperature for up to 2 days. To reheat, simply warm them in a preheated oven at 350°F (175°C) for a few minutes.Final Thoughts
So there you have it – my recipe for the most irresistible Cherry Hand Pies! I hope you enjoy making and sharing these delightful treats as much as I do. Don’t be afraid to experiment with different fillings and shapes to create your own signature hand pies. Happy baking!Can I use frozen cherries for the filling?
Yes, you can use frozen cherries for the filling. Just make sure to thaw them before using.
How do I prevent the filling from leaking out of the hand pies during baking?
Ensure you seal the edges of the pastry well with a fork. You can also lightly brush the edges with water before sealing for extra security. Chilling the filled hand pies for 15 minutes before baking can also help.
What can I do if my puff pastry gets too warm and sticky while I’m working with it?
If the puff pastry gets too warm and sticky, put it back in the refrigerator for a few minutes to chill. Avoid over-handling the pastry, as this can also make it tough.
How long can I store the cherry hand pies?
Cherry Hand Pies are best enjoyed fresh, but they can be stored in an airtight container at room temperature for up to 2 days. To reheat, warm them in a preheated oven at 350°F (175°C) for a few minutes.
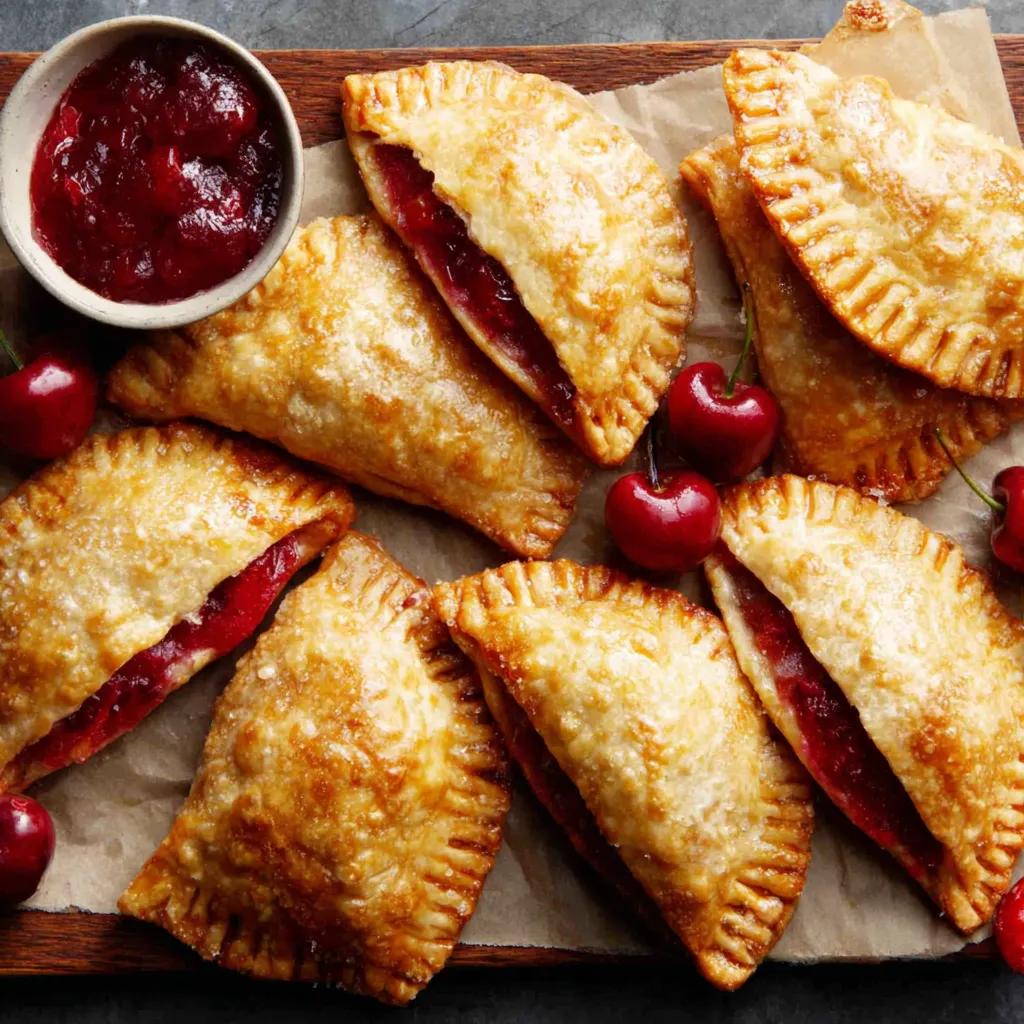
Irresistible Cherry Hand Pies
These Cherry Hand Pies are a delightful handheld dessert, perfect for summer gatherings and picnics. Flaky puff pastry encases a sweet and tangy cherry filling, creating an irresistible treat that’s easy to make and a guaranteed crowd-pleaser.
Ingredients
Equipment
Method
- In a large saucepan, combine the cherries, sugar, cornstarch, lemon juice, almond extract (if using), and salt.
- Cook over medium heat, stirring constantly, until the mixture thickens and the cherries release their juices, about 5-7 minutes. The filling should resemble a thick jam.
- Remove from heat and let the filling cool completely. Refrigerate to speed up cooling.
- Preheat your oven to 400°F (200°C). Line two baking sheets with parchment paper.
- Lightly flour your work surface. Gently unfold one sheet of puff pastry. If it’s sticky, dust with a little more flour. Roll it out slightly to even it out.
- Use cookie cutters or a sharp knife to cut out desired shapes from the puff pastry.
- Place half of the cut-out shapes on the prepared baking sheets.
- Spoon about 1-2 tablespoons of the cooled cherry filling onto the center of each pastry shape, leaving a small border around the edge. Be careful not to overfill.
- Gently place the remaining pastry shapes on top of the filling, creating little “sandwiches”.
- Press the edges of the pastry together with a fork to seal. Lightly brush the edges with water before sealing for extra security.
- In a small bowl, whisk the egg. Brush the tops of the hand pies with the egg wash.
- Sprinkle generously with granulated sugar.
- Bake for 15-20 minutes, or until the hand pies are golden brown and the filling is bubbly.
- Let the hand pies cool on the baking sheets for a few minutes before transferring them to a wire rack to cool completely.
- Serve warm or at room temperature.
Notes
Puff pastry can be temperamental. If it gets too warm, chill it in the fridge. Seal the edges well to prevent filling leakage. If browning too quickly, tent with foil. These hand pies are best enjoyed fresh, but can be stored in an airtight container at room temperature for up to 2 days. To reheat, warm in a preheated oven at 350°F (175°C) for a few minutes. For flavor variations, add cinnamon, nutmeg, or ginger to the filling; add almond extract to the egg wash; fold in mini chocolate chips; or experiment with other fruit combinations like blueberries, raspberries, or peaches. Serve with ice cream or whipped cream, dust with powdered sugar, or drizzle with a simple glaze made from powdered sugar and milk or lemon juice.