Unlocking the Secrets: The Science Behind the Glaze
The key to truly caramelized BBQ chicken lies not just in the sauce, but in understanding the Maillard reaction and caramelization. These two distinct chemical processes are responsible for the beautiful browning and complex flavors we crave. The Maillard reaction occurs between amino acids (from the chicken) and reducing sugars (in the BBQ sauce) at high temperatures, creating hundreds of different flavor compounds. Caramelization, on the other hand, involves the browning of sugars themselves. For optimal caramelization, you need enough sugar in your BBQ sauce and sufficiently high heat. However, too much sugar or too high heat will lead to burning, a common pitfall. Furthermore, the presence of moisture inhibits these reactions. Therefore, the trick is to slowly reduce the sauce, allowing water to evaporate and concentrating the sugars while carefully monitoring the temperature to prevent burning. Bone-in, skin-on chicken thighs are ideal because the bone helps regulate the internal temperature and the skin renders, providing fat that contributes to browning and flavor. Marinades with enzymatic ingredients like pineapple juice can pre-tenderize the chicken and help with even cooking, but excess marinade must be patted dry before grilling to promote proper caramelization.The Ultimate Caramelized BBQ Chicken Thighs Recipe
 This recipe has been meticulously tested and refined to deliver consistently perfect caramelized BBQ chicken thighs. It walks the line between bold flavor, beautiful color, and delectable texture.
Ingredients:
- 8 bone-in, skin-on chicken thighs (about 2.5 pounds)
- 1 cup your favorite BBQ sauce (avoid overly sweet sauces initially)
- 2 tablespoons apple cider vinegar
- 1 tablespoon Worcestershire sauce
- 1 tablespoon brown sugar (packed)
- 1 teaspoon smoked paprika
- 1/2 teaspoon garlic powder
- 1/4 teaspoon cayenne pepper (optional, for heat)
- Salt and freshly ground black pepper to taste
- Optional: Fresh chopped parsley or green onions for garnish
Instructions:
- Prepare the Chicken: Pat the chicken thighs dry with paper towels. This is crucial for browning. Season generously with salt, pepper, smoked paprika, and garlic powder.
- Make the BBQ Glaze: In a small saucepan, combine the BBQ sauce, apple cider vinegar, Worcestershire sauce, brown sugar, and cayenne pepper (if using). Bring to a simmer over medium heat, stirring occasionally. Reduce the heat to low and simmer for 10-15 minutes, or until slightly thickened, stirring frequently to prevent sticking.
- Grill the Chicken: Preheat your grill to medium heat (about 350-400°F). If using a charcoal grill, arrange the coals for indirect heat. Place the chicken thighs skin-side down on the grill. Cook for 8-10 minutes, or until the skin is golden brown and crispy. Avoid flare-ups by moving the chicken to a cooler part of the grill if necessary.
- Flip and Glaze: Flip the chicken thighs and cook for another 8-10 minutes. Begin basting with the BBQ glaze during the last 10 minutes of cooking, applying a thin layer every 2-3 minutes. Be careful not to over-glaze too early, as the sugars in the sauce can burn.
- Check for Doneness: The chicken is done when the internal temperature reaches 165°F. Use a meat thermometer inserted into the thickest part of the thigh (avoiding the bone).
- Rest and Serve: Remove the chicken from the grill and let it rest for 5-10 minutes before serving. This allows the juices to redistribute, resulting in a more tender and flavorful chicken. Garnish with fresh parsley or green onions, if desired.
My Deep Dive: The Quest for Caramelized Perfection
My journey to perfect caramelized BBQ chicken thighs was far from smooth. Like many of you, I initially thought it was as simple as slapping on some BBQ sauce and throwing it on the grill. Oh, how wrong I was!Phase 1: The Charred Disasters
My first few attempts were a disaster. I used a high-sugar BBQ sauce, cranked up the heat, and ended up with chicken that was burnt on the outside and raw on the inside. The sauce was a sticky, black mess. I realized I needed to understand the science behind the process. It was during this stage that I discovered the importance of the Maillard reaction and caramelization, concepts I’d previously only associated with baking.Phase 2: The Soggy Struggle
Next, I tried lowering the heat, but then the chicken became soggy and the skin didn’t crisp up. The sauce never really caramelized; it just sat there, a lukewarm, unappealing coating. I experimented with different BBQ sauces, marinades, and cooking times, but nothing seemed to work consistently. I even contemplated giving up and just making Crock Pot Bourbon Chicken instead, a much less fussy option.Phase 3: The “Aha!” Moment
Then, I had an “Aha!” moment. I realized that the key was to control the moisture and gradually build up the caramelization. I started patting the chicken thighs dry before seasoning them, which made a huge difference in skin crispness. I also learned to reduce the BBQ sauce in a saucepan before applying it to the chicken, concentrating the sugars and flavors. Using apple cider vinegar, as well, helped cut through the sweetness. Finally, I understood that basting with the glaze should be done gradually, during the last few minutes of cooking, to prevent burning. It was also during this time that I perfected my technique for making Crispy Skillet Chicken Thighs, a related skill that helped me understand how to render chicken fat effectively.Phase 4: Fine-Tuning and Flavor Exploration
From there, it was all about fine-tuning the recipe and experimenting with different flavor combinations. I tried adding smoked paprika for a smoky depth, cayenne pepper for a touch of heat, and Worcestershire sauce for umami. I discovered that a little brown sugar in the glaze amplified the caramelization process. Through rigorous testing, I also realized that letting the chicken rest after cooking was crucial for achieving optimal tenderness and juiciness. And while this recipe shines on its own, sometimes I’ll incorporate it into dishes like Bbq Chicken Quesadillas or even Bbq Chicken Mac And Cheese for a creative twist. One can also adjust the sauces a bit and compare it to Sweet Baby Ray’s Chicken or even a variation of Bbq Pulled Chicken Crockpot.The Foolproof Method: Your Path to Caramelized Glory
After countless experiments and more than a few burnt chicken thighs, I’ve distilled the process down to a simple, foolproof method. Follow these steps, and you’ll be grilling up caramelized BBQ chicken thighs like a pro in no time!- Dry is Key: Always pat your chicken thighs thoroughly dry with paper towels before seasoning.
- Season Generously: Don’t be shy with the salt, pepper, and other seasonings. They penetrate the meat and enhance the flavor.
- Pre-Reduce the Glaze: Simmer your BBQ sauce with vinegar, Worcestershire and brown sugar in a saucepan to concentrate the sugars and prevent burning.
- Medium Heat is Your Friend: Preheat your grill to medium heat (350-400°F). Avoid high heat, which will lead to burning.
- Skin-Side Down First: Start grilling the chicken skin-side down to render the fat and create crispy skin.
- Baste Sparingly: Begin basting with the glaze during the last 10 minutes of cooking, applying a thin layer every 2-3 minutes.
- Temperature Matters: Use a meat thermometer to ensure the chicken reaches an internal temperature of 165°F.
- Rest is Essential: Let the chicken rest for 5-10 minutes before serving to allow the juices to redistribute.
What is the secret to getting truly caramelized BBQ chicken?
The key lies in understanding the Maillard reaction and caramelization, reducing the sauce to concentrate sugars, using bone-in, skin-on chicken thighs, and patting the chicken dry before cooking to promote browning.
Why is it important to pat the chicken thighs dry before grilling?
Patting the chicken thighs dry is crucial for browning and achieving crispy skin. Excess moisture inhibits the Maillard reaction and caramelization.
How do you prevent the BBQ sauce from burning on the grill?
Prevent burning by pre-reducing the BBQ sauce in a saucepan to concentrate the sugars, using medium heat (350-400°F), and basting sparingly during the last 10 minutes of cooking.
What temperature should the chicken reach to be considered done?
The chicken is done when the internal temperature reaches 165°F, measured with a meat thermometer inserted into the thickest part of the thigh, avoiding the bone.
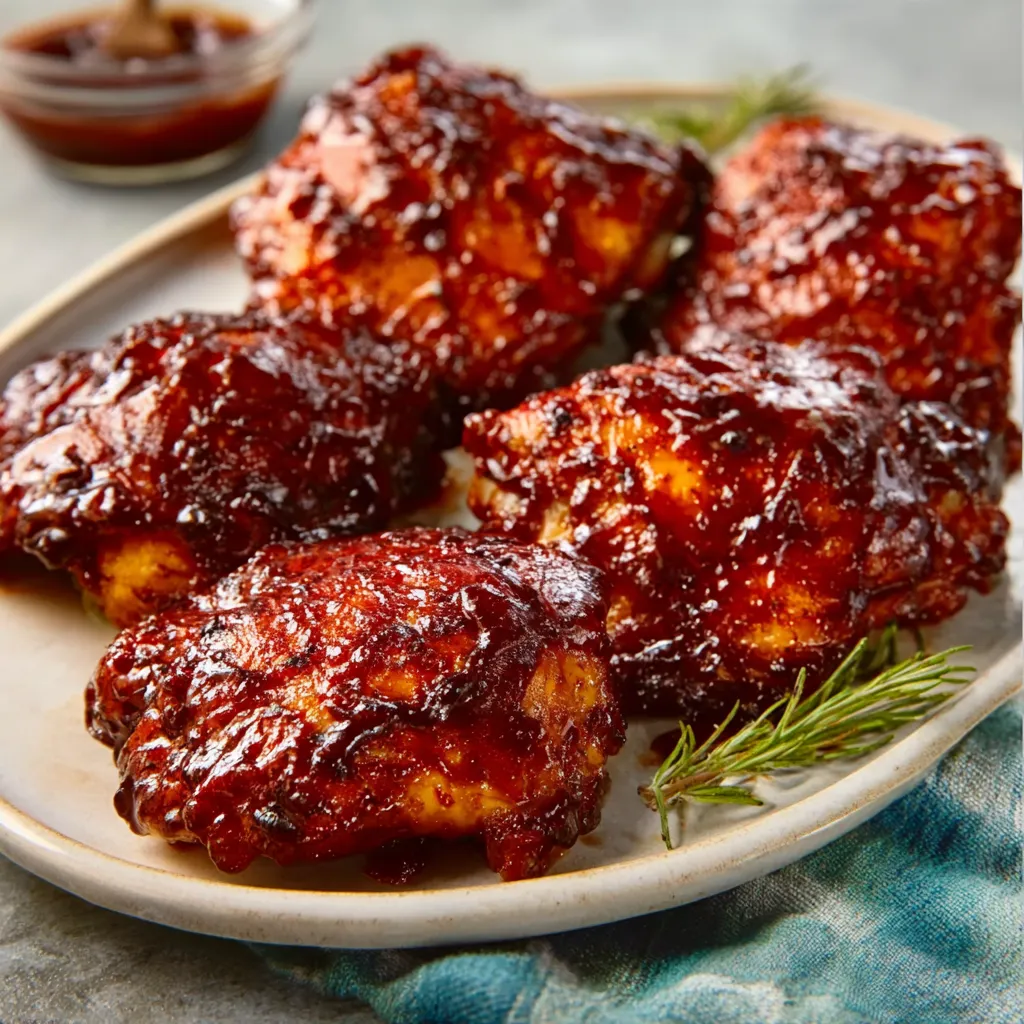
Ultimate Caramelized BBQ Chicken Thighs
These caramelized BBQ chicken thighs achieve the perfect balance of smoky char, sticky-sweet glaze, and juicy, tender meat. The key is controlling moisture, gradually building caramelization, and using a well-balanced BBQ glaze.
Ingredients
Equipment
Method
- Prepare the Chicken: Pat the chicken thighs dry with paper towels. Season generously with salt, pepper, smoked paprika, and garlic powder.
- Make the BBQ Glaze: In a small saucepan, combine the BBQ sauce, apple cider vinegar, Worcestershire sauce, brown sugar, and cayenne pepper (if using).
- Bring to a simmer over medium heat, stirring occasionally. Reduce the heat to low and simmer for 10-15 minutes, or until slightly thickened, stirring frequently to prevent sticking.
- Grill the Chicken: Preheat your grill to medium heat (about 350-400°F). If using a charcoal grill, arrange the coals for indirect heat.
- Place the chicken thighs skin-side down on the grill. Cook for 8-10 minutes, or until the skin is golden brown and crispy. Avoid flare-ups by moving the chicken to a cooler part of the grill if necessary.
- Flip and Glaze: Flip the chicken thighs and cook for another 8-10 minutes.
- Begin basting with the BBQ glaze during the last 10 minutes of cooking, applying a thin layer every 2-3 minutes. Be careful not to over-glaze too early, as the sugars in the sauce can burn.
- Check for Doneness: The chicken is done when the internal temperature reaches 165°F. Use a meat thermometer inserted into the thickest part of the thigh (avoiding the bone).
- Rest and Serve: Remove the chicken from the grill and let it rest for 5-10 minutes before serving. This allows the juices to redistribute, resulting in a more tender and flavorful chicken. Garnish with fresh parsley or green onions, if desired.
Notes
Patting the chicken dry before seasoning is crucial for crispy skin. Reducing the BBQ sauce in a saucepan concentrates the sugars and prevents burning. Baste gradually during the last few minutes of cooking. Let the chicken rest before serving for optimal tenderness and juiciness. Store leftovers in an airtight container in the refrigerator for up to 3 days.