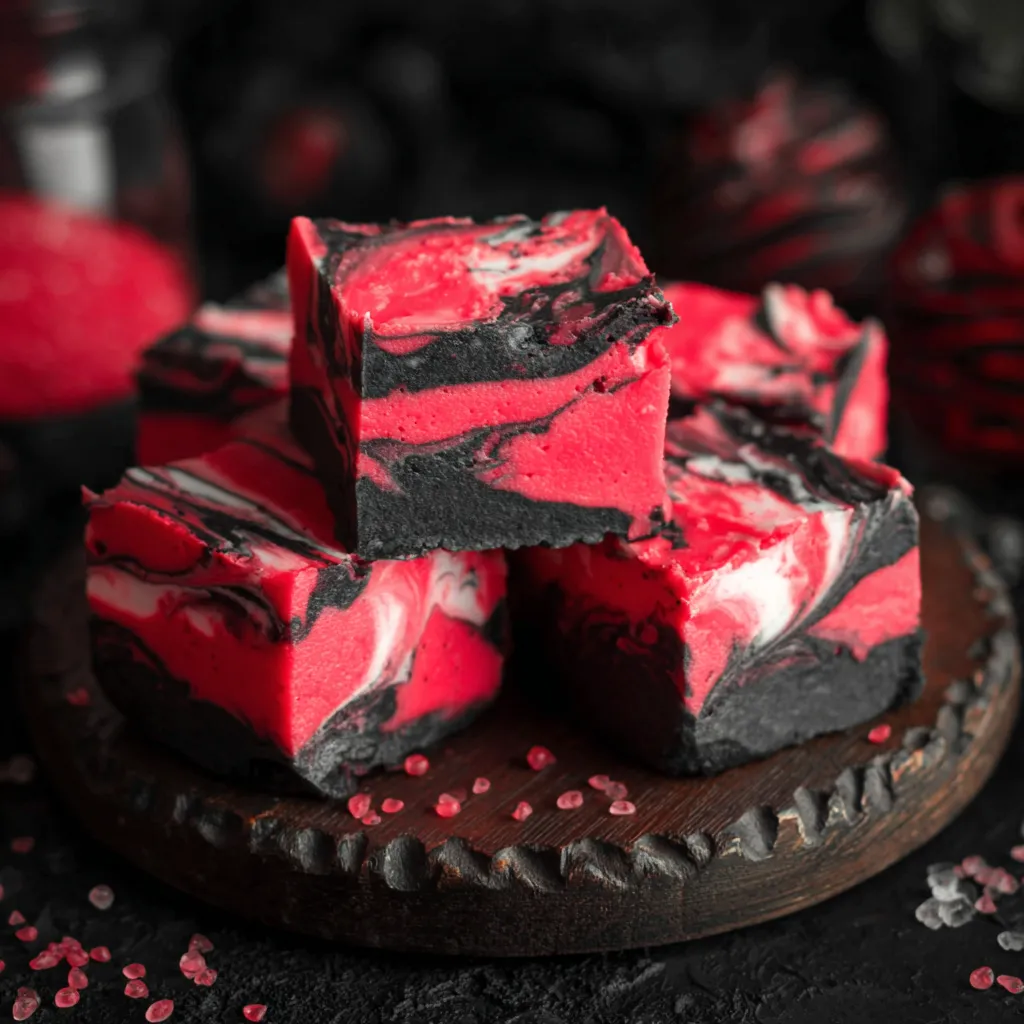
This Blood Velvet Fudge isn’t just any fudge; it’s a decadent, creamy delight that perfectly captures the spirit of spooky season with its rich red hue and velvety smooth texture. Imagine sinking your teeth into a bite of pure indulgence, a sweet treat that’s as visually stunning as it is delicious. I promise, this recipe will become a Halloween staple!
What You’ll Need: The Blood Velvet Fudge Ingredients

For the Fudge:
- 3 cups (360g) powdered sugar
- 1 cup (200g) granulated sugar
- ¾ cup (170ml) heavy cream
- ½ cup (1 stick, 113g) unsalted butter, cut into cubes
- ¼ cup (60ml) milk
- 1 teaspoon red food coloring gel (adjust to desired intensity)
- 1 teaspoon vanilla extract
- ½ teaspoon salt
- Optional: ¼ cup white chocolate chips or red sprinkles for topping
Essential Equipment:
- 8×8 inch baking pan
- Parchment paper
- Medium saucepan
- Candy thermometer (optional, but recommended)
- Mixing spoon or spatula
Crafting the Perfect Blood Velvet Fudge: Step-by-Step Instructions
Step 1: Prep Your Pan
- Line an 8×8 inch baking pan with parchment paper, leaving some overhang on the sides. This makes it super easy to lift the fudge out later! Trust me, you’ll thank me for this tip.
Step 2: Combine and Cook
- In a medium saucepan, combine the granulated sugar, heavy cream, butter, and milk.
- Place the saucepan over medium heat and stir constantly until the butter is melted and the sugar is dissolved.
- Bring the mixture to a gentle boil, stirring occasionally. If you have a candy thermometer, aim for 235-240°F (113-116°C) – this is the “soft-ball” stage. If you don’t have a thermometer, cook for about 5-7 minutes, keeping a close eye on it.
- Tricky Tip: Watch closely to make sure it doesn’t burn! Burnt sugar is NO bueno! Keep stirring!
Step 3: Remove From Heat and Add the Goodies
- Remove the saucepan from the heat.
- Immediately add the powdered sugar, red food coloring gel, vanilla extract, and salt.
- Using a spoon or spatula, stir vigorously until the mixture is smooth and creamy. Be careful not to overmix, as this can make the fudge grainy.
- Troubleshooting: If you find that the powdered sugar isn’t fully incorporating, try adding a tablespoon of milk at a time until you reach the desired consistency.
Step 4: Pour and Decorate
- Pour the fudge mixture into the prepared baking pan and spread it evenly.
- If desired, sprinkle the top with white chocolate chips or red sprinkles.
- Gently press the toppings into the fudge so they adhere.
Step 5: Chill and Enjoy!
- Cover the pan with plastic wrap and refrigerate for at least 2 hours, or preferably overnight, to allow the fudge to set completely.
- Once the fudge is firm, lift it out of the pan using the parchment paper overhang.
- Cut the fudge into small squares and serve.
- Storage Tip: Store leftover fudge in an airtight container in the refrigerator for up to a week.
Let’s Talk About That Velvet Touch: Achieving the Perfect Texture
The secret to truly amazing Blood Velvet Fudge lies in its texture. You want it to be smooth, creamy, and melt-in-your-mouth delicious. Here are a few tips to help you achieve that perfect velvet finish:
- Don’t Overcook: Overcooking the sugar mixture can result in a grainy fudge. Use a candy thermometer for best results, and remove the mixture from the heat as soon as it reaches the soft-ball stage.
- Don’t Overmix: Overmixing after adding the powdered sugar can also lead to a grainy texture. Stir just until the ingredients are combined.
- Quality Ingredients: Using high-quality ingredients, especially butter and heavy cream, will make a big difference in the final result.
- The Color is Key: Red food coloring gel will give you the most vibrant “blood velvet” color. Liquid food coloring tends to be less concentrated, so you may need to use more, which can affect the consistency of the fudge.
Variations to Make it Your Own: Get Creative!
While this Blood Velvet Fudge recipe is fantastic as is, feel free to experiment and make it your own! Here are a few ideas to get you started:
- Chocolate Chunk Surprise: Fold in chopped dark chocolate or milk chocolate chunks after removing the mixture from the heat.
- Nutty Delight: Add chopped pecans, walnuts, or almonds for a bit of crunch.
- Peppermint Twist: Add a few drops of peppermint extract for a festive holiday flavor.
- Spice it Up: A pinch of cinnamon or nutmeg can add warmth and depth to the flavor.
- Boozy Boost: A tablespoon of your favorite liqueur, such as Baileys or Kahlua, can add a touch of sophistication (adults only, of course!).
Serving Suggestions: Make it a Spooky Spectacle
Blood Velvet Fudge is perfect for Halloween parties, spooky movie nights, or any occasion where you want to add a touch of eerie elegance. Here are a few serving suggestions:
- Halloween Dessert Table: Arrange the fudge squares on a spooky platter alongside other Halloween treats like Spooky Brownies and Halloween Eyeball Jello Shots.
- Party Favors: Package individual squares of fudge in small cellophane bags and tie with ribbon for a festive party favor.
- Gift Giving: Blood Velvet Fudge makes a thoughtful and delicious homemade gift for friends and family.
- Themed Drinks: Pair your fudge with a spooky themed drink like Beetlejuice Drink for the ultimate Halloween experience.
Beyond Fudge: More Spooky Treats to Explore
If you’re looking to expand your Halloween baking repertoire, consider trying these other spooky and delicious recipes:
- Witch’s Brew Stew: A savory option for your spooky feast.
- Red Velvet Popcorn: A crunchy, sweet treat that’s perfect for snacking.
- Halloween Brain Treats: For those who like their desserts with a side of gore.
Troubleshooting: Common Fudge Fails and How to Fix Them
Making fudge can be a little tricky, but don’t worry, I’m here to help! Here are a few common problems and their solutions:
- Grainy Fudge: This is usually caused by overcooking or overmixing. Be sure to use a candy thermometer and stir just until the ingredients are combined.
- Fudge That Won’t Set: This can be caused by not cooking the sugar mixture to a high enough temperature. Use a candy thermometer to ensure you reach the soft-ball stage.
- Fudge That’s Too Hard: This is usually caused by overcooking. Next time, try removing the mixture from the heat a little earlier.
- Fudge That’s Too Soft: This can be caused by not chilling the fudge long enough. Be sure to refrigerate it for at least 2 hours, or preferably overnight.
Final Thoughts: Your Fudge-Making Adventure Awaits!
So, are you ready to embark on your Blood Velvet Fudge adventure? I know you can do it! With a little patience and these tips in hand, you’ll be whipping up batches of this decadent treat in no time. Remember to have fun, get creative, and enjoy the spooky season! Happy baking!
What makes this Blood Velvet Fudge different from other fudge recipes?
This Blood Velvet Fudge is a decadent, creamy delight that captures the spirit of spooky season with its rich red hue and velvety smooth texture, making it visually stunning and delicious.
What is the key to achieving the perfect ‘velvet’ texture for this fudge?
The key is to avoid overcooking and overmixing the fudge. Use a candy thermometer to reach the soft-ball stage (235-240°F) and stir just until the ingredients are combined. Also, use high-quality ingredients.
What are some variations I can try to customize the Blood Velvet Fudge?
You can add chopped dark chocolate or milk chocolate chunks, nuts (pecans, walnuts, or almonds), peppermint extract, cinnamon, nutmeg, or even a tablespoon of your favorite liqueur (like Baileys or Kahlua).
What should I do if my Blood Velvet Fudge turns out grainy?
Grainy fudge is usually caused by overcooking or overmixing. Use a candy thermometer and stir just until the ingredients are combined. You might also have overcooked the mixture.
Blood Velvet Fudge
Ingredients
Equipment
Method
- Line an 8×8 inch baking pan with parchment paper, leaving some overhang.
- In a medium saucepan, combine the granulated sugar, heavy cream, butter, and milk.
- Place the saucepan over medium heat and stir constantly until the butter is melted and the sugar is dissolved.
- Bring the mixture to a gentle boil, stirring occasionally. If using a candy thermometer, aim for 235-240°F (113-116°C), the soft-ball stage. Otherwise, cook for about 5-7 minutes, keeping a close eye on it.
- Remove the saucepan from the heat.
- Immediately add the powdered sugar, red food coloring gel, vanilla extract, and salt.
- Using a spoon or spatula, stir vigorously until the mixture is smooth and creamy. Be careful not to overmix.
- If the powdered sugar isn’t fully incorporating, add a tablespoon of milk at a time until you reach the desired consistency.
- Pour the fudge mixture into the prepared baking pan and spread it evenly.
- If desired, sprinkle the top with white chocolate chips or red sprinkles.
- Gently press the toppings into the fudge so they adhere.
- Cover the pan with plastic wrap and refrigerate for at least 2 hours, or preferably overnight, to allow the fudge to set completely.
- Once the fudge is firm, lift it out of the pan using the parchment paper overhang.
- Cut the fudge into small squares and serve.