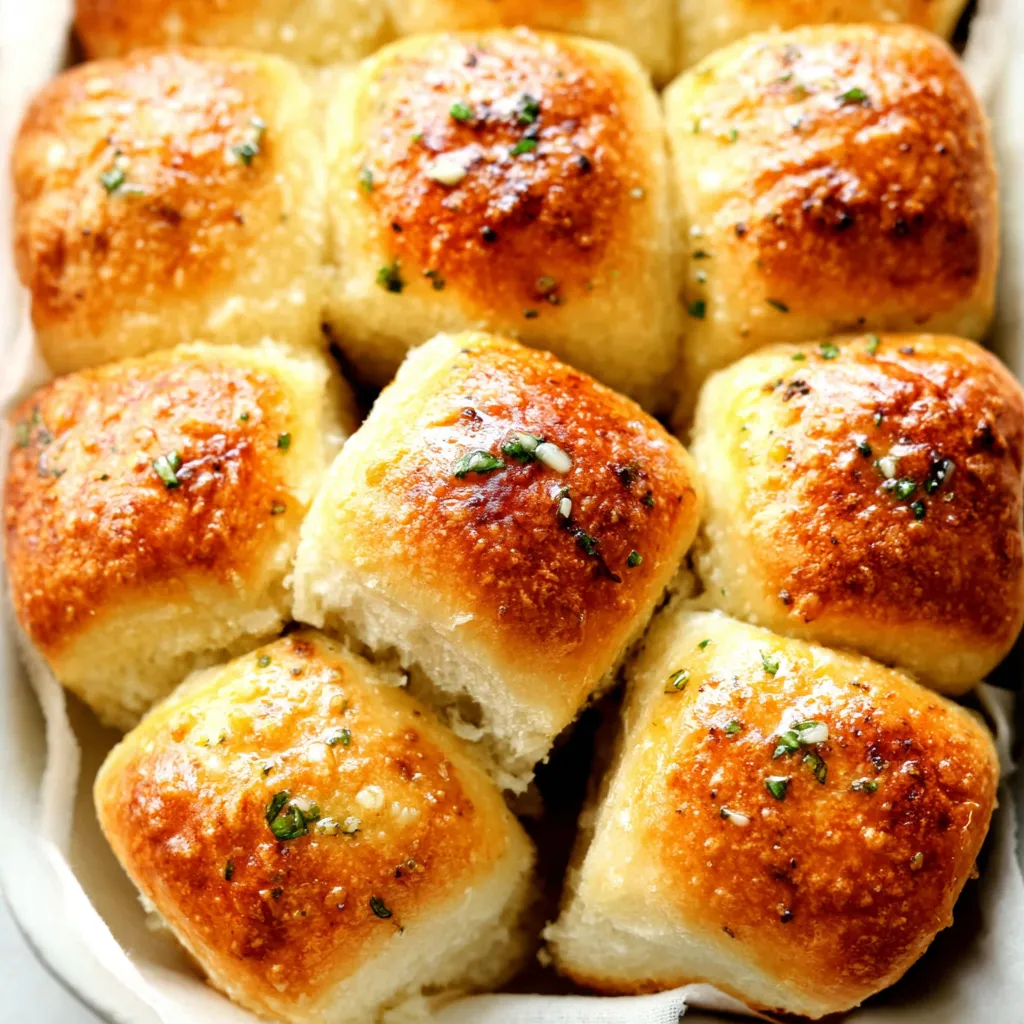
Is there anything better than tearing into a warm, pillowy roll, slathered in garlic butter, with that perfect balance of savory and comforting flavors? These Garlic Rolls are more than just a side dish; they’re an experience, a delightful indulgence that elevates any meal from ordinary to extraordinary. Trust me, with this recipe, you’ll be baking up the most irresistible garlic rolls your friends and family have ever tasted, guaranteed!
The Secret to Incredible Garlic Rolls: Ingredients You’ll Need

For the Dough:
- 1 cup (240ml) warm milk (about 105-115°F)
- 2 ¼ teaspoons (7g) active dry yeast
- ¼ cup (50g) granulated sugar
- 1 teaspoon salt
- 1 large egg, at room temperature
- ¼ cup (60ml) vegetable oil
- 3 – 3 ½ cups (360-420g) all-purpose flour, plus more for dusting
For the Garlic Butter:
- ½ cup (113g) unsalted butter, melted
- 4-6 cloves garlic, minced (or more, to taste!)
- 1 tablespoon fresh parsley, chopped (optional)
- ½ teaspoon garlic powder (optional, for extra garlicky flavor)
- Salt and pepper to taste
Let’s Get Baking: Step-by-Step Instructions
Making the Dough:
- Proof the Yeast: In a large bowl, combine the warm milk, yeast, and sugar. Let it sit for 5-10 minutes until foamy. This means the yeast is active and ready to go! If it doesn’t foam, your yeast might be old – try again with fresh yeast.
- Combine Wet Ingredients: Add the salt, egg, and oil to the yeast mixture. Whisk until well combined.
- Add the Flour: Gradually add the flour, one cup at a time, mixing with a wooden spoon or dough hook attachment on your stand mixer. Start with 3 cups and add more as needed until the dough comes together and pulls away from the sides of the bowl. You want a soft, slightly sticky dough.
- Knead the Dough: Turn the dough out onto a lightly floured surface and knead for 5-7 minutes, or until smooth and elastic. If using a stand mixer, knead with the dough hook for 5 minutes. The dough should be tacky but not overly sticky. If it’s too sticky, add a tablespoon of flour at a time until it reaches the right consistency.
- First Rise: Place the dough in a lightly oiled bowl, turning to coat. Cover with plastic wrap or a clean kitchen towel and let rise in a warm place for 1-1.5 hours, or until doubled in size. This is crucial for light and airy rolls!
Shaping and Baking the Rolls:
- Punch Down the Dough: Gently punch down the dough to release the air. Turn it out onto a lightly floured surface.
- Divide and Shape: Divide the dough into 12 equal pieces. Roll each piece into a ball. You can also get creative here and shape them into knots or other fun shapes!
- Second Rise: Place the rolls in a greased 9×13 inch baking dish. Cover with plastic wrap or a clean kitchen towel and let rise for another 30-45 minutes, or until puffy. This second rise gives them that extra bit of fluffiness.
- Preheat the Oven: While the rolls are rising, preheat your oven to 375°F (190°C).
- Bake the Rolls: Bake for 18-22 minutes, or until golden brown on top. Keep an eye on them, as ovens can vary. If they start to brown too quickly, tent them with foil.
Garlic Butter Time!:
- Make the Garlic Butter: While the rolls are baking, melt the butter in a small saucepan or microwave. Add the minced garlic, parsley (if using), garlic powder (if using), salt, and pepper. Stir to combine.
- Brush with Garlic Butter: As soon as the rolls come out of the oven, brush them generously with the garlic butter. Make sure to get into all the nooks and crannies!
- Serve Immediately: Let the rolls cool slightly before serving. They are best enjoyed warm!
Tips and Tricks for Garlic Roll Perfection
- Warm Milk is Key: Make sure your milk is warm but not hot. Too hot, and you’ll kill the yeast! A temperature of 105-115°F is ideal.
- Don’t Overwork the Dough: Over-kneading can result in tough rolls. Knead just until the dough is smooth and elastic.
- Proper Rising is Essential: Give the dough enough time to rise in a warm place. This is what makes the rolls light and airy. A slightly warm oven (turned off!) works great.
- Garlic Intensity: Adjust the amount of garlic to your liking. If you’re a garlic lover, don’t be afraid to add more! Roasting the garlic beforehand can also add a delicious, mellow flavor.
- Fresh Herbs: Fresh parsley adds a lovely pop of color and flavor, but you can also use other herbs like rosemary or thyme.
- Cheese, Please!: For extra indulgence, sprinkle some grated Parmesan cheese over the rolls before baking.
- Freezing for Later: These garlic rolls freeze beautifully! Let them cool completely, then wrap them tightly in plastic wrap and place them in a freezer bag. To reheat, thaw them in the refrigerator overnight and then warm them in a low oven (around 300°F) until heated through.
Variations to Spice Things Up
- Cheesy Garlic Rolls: Sprinkle shredded mozzarella or cheddar cheese over the rolls during the last few minutes of baking.
- Herb-Infused Garlic Rolls: Add chopped fresh herbs like rosemary, thyme, or oregano to the garlic butter.
- Spicy Garlic Rolls: Add a pinch of red pepper flakes to the garlic butter for a little kick.
- Garlic Knot Rolls: Shape the dough into knots instead of balls for a fun twist.
Garlic Rolls: The Perfect Pairing
These garlic rolls are incredibly versatile and pair well with a variety of dishes. They’re fantastic alongside pasta dishes like spaghetti with marinara sauce or creamy Alfredo. They also make a wonderful accompaniment to soups and stews, perfect for soaking up all the delicious broth. And, of course, they’re always a hit with grilled meats and vegetables. For a truly decadent experience, try dipping them in some homemade marinara sauce or pesto. If you’re planning a potluck, consider bringing these along with a Garbage Bread for a surefire crowd-pleaser! Or for a sweet and savory treat, try them with Buttery Pecan Crescent Rolls. If you like a less intense garlic flavor, try these Buttery Garlic Rolls. Or if you want something very simple and classic, try these Garlic Butter Rolls.Troubleshooting: Common Garlic Roll Problems and Solutions
- Rolls are too dense: This could be due to not using enough yeast, not allowing the dough to rise long enough, or using too much flour. Make sure your yeast is fresh, give the dough ample time to rise in a warm place, and add flour gradually until the dough is just right.
- Rolls are too dry: This could be due to overbaking. Keep an eye on the rolls while they’re in the oven and tent them with foil if they start to brown too quickly. Brushing them generously with garlic butter after baking will also help.
- Rolls are not garlicky enough: Don’t be afraid to add more garlic to the garlic butter! You can also add garlic powder for an extra boost of flavor.
Why These Garlic Rolls Are the Best
What sets these Garlic Rolls apart is the perfect balance of flavors and textures. They’re soft, fluffy, and incredibly buttery, with just the right amount of garlic. The recipe is easy to follow, even for beginner bakers, and the results are always impressive. Plus, they’re so versatile – you can customize them with different herbs, cheeses, or spices to suit your taste.Now It’s Your Turn!
So, there you have it – everything you need to bake up a batch of the best ever Garlic Rolls. I know baking bread can sometimes seem intimidating, but trust me, this recipe is foolproof. Gather your ingredients, follow the steps, and get ready to enjoy the most delicious, garlicky, buttery rolls you’ve ever tasted. Happy baking!What is the ideal temperature for the milk when proofing the yeast?
The milk should be warm, around 105-115°F (40-46°C). Milk that is too hot can kill the yeast.
What can I do if my rolls are too dense?
Dense rolls can be caused by not enough yeast, insufficient rising time, or too much flour. Ensure your yeast is fresh, allow the dough to rise properly in a warm place, and add flour gradually until the dough is the right consistency.
Can these garlic rolls be frozen for later?
Yes, these garlic rolls freeze well. Let them cool completely, wrap them tightly in plastic wrap, place them in a freezer bag, thaw them overnight in the refrigerator, and then warm them in a low oven (around 300°F) until heated through.
What are some variations I can make to the garlic rolls?
You can make cheesy garlic rolls by adding shredded mozzarella or cheddar, herb-infused garlic rolls by adding herbs to the butter, spicy garlic rolls by adding red pepper flakes, or garlic knot rolls by shaping the dough into knots.
Best Ever Garlic Rolls
Ingredients
Equipment
Method
- Proof the Yeast: In a large bowl, combine the warm milk, yeast, and sugar. Let it sit for 5-10 minutes until foamy.
- Combine Wet Ingredients: Add the salt, egg, and oil to the yeast mixture. Whisk until well combined.
- Add the Flour: Gradually add the flour, one cup at a time, mixing with a wooden spoon or dough hook attachment on your stand mixer. Start with 3 cups and add more as needed until the dough comes together and pulls away from the sides of the bowl. You want a soft, slightly sticky dough.
- Knead the Dough: Turn the dough out onto a lightly floured surface and knead for 5-7 minutes, or until smooth and elastic. If using a stand mixer, knead with the dough hook for 5 minutes.
- First Rise: Place the dough in a lightly oiled bowl, turning to coat. Cover with plastic wrap or a clean kitchen towel and let rise in a warm place for 1-1.5 hours, or until doubled in size.
- Punch Down the Dough: Gently punch down the dough to release the air. Turn it out onto a lightly floured surface.
- Divide and Shape: Divide the dough into 12 equal pieces. Roll each piece into a ball.
- Second Rise: Place the rolls in a greased 9×13 inch baking dish. Cover with plastic wrap or a clean kitchen towel and let rise for another 30-45 minutes, or until puffy.
- Preheat the Oven: While the rolls are rising, preheat your oven to 375°F (190°C).
- Bake the Rolls: Bake for 18-22 minutes, or until golden brown on top. If they start to brown too quickly, tent them with foil.
- Make the Garlic Butter: While the rolls are baking, melt the butter in a small saucepan or microwave. Add the minced garlic, parsley (if using), garlic powder (if using), salt, and pepper. Stir to combine.
- Brush with Garlic Butter: As soon as the rolls come out of the oven, brush them generously with the garlic butter.
- Serve Immediately: Let the rolls cool slightly before serving. They are best enjoyed warm!