Ingredients

For the Apple Filling:
- 6-8 medium apples (such as Honeycrisp, Granny Smith, or a combination), peeled, cored, and sliced
- 1/4 cup granulated sugar
- 2 tablespoons all-purpose flour
- 1 teaspoon ground cinnamon
- 1/4 teaspoon ground nutmeg
- 1 tablespoon lemon juice
- 2 tablespoons butter, cut into small pieces
For the Crisp Topping:
- 1 cup all-purpose flour
- 1 cup rolled oats (not instant)
- 1 cup packed brown sugar
- 1/2 teaspoon baking powder
- 1/4 teaspoon salt
- 1/2 cup (1 stick) cold unsalted butter, cut into small pieces
- 1/4 cup chopped pecans or walnuts (optional, but highly recommended!)
Let’s Talk Apples: Choosing the Perfect Variety
Okay, friend, let’s get real about apples. This isn’t just about grabbing whatever’s on sale at the store. Choosing the right apples can seriously make or break your Apple Crisp. My personal favorite is a blend of sweet and tart – Honeycrisp for that juicy sweetness and Granny Smith for a bit of tang. The Honeycrisp Apple Salad uses the same delicious variety, so you know it’s good! Braeburn and Fuji are also great options. The key is to use apples that will hold their shape during baking and not turn into complete mush. Trust me, nobody wants a mushy crisp.Butter is Better: The Cold Butter Secret
Let’s talk about the topping! The secret to that perfectly crumbly, golden-brown topping? Cold butter, my friend, cold butter. Seriously, don’t even think about using softened butter. You want to cut the cold butter into the dry ingredients until you get a coarse, crumbly mixture. This creates those beautiful pockets of butter that melt during baking, resulting in the irresistible crisp texture. If your butter gets too soft while you’re working, pop the whole mixture into the freezer for 5-10 minutes. You’ll thank me later.Step-by-Step Instructions
Get Started: Preheat and Prep
- Preheat your oven to 375°F (190°C).
- Lightly grease a 9-inch square baking dish or a similar-sized pie dish.
Make the Apple Filling:
- In a large bowl, combine the sliced apples, granulated sugar, flour, cinnamon, nutmeg, and lemon juice. Toss gently to coat the apples evenly.
- Transfer the apple mixture to the prepared baking dish.
- Dot the top of the apple filling with the butter pieces. This adds extra richness and flavor!
Prepare the Crisp Topping:
- In a separate large bowl, whisk together the flour, rolled oats, brown sugar, baking powder, and salt.
- Add the cold butter pieces and use a pastry blender or your fingertips to cut the butter into the dry ingredients until the mixture resembles coarse crumbs. Don’t overmix! You want to see small pieces of butter.
- Stir in the chopped pecans or walnuts (if using).
Assemble and Bake:
- Sprinkle the crisp topping evenly over the apple filling.
- Bake in the preheated oven for 35-45 minutes, or until the topping is golden brown and the apple filling is bubbly. If the topping starts to brown too quickly, you can loosely tent the dish with aluminum foil during the last 10-15 minutes of baking.
- Let the Apple Crisp cool for at least 15 minutes before serving. This allows the filling to thicken slightly.
Troubleshooting Tips: Avoiding Common Pitfalls
- Too much juice? If your apples are particularly juicy, you might end up with a watery crisp. To combat this, add an extra tablespoon of flour or cornstarch to the apple filling.
- Topping not crispy enough? Make sure you’re using cold butter and don’t overmix the topping. Also, check your oven temperature – an accurate oven is key! You might consider trying the Crunchy Apple Crisp recipe if you want to ensure the perfect topping.
- Apples not cooked through? If your apples are still firm after baking, try slicing them thinner next time. You can also par-cook them in a skillet with a little butter and sugar before adding them to the baking dish.
Serving Suggestions: Take it to the Next Level
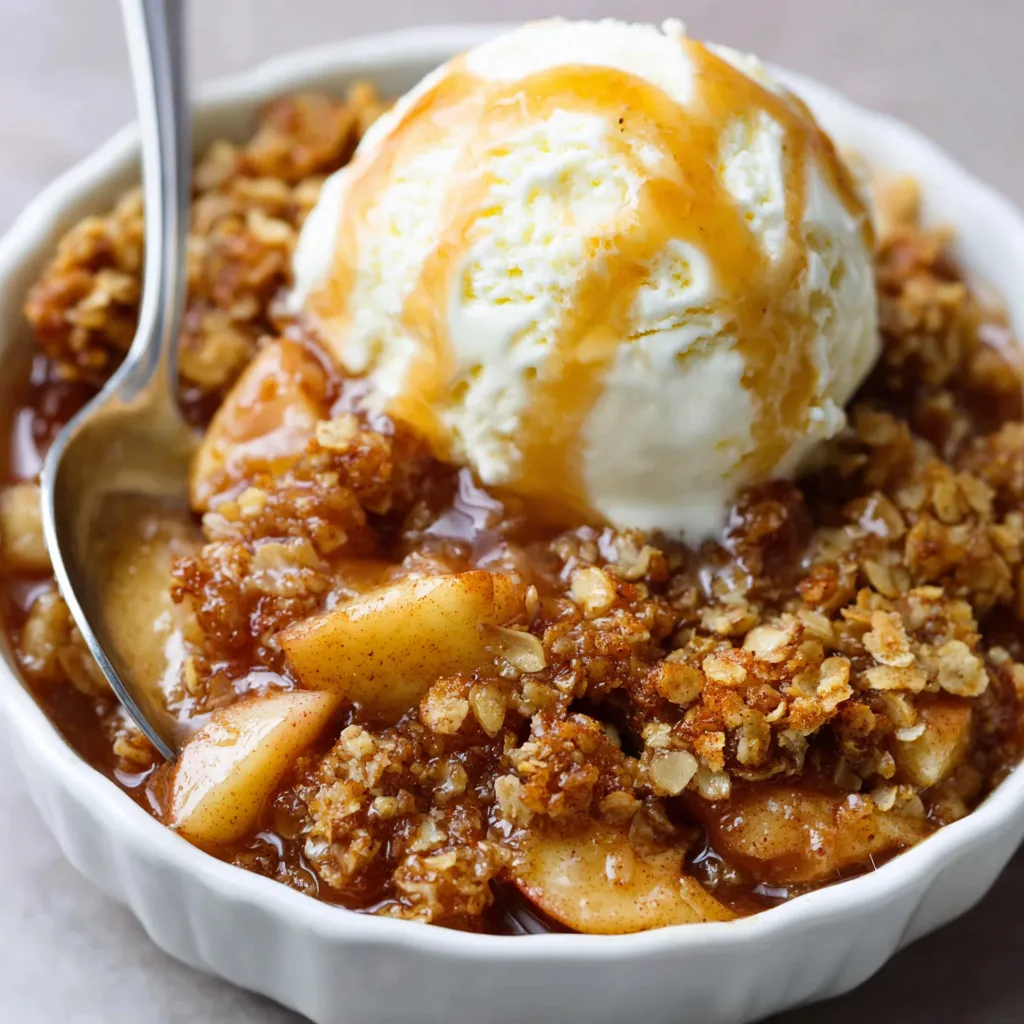
Okay, the Apple Crisp is out of the oven, and it smells absolutely divine. Now what? Well, serving it is just as important as baking it! My absolute favorite way to enjoy it is warm, with a scoop of vanilla ice cream melting on top. The contrast of the warm crisp and cold ice cream is heavenly! A drizzle of caramel sauce adds an extra touch of decadence. You could even try it with a dollop of whipped cream or a sprinkle of cinnamon. And for the ultimate indulgence, pair it with a slice of Salted Caramel Apple Pie Cheesecake. Trust me; your taste buds will thank you.Variations: Remix Your Crisp!
The beauty of Apple Crisp is its versatility! Feel free to get creative and adapt the recipe to your liking.- Spice it up: Add a pinch of ground ginger or cardamom to the apple filling for a warmer, more complex flavor.
- Berry Delicious: Toss in a handful of fresh or frozen berries (like blueberries or raspberries) along with the apples.
- Nutty Goodness: Experiment with different types of nuts in the topping, such as almonds, walnuts, or pecans. Toasted nuts add even more flavor! You may also like Apple Pumpkin Streusel Muffins for a nutty, spiced twist!
- Crumble vs. Crisp: While similar, a crumble typically doesn’t contain oats. If you prefer a crumble topping, simply omit the oats from the recipe.
- Individual Servings: Bake the crisp in individual ramekins for a more elegant presentation.
Storage Tips: Keeping the Crisp Crisp
If you happen to have any leftovers (which is rare!), store them in an airtight container in the refrigerator for up to 3 days. To reheat, simply warm it in the oven at 350°F (175°C) for 10-15 minutes, or until heated through. You can also microwave it in short bursts, but be careful not to overcook it. It might not be quite as crispy as the first day, but it will still be delicious.Why This Recipe is the BEST
Look, there are a *lot* of Apple Crisp recipes out there. But what sets this one apart is the perfect balance of flavors and textures. The apples are tender and juicy, the topping is buttery and crisp, and the spices add just the right amount of warmth. Plus, it’s so easy to make! Even if you’re a baking newbie, you can totally nail this recipe. You can even try the Homemade Apple Crisp recipe for a similar experience!Final Thoughts: Enjoy Every Bite!
So there you have it – my ultimate Apple Crisp recipe! I hope you love it as much as I do. It’s the perfect dessert for a cozy night in, a holiday gathering, or any time you’re craving a little bit of comfort. And remember, baking should be fun! Don’t be afraid to experiment and make it your own. Happy baking, my friend! You might even like these fun and easy Apple Pie Cheesecake Bites as a fun alternative. And if you want something really simple try Cozy Apple Crisp recipe.What types of apples are best to use for Apple Crisp?
A blend of sweet and tart apples like Honeycrisp and Granny Smith is recommended. Braeburn and Fuji are also good options. Choose apples that will hold their shape during baking.
Why is it important to use cold butter for the crisp topping?
Cold butter creates those beautiful pockets of butter that melt during baking, resulting in the irresistible crisp texture. Using softened butter will not achieve the same result.
How do I prevent my apple crisp from becoming too watery?
If your apples are particularly juicy, add an extra tablespoon of flour or cornstarch to the apple filling.
How should I store leftover apple crisp?
Store leftover apple crisp in an airtight container in the refrigerator for up to 3 days. Reheat in the oven at 350°F (175°C) for 10-15 minutes, or microwave in short bursts.
Best Apple Crisp Ever
This apple crisp recipe delivers a symphony of flavors and textures with tender, cinnamon-spiced apples and a buttery, crunchy oat crumble. It’s an easy-to-make dessert that elevates the classic to new heights, perfect for any occasion.
Ingredients
Equipment
Method
- Preheat your oven to 375°F (190°C).
- Lightly grease a 9-inch square baking dish or a similar-sized pie dish.
- In a large bowl, combine the sliced apples, granulated sugar, flour, cinnamon, nutmeg, and lemon juice. Toss gently to coat the apples evenly.
- Transfer the apple mixture to the prepared baking dish.
- Dot the top of the apple filling with the butter pieces.
- In a separate large bowl, whisk together the flour, rolled oats, brown sugar, baking powder, and salt.
- Add the cold butter pieces and use a pastry blender or your fingertips to cut the butter into the dry ingredients until the mixture resembles coarse crumbs. Don’t overmix! You want to see small pieces of butter.
- Stir in the chopped pecans or walnuts (if using).
- Sprinkle the crisp topping evenly over the apple filling.
- Bake in the preheated oven for 35-45 minutes, or until the topping is golden brown and the apple filling is bubbly. If the topping starts to brown too quickly, you can loosely tent the dish with aluminum foil during the last 10-15 minutes of baking.
- Let the Apple Crisp cool for at least 15 minutes before serving. This allows the filling to thicken slightly.
Notes
For extra juicy apples, add an extra tablespoon of flour or cornstarch to the filling. To keep the topping crispy, use cold butter and don’t overmix. Store leftovers in an airtight container in the refrigerator for up to 3 days and reheat in the oven or microwave. Try adding a pinch of ginger or cardamom to the apple filling, or toss in some fresh or frozen berries. Serve warm with vanilla ice cream, caramel sauce, or whipped cream.