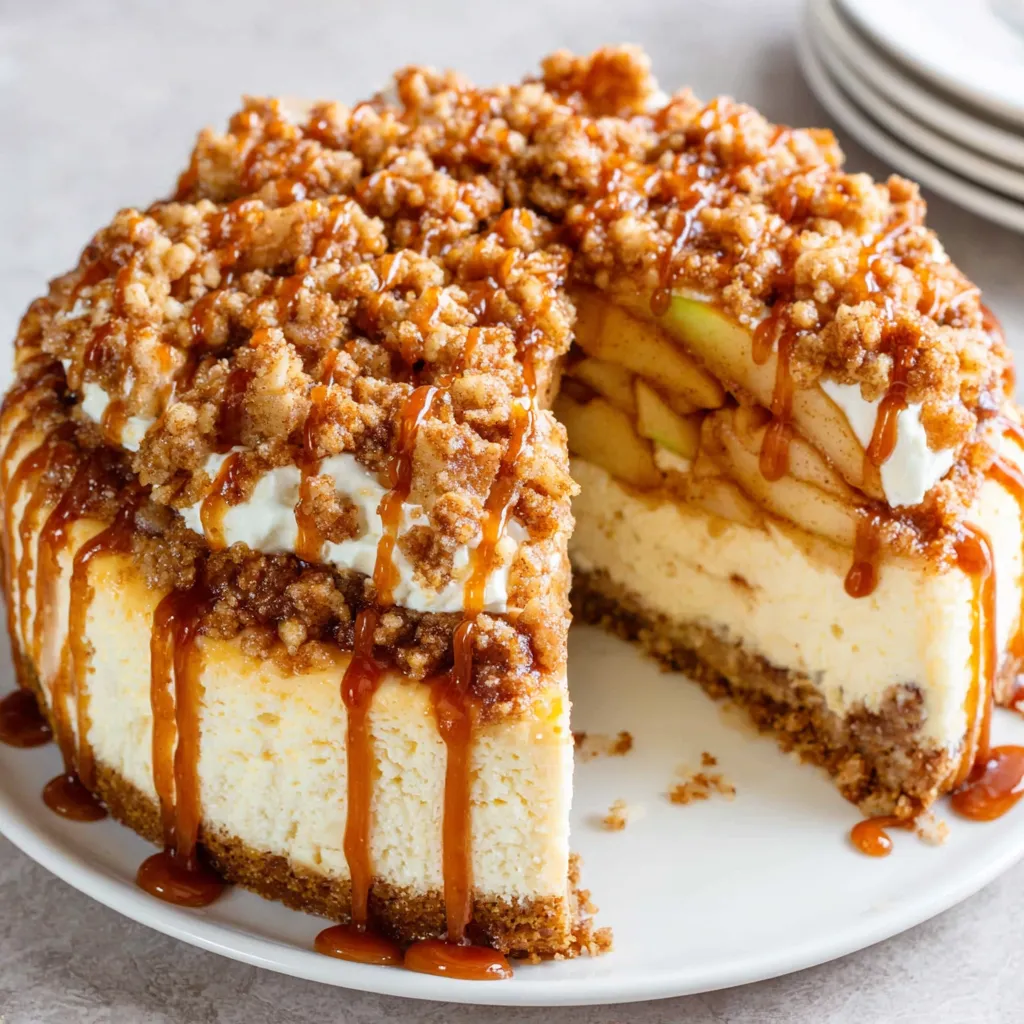
Imagine the comforting warmth of apple crisp colliding with the creamy decadence of cheesecake. This isn’t just a dessert; it’s a symphony of textures and flavors, where every bite is a celebration of autumn. Get ready to bake up an unforgettable Apple Crisp Cheesecake that will wow your friends and family – I promise, this will be your new go-to dessert
Ingredients

For the Crust:
- 1 ½ cups graham cracker crumbs
- 5 tablespoons unsalted butter, melted
- ¼ cup granulated sugar
For the Apple Crisp Topping:
- 6 medium apples, peeled, cored, and sliced (Granny Smith, Honeycrisp, or a mix)
- ½ cup all-purpose flour
- ½ cup rolled oats
- ½ cup packed brown sugar
- ½ teaspoon ground cinnamon
- ¼ teaspoon ground nutmeg
- ½ cup unsalted butter, cold and cubed
For the Cheesecake Filling:
- 3 (8 ounce) packages cream cheese, softened
- 1 ½ cups granulated sugar
- ½ cup sour cream
- 2 teaspoons vanilla extract
- 4 large eggs
Let’s Get Baking: Your Step-by-Step Guide
Step 1: Make the Graham Cracker Crust
- Preheat your oven to 350°F (175°C).
- In a medium bowl, combine the graham cracker crumbs, melted butter, and sugar.
- Press the mixture firmly into the bottom of a 9-inch springform pan.
- Bake for 8-10 minutes, or until lightly golden. Let cool slightly.
Step 2: Prepare the Apple Crisp Topping
- In a large bowl, combine the sliced apples, flour, rolled oats, brown sugar, cinnamon, and nutmeg.
- Add the cubed butter and use a pastry blender or your fingers to cut the butter into the dry ingredients until the mixture resembles coarse crumbs. Don’t overmix! You want those butter pockets for extra goodness.
Step 3: Whip Up the Cheesecake Filling
- In a large bowl, beat the softened cream cheese and sugar together until smooth and creamy. No lumps allowed!
- Stir in the sour cream and vanilla extract until well combined.
- Add the eggs one at a time, mixing well after each addition. Be careful not to overmix – this can incorporate too much air and cause cracks.
Step 4: Assemble the Apple Crisp Cheesecake
- Pour the cheesecake filling over the slightly cooled graham cracker crust.
- Evenly spread the apple crisp topping over the cheesecake filling.
Step 5: Bake to Perfection
- Wrap the bottom of the springform pan tightly with aluminum foil to prevent water from seeping in during baking. This is crucial!
- Place the springform pan inside a larger roasting pan. Pour hot water into the roasting pan until it reaches about halfway up the sides of the springform pan (this creates a water bath).
- Bake in the preheated oven for 60-75 minutes, or until the edges of the cheesecake are set but the center still has a slight wobble. Don’t panic if it jiggles a little – it will firm up as it cools.
- Turn off the oven and let the cheesecake cool inside the oven with the door slightly ajar for 1 hour. This gradual cooling helps prevent cracking.
- Remove the cheesecake from the water bath and let it cool completely on a wire rack.
- Cover the cheesecake and refrigerate for at least 4 hours, or preferably overnight, before serving. This allows the flavors to meld and the cheesecake to fully set.
Troubleshooting Tips & Tricks
Cheesecake baking can be a little intimidating, but don’t worry, I’ve got your back! Here are a few common issues and how to avoid them:
- Cracked Cheesecake: The dreaded crack! This usually happens due to temperature fluctuations. The water bath helps prevent this by ensuring even baking. Also, the gradual cooling in the oven is key. Avoid opening the oven door frequently during baking.
- Soggy Crust: Make sure to press the graham cracker crumbs firmly into the pan. Pre-baking the crust also helps to crisp it up. And remember, the aluminum foil is your friend for keeping water out!
- Lumpy Filling: Ensure your cream cheese is completely softened before you start mixing. If you still have lumps, try using a hand mixer to smooth it out.
- Uneven Baking: Ovens can have hot spots. Rotate the cheesecake halfway through baking to ensure even cooking.
Variations and Flavor Boosters
Want to put your own spin on this Apple Crisp Cheesecake? Here are a few ideas to get you started:
- Caramel Drizzle: Drizzle warm caramel sauce over the top of the cheesecake before serving for an extra touch of indulgence.
- Chopped Nuts: Add chopped pecans or walnuts to the apple crisp topping for added crunch and flavor.
- Spiced Apples: Use a mix of spices like ginger, cloves, and cardamom in the apple crisp topping for a more complex flavor profile.
- Lemon Zest: Add a teaspoon of lemon zest to the cheesecake filling for a bright, citrusy note.
- Bourbon Vanilla: Swap out the vanilla extract for bourbon vanilla extract to infuse the cheesecake with a rich, warm flavor.
Serving Suggestions
This Apple Crisp Cheesecake is delicious on its own, but here are a few serving suggestions to elevate it even further:
- Serve chilled with a dollop of whipped cream or a scoop of vanilla ice cream.
- Garnish with fresh apple slices and a sprinkle of cinnamon.
- Pair with a warm cup of coffee or tea.
- For a truly decadent treat, serve with a side of Salted Caramel Apple Pie Cheesecake Ultimate.
Storage Instructions
To keep your Apple Crisp Cheesecake fresh and delicious, follow these storage instructions:
- Store leftovers in the refrigerator for up to 5 days.
- Wrap the cheesecake tightly with plastic wrap or store it in an airtight container to prevent it from drying out.
- For longer storage, you can freeze the cheesecake for up to 2 months. Thaw it overnight in the refrigerator before serving.
Why This Recipe Works
This Apple Crisp Cheesecake is more than just a sum of its parts. The graham cracker crust provides a sturdy and flavorful base, while the creamy cheesecake filling adds a touch of elegance. The apple crisp topping brings a warm, comforting sweetness that perfectly complements the richness of the cheesecake. The water bath ensures even baking and prevents cracking, resulting in a perfectly textured and visually stunning dessert. The combination of textures and flavors is simply irresistible!
If you are craving smaller portions, then you might enjoy these Apple Pie Cheesecake Bites. Also, for more apple crisp recipes, check out this Homemade Apple Crisp. Or, indulge yourself with this Caramel Apple Cheesecake Bliss. If you want to make it simple, try this Cozy Apple Crisp or this Crunchy Apple Crisp.
Final Thoughts
There you have it – your very own Apple Crisp Cheesecake masterpiece! I know it seems like a lot of steps, but trust me, it’s totally worth it. This dessert is perfect for holidays, special occasions, or just a cozy night in. So go ahead, grab your apron, and get baking! You’ve got this!
Why is a water bath important when baking this apple crisp cheesecake?
The water bath ensures even baking and helps prevent the cheesecake from cracking due to temperature fluctuations.
What are some tips for preventing a soggy graham cracker crust?
Press the graham cracker crumbs firmly into the pan, pre-bake the crust, and wrap the bottom of the springform pan with aluminum foil to prevent water from seeping in.
How long can I store leftover apple crisp cheesecake?
You can store leftovers in the refrigerator for up to 5 days, wrapped tightly in plastic wrap or in an airtight container. For longer storage, you can freeze it for up to 2 months.
What types of apples are recommended for the apple crisp topping?
The recipe recommends using Granny Smith, Honeycrisp, or a mix of apples for the apple crisp topping.
Apple Crisp Cheesecake
Ingredients
Equipment
Method
- Preheat oven to 350°F (175°C).
- In a medium bowl, combine graham cracker crumbs, melted butter, and sugar.
- Press the mixture firmly into the bottom of a 9-inch springform pan.
- Bake for 8-10 minutes, or until lightly golden. Let cool slightly.
- In a large bowl, combine sliced apples, flour, rolled oats, brown sugar, cinnamon, and nutmeg.
- Add the cubed butter and use a pastry blender or your fingers to cut the butter into the dry ingredients until the mixture resembles coarse crumbs.
- In a large bowl, beat the softened cream cheese and sugar together until smooth and creamy.
- Stir in the sour cream and vanilla extract until well combined.
- Add the eggs one at a time, mixing well after each addition. Be careful not to overmix.
- Pour the cheesecake filling over the slightly cooled graham cracker crust.
- Evenly spread the apple crisp topping over the cheesecake filling.
- Wrap the bottom of the springform pan tightly with aluminum foil.
- Place the springform pan inside a larger roasting pan. Pour hot water into the roasting pan until it reaches about halfway up the sides of the springform pan.
- Bake in the preheated oven for 60-75 minutes, or until the edges of the cheesecake are set but the center still has a slight wobble.
- Turn off the oven and let the cheesecake cool inside the oven with the door slightly ajar for 1 hour.
- Remove the cheesecake from the water bath and let it cool completely on a wire rack.
- Cover the cheesecake and refrigerate for at least 4 hours, or preferably overnight, before serving.