Ingredients
For the Cheesecake Batter:
- 6 large eggs, separated
- 120g cream cheese, softened
- 50g unsalted butter
- 100ml milk
- 60g cake flour, sifted
- 20g cornstarch, sifted
- 1/4 teaspoon cream of tartar
- 90g granulated sugar
- 1/4 teaspoon lemon juice
- Pinch of salt
For the Water Bath:
- Hot water
Optional Toppings:
- Powdered sugar, for dusting
- Fresh berries
Essential Equipment

- 8-inch round cake pan (springform preferred)
- Parchment paper
- Large mixing bowls
- Electric mixer (stand or hand mixer)
- Whisk
- Rubber spatula
- Large roasting pan or baking dish for the water bath
Let’s Talk About the Magic: Achieving the Perfect Texture
The key to a truly amazing Japanese Cotton Cheesecake is all in the technique. We’re aiming for that signature “souffle” texture – light, airy, and almost melt-in-your-mouth. This Fluffy Japanese Cotton Cheesecake isn’t just a dessert; it’s an experience.
One of the biggest challenges is preventing the cheesecake from cracking. That’s why the water bath is absolutely crucial! The gentle steam helps to cook the cheesecake evenly, preventing the top from drying out and cracking. Also, make sure not to overbake it.
Remember, patience is your friend. This isn’t a quick bake, but the reward is so worth it. And don’t worry if your cheesecake deflates a bit after it comes out of the oven; that’s perfectly normal for this type of cake!
Step-by-Step Instructions
Preparing the Pan:
- Preheat oven to 320°F (160°C).
- Grease the bottom and sides of your 8-inch cake pan.
- Line the bottom with a circle of parchment paper. Cut strips of parchment paper to line the sides of the pan, extending a few inches above the rim. This helps the cake rise evenly and prevents sticking.
- Wrap the bottom of the cake pan tightly with aluminum foil. This will prevent water from seeping into the cake during the water bath.
Making the Batter:
- In a heatproof bowl set over a simmering pot of water (double boiler), combine the cream cheese, butter, and milk. Heat until melted and smooth, stirring occasionally.
- Remove from heat and let cool slightly.
- Whisk in the sifted cake flour and cornstarch until smooth. Make sure there are no lumps!
- Add the egg yolks, one at a time, whisking well after each addition. Stir in the lemon juice and salt. Set aside.
- In a separate, clean bowl, beat the egg whites with the cream of tartar until soft peaks form.
- Gradually add the sugar, beating until stiff, glossy peaks form. Be careful not to overwhip!
- Gently fold about one-third of the egg white mixture into the yolk mixture to lighten it.
- Fold in the remaining egg white mixture in two additions, being careful not to deflate the batter. Use a rubber spatula and gently fold until just combined. Overmixing will result in a tough cheesecake.
Baking the Cheesecake:
- Pour the batter into the prepared cake pan. Gently tap the pan on the counter a few times to release any air bubbles.
- Place the cake pan in a large roasting pan or baking dish.
- Pour hot water into the roasting pan, reaching about 1 inch up the sides of the cake pan. This creates a water bath.
- Bake for 60-70 minutes, or until the top is lightly golden and the center is slightly jiggly. The exact baking time will depend on your oven.
- Turn off the oven and crack the oven door open slightly. Let the cheesecake cool in the oven for 30-60 minutes. This helps prevent the cheesecake from collapsing.
- Remove the cheesecake from the oven and water bath. Let it cool completely at room temperature before refrigerating for at least 4 hours, or preferably overnight.
Serving:
- Once chilled, gently run a thin knife or spatula around the edges of the cake pan to loosen the cheesecake.
- Remove the sides of the springform pan and carefully peel off the parchment paper.
- Dust with powdered sugar, if desired.
- Slice and serve. Enjoy this light and airy Asian dessert!
Troubleshooting Tips & Tricks
Why is my cheesecake cracking?
Cracking usually happens due to high heat or uneven baking. Make sure your oven temperature is accurate, and the water bath is essential to regulate the heat and keep the cheesecake moist. Also, avoid opening the oven door frequently during baking.
Why is my cheesecake sinking?
A slight deflation is normal, but significant sinking can be caused by overwhipping the egg whites or opening the oven door too early. Be gentle when folding in the egg whites, and let the cheesecake cool gradually in the oven before removing it.
My cheesecake is too dense. What did I do wrong?
Overmixing the batter after adding the flour can lead to a dense cheesecake. Mix only until just combined, and be gentle when folding in the egg whites.
Variations to Try
Once you’ve mastered the basic recipe, feel free to experiment! You can add a splash of vanilla extract or other flavorings to the batter. Some people like to add a layer of fruit compote to the bottom of the pan before pouring in the batter. Get creative and make it your own!
Serving Suggestions
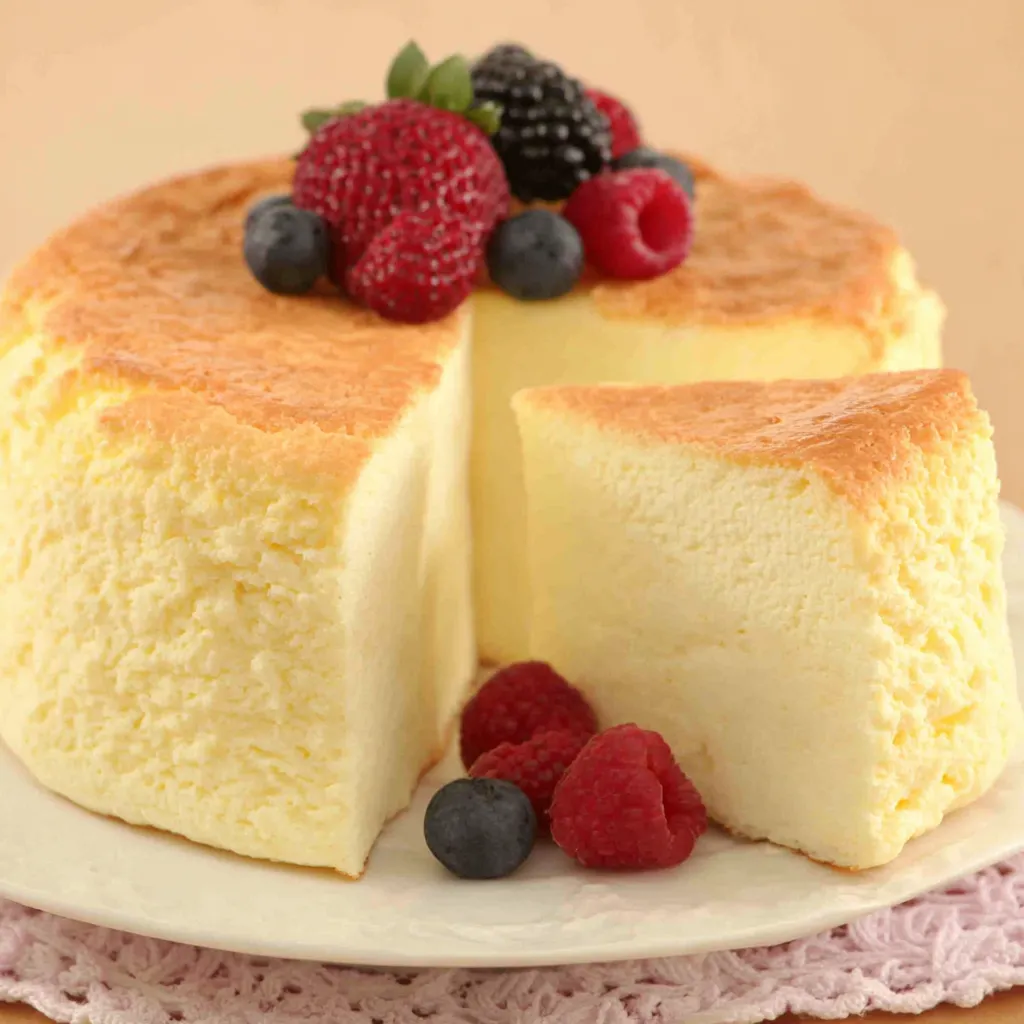
This Fluffy Japanese Cotton Cheesecake is perfect on its own, but it’s also delicious with fresh berries, a dollop of whipped cream, or a scoop of ice cream. It’s a wonderful dessert for special occasions or simply a treat to enjoy any time of day. It is truly a melt in your mouth dessert!
Other Delicious Cheesecake Recipes
If you’re a cheesecake lover like me, you’ll want to check out some of my other favorite recipes. For a taste of fall, try the Pumpkin Cheesecake. Or, if you’re craving something with a bit of crunch, the Apple Crumble Cheesecake is always a hit. And for the holiday season, you can’t go wrong with the Sugar Cookie Cheesecake! Feeling festive? Try these Pumpkin Spice Cheesecake Bars or the Caramel Apple Cheesecake Bars Ultimate. These options are great for sharing!
Storing Your Masterpiece
Leftover Japanese Cotton Cheesecake can be stored in the refrigerator for up to 3 days. Wrap it tightly in plastic wrap or store it in an airtight container to prevent it from drying out.
Is Japanese Cotton Cheesecake Gluten-Free?
As written, this recipe is not gluten-free because it contains cake flour. However, you can easily adapt it by using a gluten-free all-purpose flour blend. Be sure to check the label to ensure the blend is suitable for baking and has a good binding agent.
Conclusion
You’ve now unlocked the secrets to creating a truly magnificent Japanese Cotton Cheesecake! This souffle cheesecake is not just a recipe; it’s a journey into the world of light, airy, and unforgettable desserts. So go ahead, bake this gorgeous cake and prepare to be amazed by the delighted reactions of your friends and family.Why is a water bath essential for baking Japanese Cotton Cheesecake?
The water bath helps to cook the cheesecake evenly, preventing the top from drying out and cracking. The gentle steam regulates the heat and keeps the cheesecake moist.
Is it normal for the Japanese Cotton Cheesecake to deflate after baking?
Yes, it’s perfectly normal for this type of cake to deflate a bit after it comes out of the oven. This is due to the airy nature of the cheesecake.
What causes the cheesecake to crack during baking, and how can I prevent it?
Cracking usually happens due to high heat or uneven baking. Ensure your oven temperature is accurate, use a water bath to regulate heat, and avoid opening the oven door frequently.
How can I store leftover Japanese Cotton Cheesecake?
Leftover Japanese Cotton Cheesecake can be stored in the refrigerator for up to 3 days. Wrap it tightly in plastic wrap or store it in an airtight container to prevent it from drying out.
BEST JAPANESE COTTON CHEESECAKE EVER
Ingredients
Equipment
Method
- Preheat oven to 320°F (160°C).
- Grease the bottom and sides of your 8-inch cake pan.
- Line the bottom with a circle of parchment paper. Cut strips of parchment paper to line the sides of the pan, extending a few inches above the rim.
- Wrap the bottom of the cake pan tightly with aluminum foil to prevent water from seeping in.
- In a heatproof bowl set over a simmering pot of water (double boiler), combine the cream cheese, butter, and milk.
- Heat until melted and smooth, stirring occasionally.
- Remove from heat and let cool slightly.
- Whisk in the sifted cake flour and cornstarch until smooth, ensuring no lumps remain.
- Add the egg yolks, one at a time, whisking well after each addition. Stir in the lemon juice and salt. Set aside.
- In a separate, clean bowl, beat the egg whites with the cream of tartar until soft peaks form.
- Gradually add the sugar, beating until stiff, glossy peaks form. Be careful not to overwhip.
- Gently fold about one-third of the egg white mixture into the yolk mixture to lighten it.
- Fold in the remaining egg white mixture in two additions, being careful not to deflate the batter. Use a rubber spatula and gently fold until just combined. Overmixing will result in a tough cheesecake.
- Pour the batter into the prepared cake pan. Gently tap the pan on the counter a few times to release any air bubbles.
- Place the cake pan in a large roasting pan or baking dish.
- Pour hot water into the roasting pan, reaching about 1 inch up the sides of the cake pan to create a water bath.
- Bake for 60-70 minutes, or until the top is lightly golden and the center is slightly jiggly. The exact baking time will depend on your oven.
- Turn off the oven and crack the oven door open slightly. Let the cheesecake cool in the oven for 30-60 minutes to prevent collapsing.
- Remove the cheesecake from the oven and water bath. Let it cool completely at room temperature before refrigerating for at least 4 hours, or preferably overnight.
- Once chilled, gently run a thin knife or spatula around the edges of the cake pan to loosen the cheesecake.
- Remove the sides of the springform pan and carefully peel off the parchment paper.
- Dust with powdered sugar, if desired.
- Slice and serve. Enjoy!
