Craving all the flavors of sushi but don’t want to spend hours meticulously rolling each piece? This Salmon Sushi Bake takes all your favorite sushi components and layers them into a warm, comforting casserole, perfect for a weeknight dinner or a potluck gathering. Get ready for an explosion of flavor and texture, because this recipe is about to become your new obsession!
Let’s Gather Our Ingredients
Before we dive into the fun part, let’s make sure we have everything we need. Don’t worry, most of these ingredients are easy to find at your local grocery store!
For the Rice Layer:
- 2 cups sushi rice
- 2 1/4 cups water
- 1/4 cup rice vinegar
- 2 tablespoons sugar
- 1 teaspoon salt
For the Salmon Topping:
- 1 pound salmon fillet, skin removed
- 2 tablespoons mayonnaise (Japanese mayo, like Kewpie, is preferred!)
- 1 tablespoon sriracha (adjust to your spice preference)
- 1 tablespoon soy sauce
- 1 teaspoon sesame oil
- 1/2 teaspoon garlic powder
- 1/4 cup green onions, chopped
For the Assembling and Garnishing:
- Nori seaweed sheets, cut into strips or squares
- Avocado, sliced (optional)
- Sesame seeds (black and/or white)
- Eel sauce (optional)
- Spicy mayo (optional)
- Furikake seasoning (optional)
Step-by-Step Instructions to Sushi Bake Bliss

Alright, now for the main event! Follow these steps carefully, and you’ll be enjoying your Salmon Sushi Bake in no time. Don’t be intimidated; it’s much easier than it looks!
Step 1: Cook the Sushi Rice
- Rinse the sushi rice under cold water until the water runs clear. This usually takes about 3-4 rinses.
- Combine the rinsed rice and water in a pot. Bring to a boil over medium-high heat.
- Once boiling, reduce the heat to low, cover the pot, and simmer for 15 minutes.
- Remove the pot from the heat and let it sit, covered, for another 10 minutes. This allows the rice to steam and finish cooking.
- While the rice is steaming, prepare the sushi vinegar mixture. In a small bowl, whisk together the rice vinegar, sugar, and salt until the sugar and salt are dissolved.
- Transfer the cooked rice to a large bowl. Gently drizzle the sushi vinegar mixture over the rice, using a rice paddle or spatula to gently fold it in. Be careful not to mash the rice. Allow the rice to cool slightly.
Step 2: Prepare the Salmon Topping
- Preheat your oven to 400°F (200°C).
- Place the salmon fillet on a baking sheet lined with parchment paper.
- In a small bowl, whisk together the mayonnaise, sriracha, soy sauce, sesame oil, and garlic powder.
- Spread the mayonnaise mixture evenly over the salmon fillet.
- Bake for 12-15 minutes, or until the salmon is cooked through and flakes easily with a fork.
- Once the salmon is cooked, let it cool slightly, then flake it with a fork.
- Gently stir in the chopped green onions.
Step 3: Assemble the Salmon Sushi Bake
- Lightly grease a 9×13 inch baking dish.
- Spread the cooled sushi rice evenly in the bottom of the dish.
- Spoon the salmon mixture evenly over the rice layer.
Step 4: Bake (Optional, But Recommended!)
- For a warm and slightly crispy topping, bake the assembled sushi bake in the preheated oven for 5-10 minutes, or until heated through. This step is optional, but it adds a nice touch!
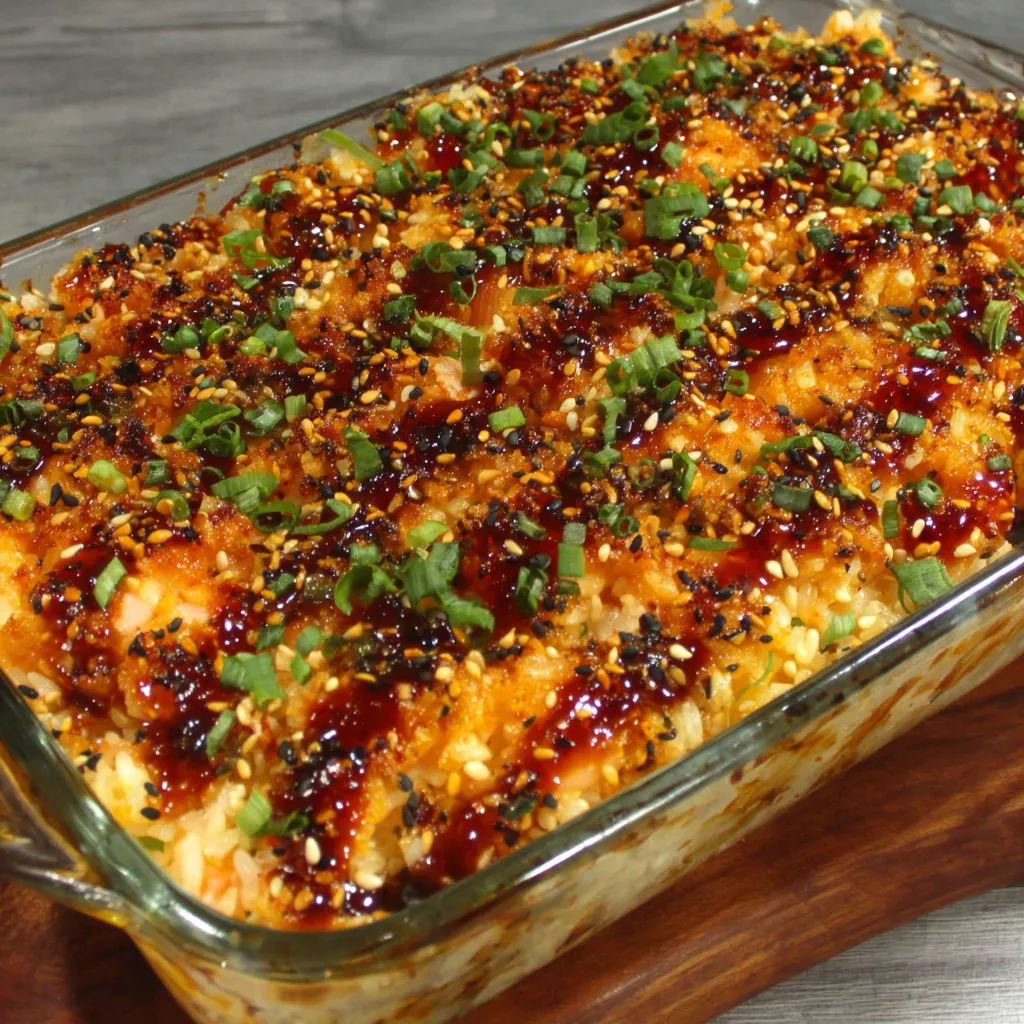
Step 5: Garnish and Serve
- Remove the sushi bake from the oven (if baked) and let it cool slightly.
- Cut the nori seaweed sheets into strips or squares.
- Serve the Salmon Sushi Bake warm or at room temperature. Let everyone customize their serving with nori strips, sliced avocado, sesame seeds, eel sauce, spicy mayo, and furikake seasoning, if desired.
Tips and Tricks for the Perfect Sushi Bake
Want to take your Salmon Sushi Bake to the next level? Here are a few insider tips to ensure success:
- Rice is Key: Using sushi rice is essential for that authentic sushi flavor and texture. Don’t substitute with other types of rice.
- Don’t Overcook the Salmon: Overcooked salmon will be dry and rubbery. Aim for just cooked through, so it remains tender and flaky.
- Spice It Up (or Down): Adjust the amount of sriracha to your liking. If you’re not a fan of spice, you can omit it altogether.
- Customize Your Toppings: Feel free to add other toppings you love, such as mango, cucumber, or edamame.
- Make Ahead: You can prepare the rice and salmon topping ahead of time and store them separately in the refrigerator. Assemble the sushi bake just before baking (if baking).
Variations to Keep Things Interesting
Once you’ve mastered the basic Salmon Sushi Bake, why not try some fun variations? Here are a few ideas to get your creative juices flowing:
- Spicy Tuna Sushi Bake: Substitute the salmon with tuna and add a bit more sriracha for an extra kick.
- Vegetarian Sushi Bake: Use marinated tofu or mushrooms instead of salmon for a vegetarian-friendly option.
- Shrimp Sushi Bake: Replace the salmon with cooked shrimp.
- California Roll Sushi Bake: Incorporate imitation crab meat, avocado, and cucumber for a deconstructed California roll experience. You might also enjoy a classic Cucumber California Roll if you are in the mood for the original form!
Serving Suggestions: Complete Your Meal
While the Salmon Sushi Bake is delicious on its own, it’s even better when paired with some complementary side dishes. Consider these options:
- Edamame: A classic Japanese appetizer that’s both healthy and satisfying.
- Miso Soup: A warm and comforting soup that’s perfect for a chilly evening.
- Asian Cucumber Salad: A refreshing and crunchy salad that balances the richness of the sushi bake.
- Seaweed Salad: Another refreshing and flavorful option that adds a nice textural contrast.
Beyond Sushi Bake: Other Rice Bowl Inspirations
If you love the idea of a flavorful rice bowl but want to explore other options, check out these amazing recipes:
- Sticky Chicken Rice Bowls: Sweet and savory chicken served over fluffy rice – a guaranteed crowd-pleaser.
- Teriyaki Chicken Rice Bowl Recipe: A classic Japanese favorite that’s quick, easy, and incredibly delicious.
Storing Leftovers
If you happen to have any leftovers (which is unlikely!), store them in an airtight container in the refrigerator. They’ll keep for up to 2 days. Note that the texture of the rice may change slightly after being refrigerated. It is best consumed fresh.
Final Thoughts: Your New Favorite Weeknight Dinner
The Salmon Sushi Bake is more than just a recipe; it’s a fun and delicious way to enjoy all the flavors of sushi without the fuss. It’s perfect for busy weeknights, potlucks, or any occasion where you want to impress your friends and family. So gather your ingredients, fire up your oven, and get ready to experience sushi in a whole new way. You’ve got this!
If you enjoyed this Salmon Sushi Bake, please leave a comment and rating below! I love hearing from you.
Can I use regular rice instead of sushi rice?
No, using sushi rice is essential for the authentic sushi flavor and texture of the Salmon Sushi Bake. Other types of rice are not recommended.
How can I adjust the spiciness of the salmon topping?
Adjust the amount of sriracha in the mayonnaise mixture to your liking. You can omit it altogether if you don’t like spice.
Can I prepare the Salmon Sushi Bake ahead of time?
Yes, you can prepare the rice and salmon topping ahead of time and store them separately in the refrigerator. Assemble the sushi bake just before baking (if baking).
What are some variations I can try with this recipe?
You can try variations like Spicy Tuna Sushi Bake (substituting salmon with tuna and adding more sriracha), Vegetarian Sushi Bake (using marinated tofu or mushrooms), Shrimp Sushi Bake (replacing salmon with cooked shrimp), or California Roll Sushi Bake (incorporating imitation crab meat, avocado, and cucumber).
Easy Salmon Sushi Bake
Ingredients
Equipment
Method
- Rinse the sushi rice under cold water until the water runs clear (about 3-4 rinses).
- Combine the rinsed rice and water in a pot. Bring to a boil over medium-high heat.
- Once boiling, reduce the heat to low, cover the pot, and simmer for 15 minutes.
- Remove the pot from the heat and let it sit, covered, for another 10 minutes.
- While the rice is steaming, prepare the sushi vinegar mixture. In a small bowl, whisk together the rice vinegar, sugar, and salt until the sugar and salt are dissolved.
- Transfer the cooked rice to a large bowl. Gently drizzle the sushi vinegar mixture over the rice, using a rice paddle or spatula to gently fold it in. Be careful not to mash the rice. Allow the rice to cool slightly.
- Preheat your oven to 400°F (200°C).
- Place the salmon fillet on a baking sheet lined with parchment paper.
- In a small bowl, whisk together the mayonnaise, sriracha, soy sauce, sesame oil, and garlic powder.
- Spread the mayonnaise mixture evenly over the salmon fillet.
- Bake for 12-15 minutes, or until the salmon is cooked through and flakes easily with a fork.
- Once the salmon is cooked, let it cool slightly, then flake it with a fork.
- Gently stir in the chopped green onions.
- Lightly grease a 9×13 inch baking dish.
- Spread the cooled sushi rice evenly in the bottom of the dish.
- Spoon the salmon mixture evenly over the rice layer.
- For a warm and slightly crispy topping, bake the assembled sushi bake in the preheated oven for 5-10 minutes, or until heated through. This step is optional.
- Remove the sushi bake from the oven (if baked) and let it cool slightly.
- Cut the nori seaweed sheets into strips or squares.
- Serve the Salmon Sushi Bake warm or at room temperature. Let everyone customize their serving with nori strips, sliced avocado, sesame seeds, eel sauce, spicy mayo, and furikake seasoning, if desired.
