I can still picture my college roommate, bless her heart, attempting to “cook” by microwaving everything in sight – a culinary approach that often resulted in questionable textures and even more questionable smells; thankfully, we’ve both come a long way since then, and I’m excited to share with you a recipe that’s both incredibly easy and undeniably delicious: Cheesy Garlic Chicken Wraps. This recipe will have you feeling like a kitchen pro in no time, creating a satisfying and flavorful meal that everyone will love.
Get Ready to Wrap Your Head Around Flavor!
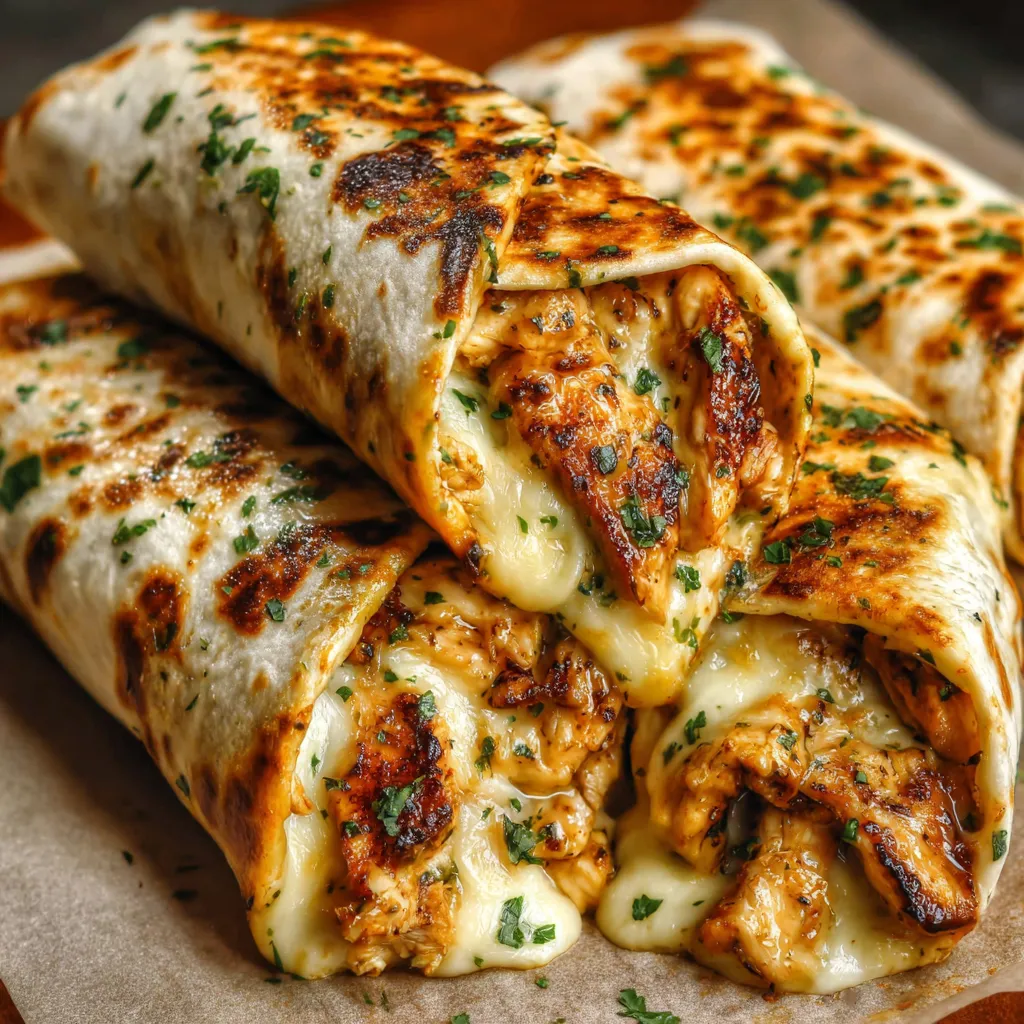
Alright, friend, let’s dive into the wonderful world of Cheesy Garlic Chicken Wraps! This isn’t just a recipe; it’s your secret weapon for busy weeknights, impromptu gatherings, or whenever you’re craving something comforting and bursting with flavor. I’m going to guide you through each step, offering tips and tricks along the way to ensure your wraps are a total success. Prepare for an explosion of garlicky goodness, melty cheese, and perfectly cooked chicken all snuggled inside a warm, soft tortilla.
Why You’ll Fall Head Over Heels for These Wraps
- Quick and Easy: Seriously, this recipe is a lifesaver when you’re short on time. From start to finish, you’re looking at about 30 minutes, maybe less!
- Customizable: The beauty of wraps is that you can adapt them to your preferences. Add your favorite veggies, switch up the cheese, or spice things up with a little chili powder.
- Kid-Friendly: Even the pickiest eaters will gobble these up. The cheesy, garlicky flavor is irresistible, and the wrap format makes them fun to eat.
- Perfect for Meal Prep: Make a batch of the chicken filling on the weekend and assemble the wraps throughout the week for easy lunches or dinners.
- Crowd-Pleaser: These wraps are always a hit at parties and potlucks. They’re easy to transport and can be served warm or at room temperature.
The Star Ingredients: What You’ll Need
Let’s gather our ingredients, shall we? Don’t worry, most of these are pantry staples, so you probably already have them on hand. Remember, good ingredients lead to great flavors, so choose the best you can find!
- Chicken Breasts: About 1.5 pounds, boneless and skinless. We’ll be cooking these to juicy perfection.
- Tortillas: Large, burrito-size tortillas are ideal for easy wrapping. Flour or whole wheat, your choice!
- Garlic: Fresh garlic is a must! About 4-5 cloves, minced. Trust me, the garlic is the MVP here.
- Cheese: A blend of shredded mozzarella and cheddar is my go-to, but feel free to experiment with provolone, Monterey Jack, or even a little pepper jack for a kick.
- Butter: For sautéing the garlic and adding richness to the chicken.
- Olive Oil: A drizzle of olive oil helps keep the chicken moist and flavorful.
- Italian Seasoning: This blend adds a lovely herbaceous note to the chicken.
- Salt and Pepper: To taste, of course!
- Optional Toppings: Get creative! Some ideas include:
- Diced tomatoes
- Shredded lettuce
- Sour cream or Greek yogurt
- Salsa
- Avocado slices
- Chopped cilantro
Ingredient Swaps & Substitutions
Sometimes, you need to make a few tweaks based on what you have available. No problem! Here are some easy substitutions:
- Chicken: You can use chicken thighs instead of breasts. Just adjust the cooking time accordingly. Rotisserie chicken is also a great shortcut!
- Tortillas: Gluten-free tortillas work perfectly well. You can even use lettuce wraps for a low-carb option.
- Cheese: Vegan cheese shreds are a good substitute if you’re dairy-free.
- Garlic: While fresh garlic is best, you can use garlic powder in a pinch. About 1 teaspoon of garlic powder equals 1 clove of fresh garlic.
- Italian Seasoning: If you don’t have Italian seasoning, you can mix together equal parts dried oregano, basil, rosemary, and thyme.
Step-by-Step: Let’s Make These Wraps!
Okay, let’s get cooking! Follow these simple steps, and you’ll be enjoying delicious Cheesy Garlic Chicken Wraps in no time.
Step 1: Prep the Chicken
First things first, let’s get that chicken ready. If your chicken breasts are thick, you can slice them in half horizontally to ensure they cook evenly and quickly. Pat the chicken dry with paper towels. This helps it brown better. Drizzle with olive oil and season generously with Italian seasoning, salt, and pepper.
Step 2: Cook the Chicken
Heat a large skillet over medium-high heat. Add the chicken breasts and cook for about 5-7 minutes per side, or until they are cooked through and no longer pink inside. The internal temperature should reach 165°F (74°C). Remove the chicken from the skillet and let it rest for a few minutes before shredding or dicing it. Resting the chicken allows the juices to redistribute, resulting in more tender and flavorful meat.
Step 3: Garlic Butter Magic
Now for the good stuff! In the same skillet, melt the butter over medium heat. Add the minced garlic and sauté for about 1-2 minutes, or until fragrant. Be careful not to burn the garlic, as it can become bitter. Once the garlic is fragrant, add the shredded or diced chicken to the skillet and toss to coat it in the garlicky butter. This is where the magic happens! That aroma alone is worth the effort.
Step 4: Cheese, Please!
Reduce the heat to low. Sprinkle the shredded cheese over the chicken and stir until it’s melted and gooey. This creates a delicious, cheesy sauce that coats every piece of chicken. If the mixture seems too thick, you can add a splash of chicken broth or water to loosen it up.
Step 5: Wrap It Up!
Warm the tortillas in a dry skillet or microwave for a few seconds to make them more pliable. Place a generous amount of the cheesy garlic chicken filling in the center of each tortilla. Add your desired toppings, such as diced tomatoes, shredded lettuce, sour cream, or salsa. Fold in the sides of the tortilla and then roll it up tightly.
Step 6: Optional: Get That Golden Crust
For an extra touch of deliciousness, you can toast the wraps in a dry skillet or panini press for a few minutes per side, or until they are golden brown and crispy. This adds a wonderful texture and visual appeal to the wraps.
Step 7: Serve and Enjoy!
Cut the wraps in half (optional) and serve immediately. These are best enjoyed warm, when the cheese is melty and the flavors are at their peak. Don’t forget a side of your favorite dipping sauce, such as ranch dressing, salsa, or guacamole.
Tips and Tricks for Wrap Perfection
Want to take your Cheesy Garlic Chicken Wraps to the next level? Here are some insider tips and tricks to ensure they’re always a hit:
- Don’t Overfill: Resist the urge to stuff the wraps to the brim. Too much filling will make them difficult to roll and can cause them to tear.
- Warm the Tortillas: Warming the tortillas before filling them makes them more pliable and less likely to crack.
- Use a Variety of Cheeses: Experiment with different cheese blends to create unique flavor combinations.
- Add Some Heat: A pinch of red pepper flakes or a dash of hot sauce will add a spicy kick to your wraps.
- Make it Ahead: You can prepare the chicken filling a day or two in advance and store it in the refrigerator. Simply reheat it before assembling the wraps.
- Get Creative with Toppings: Don’t be afraid to experiment with different toppings to customize your wraps to your liking.
- Prevent Soggy Wraps: If you’re packing these for lunch, wrap the filling separately from the tortillas and assemble just before eating. This will prevent the wraps from becoming soggy.
Serving Suggestions: What to Serve with Your Wraps
These Cheesy Garlic Chicken Wraps are delicious on their own, but they also pair well with a variety of sides. Here are a few ideas:
- Salad: A simple green salad with a light vinaigrette is a refreshing counterpoint to the richness of the wraps.
- Coleslaw: Creamy coleslaw adds a cool and crunchy element to the meal.
- French Fries or Sweet Potato Fries: A classic pairing that’s always a crowd-pleaser.
- Soup: A bowl of tomato soup or chicken noodle soup is a comforting addition, especially on a chilly day.
- Chips and Guacamole: A festive and flavorful side dish that’s perfect for parties.
Other Delicious Garlic Chicken Recipes You’ll Love
If you’re a fan of garlic chicken (and who isn’t?), here are a few other recipes you might enjoy:
- For a hearty and comforting meal, try Creamy Garlic Parmesan Crockpot Chicken & Potatoes. It’s perfect for a hands-off dinner on a busy weeknight.
- Craving pasta? The Creamy Garlic Parmesan Chicken Pasta is a simple yet satisfying dish that comes together in minutes.
- For an even easier crockpot option, check out Garlic Parmesan Crockpot Chicken. Just toss everything in the crockpot and let it do its magic.
- Another fantastic pasta choice is the Garlic Parmesan Chicken Pasta Recipe. It’s a classic for a reason!
- If you want a quick and easy weeknight meal, try Garlic Parmesan Chicken Pasta, it’s sure to please.
- And if you’re looking for a recipe that’s similar to these wraps, but with a slightly different flavor profile, give the Garlic Chicken Cheese Wraps a try!
Storing and Reheating Leftovers
If you have any leftover Cheesy Garlic Chicken Wraps, you can store them in the refrigerator for up to 3 days. To reheat, wrap them in foil and bake in a preheated oven at 350°F (175°C) for about 10-15 minutes, or until heated through. You can also microwave them, but they may become a bit soggy. For best results, reheat the filling separately from the tortillas and assemble just before serving.
Cheesy Garlic Chicken Wraps Recipe
Here’s the complete recipe for your convenience!
Ingredients:
- 1.5 lbs boneless, skinless chicken breasts
- Large burrito-size tortillas
- 4-5 cloves garlic, minced
- 1 cup shredded mozzarella cheese
- 1 cup shredded cheddar cheese
- 2 tablespoons butter
- 1 tablespoon olive oil
- 2 teaspoons Italian seasoning
- Salt and pepper to taste
- Optional toppings: diced tomatoes, shredded lettuce, sour cream, salsa, avocado slices, chopped cilantro
Instructions:
- Slice chicken breasts in half horizontally if thick. Pat dry and drizzle with olive oil. Season with Italian seasoning, salt, and pepper.
- Heat a large skillet over medium-high heat. Cook chicken for 5-7 minutes per side, or until cooked through (internal temp of 165°F). Remove and let rest before shredding or dicing.
- In the same skillet, melt butter over medium heat. Add minced garlic and sauté for 1-2 minutes, until fragrant.
- Add shredded or diced chicken to the skillet and toss to coat in the garlicky butter.
- Reduce heat to low. Sprinkle with mozzarella and cheddar cheese, stirring until melted and gooey.
- Warm tortillas in a dry skillet or microwave.
- Place a generous amount of cheesy garlic chicken filling in the center of each tortilla. Add desired toppings.
- Fold in the sides of the tortilla and roll up tightly.
- Optional: Toast the wraps in a dry skillet or panini press for a few minutes per side, until golden brown and crispy.
- Cut the wraps in half (optional) and serve immediately.
Final Thoughts: Embrace the Wrap Life!
There you have it! Cheesy Garlic Chicken Wraps – a simple, satisfying, and incredibly delicious meal that’s sure to become a new favorite in your kitchen. Don’t be afraid to experiment with different ingredients and toppings to create your own signature version. After all, cooking should be fun and creative. So go ahead, grab a tortilla, and get wrapping! You’ve got this!
How long does it take to make the Cheesy Garlic Chicken Wraps?
The recipe takes approximately 30 minutes or less from start to finish, making it a quick and easy meal option.
What are some ingredient substitutions I can make in this recipe?
You can substitute chicken breasts with chicken thighs or rotisserie chicken, flour tortillas with gluten-free tortillas or lettuce wraps, and fresh garlic with garlic powder (1 teaspoon equals 1 clove). Vegan cheese shreds can be used for dairy-free options.
How should I store and reheat leftover Cheesy Garlic Chicken Wraps?
Store leftover wraps in the refrigerator for up to 3 days. Reheat wrapped in foil in a preheated oven at 350°F (175°C) for 10-15 minutes, or microwave (though they may become soggy). For best results, reheat the filling separately from the tortillas.
What are some suggested toppings for the Cheesy Garlic Chicken Wraps?
Suggested toppings include diced tomatoes, shredded lettuce, sour cream or Greek yogurt, salsa, avocado slices, and chopped cilantro. Get creative and customize to your liking!

Easy Cheesy Garlic Chicken Wraps
Ingredients
Equipment
Method
- Slice chicken breasts in half horizontally if thick. Pat dry with paper towels and drizzle with olive oil. Season with Italian seasoning, salt, and pepper.
- Heat a large skillet over medium-high heat. Cook chicken for 5-7 minutes per side, or until cooked through and the internal temperature reaches 165°F (74°C). Remove from skillet and let rest before shredding or dicing.
- In the same skillet, melt butter over medium heat. Add minced garlic and sauté for 1-2 minutes, until fragrant, being careful not to burn the garlic.
- Add shredded or diced chicken to the skillet and toss to coat in the garlicky butter.
- Reduce heat to low. Sprinkle with mozzarella and cheddar cheese, stirring until melted and gooey.
- Warm tortillas in a dry skillet or microwave for a few seconds to make them pliable.
- Place a generous amount of cheesy garlic chicken filling in the center of each tortilla. Add desired toppings.
- Fold in the sides of the tortilla and roll up tightly.
- Optional: Toast the wraps in a dry skillet or panini press for a few minutes per side, until golden brown and crispy.
- Cut the wraps in half (optional) and serve immediately.
