Deep within the satisfying snap of a chocolate sandwich cookie lies the potential for something utterly magical. With just a bit of kitchen alchemy, those familiar black-and-white discs transform from a simple snack into the foundation for a dessert that’s as delightful to look at as it is to devour. We’re not just making a treat; we’re crafting a moment of pure, unadulterated joy, one that requires no oven, no complicated techniques, and no stress.
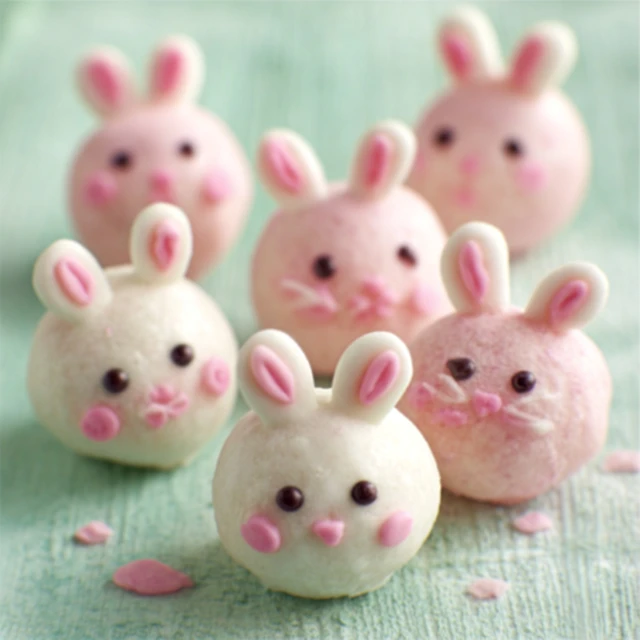
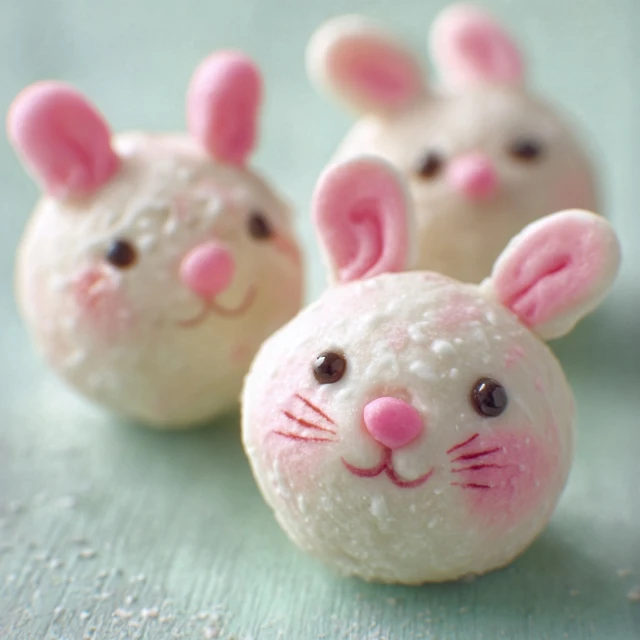
These No-Bake Bunny Oreo Balls are the sweet result of that simple transformation. Imagine a rich, fudgy truffle with the unmistakable flavor of cookies and cream, enrobed in a smooth, sweet shell of white chocolate. They’re then whimsically decorated to look like adorable little bunny bottoms, complete with fluffy coconut tails and tiny pink feet, making them the undeniable star of any springtime celebration or Easter gathering.
Recipe Highlights
- Absolutely No-Bake: Keep your kitchen cool and your stress levels low! This entire recipe comes together in the food processor and the fridge, making it perfect for warm days or when your oven is already occupied.
- Incredibly Kid-Friendly: From crushing the cookies to rolling the balls and decorating the bunnies, this is a fantastic project to get little hands involved in the kitchen. The decorating part is especially fun for all ages.
- Crowd-Pleasing Charm: These little bunnies are irresistibly cute and taste even better than they look. They are guaranteed to bring smiles and disappear quickly from any dessert table or party platter.
What You’ll Need
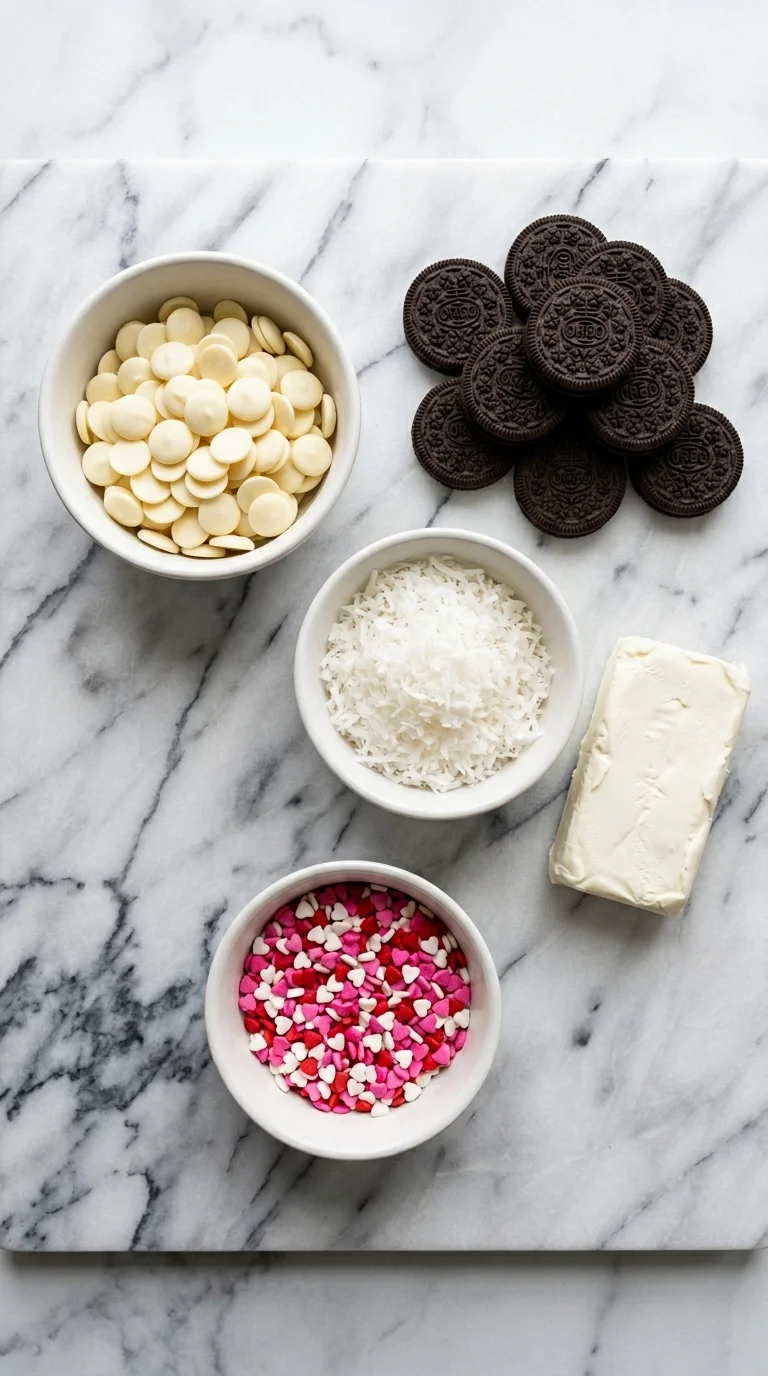
The beauty of this recipe lies in its simplicity. You only need a handful of common ingredients to create these adorable and delicious treats. Here’s what to grab from the store.
- Oreo Cookies: (The entire cookie, cream filling and all!) This is the heart and soul of our truffle, providing that classic, deep chocolate cookies-and-cream flavor and the perfect texture.
- Cream Cheese: (Use full-fat, block-style cream cheese, softened to room temperature). This is our magic binder. It adds a subtle tang that cuts through the sweetness and gives the Oreo balls their signature dense, fudgy, and creamy consistency.
- White Chocolate Melting Wafers: (Choose a good quality brand for the best results). These are designed to melt smoothly and set up with a beautiful, glossy finish, creating the perfect clean white canvas for our bunny.
- Shredded Coconut: (Sweetened is best for this recipe). This will become the fluffy, adorable little bunny tail. It adds a lovely bit of texture and a hint of coconut flavor.
- Pink Sprinkles or Candy: You’ll need these for the bunny feet! Pink heart-shaped sprinkles are perfect, but you can also use pink candy melts piped into little ovals and a dot.
Easy Substitutions
Don’t have everything on hand? No problem! This recipe is wonderfully flexible.
- Oreo Flavors: Feel free to experiment! Golden Oreos, Mint Oreos, or even Peanut Butter Oreos would create a delicious and unique twist. Using mint cookies would make a treat very similar to these festive Mint Oreo Truffles.
- Cream Cheese: If you’re in a pinch, Neufchâtel cheese can be used, though the truffles might be slightly softer. For a dairy-free version, use a dairy-free cream cheese alternative.
- White Chocolate: If you can’t find melting wafers, you can use high-quality white chocolate chips or a chopped white chocolate bar. Just be sure to melt it gently and consider adding a teaspoon of coconut oil to help it smooth out.
- Coconut-Free Tail: If you’re not a fan of coconut, you can create a tail using a small dollop of white frosting, a mini marshmallow, or even a white nonpareil sprinkle.
Fun Variations to Try
While the classic bunny bottom is a showstopper, you can easily customize these treats to fit any theme or flavor preference. This base recipe is as wonderfully versatile as my classic Oreo Truffles.
Chocolate Bunny Bottoms
Instead of white chocolate, use milk or semi-sweet chocolate melting wafers for the coating. You can still use the shredded coconut for the tail, or for a double-chocolate experience, use a sprinkle of finely crushed Oreo crumbs instead.Carrot Patch Truffles
Forget the bunny and plant a garden! Dip the Oreo balls in orange-colored candy melts. Before they set, sprinkle the top with a bit of crushed Oreo “dirt” and stick a small sprig of fresh mint or a bit of green frosting on top to look like a carrot top.Springtime Flavor Infusions
Add a little something extra to the Oreo and cream cheese mixture. A quarter teaspoon of peppermint extract, a half teaspoon of almond extract, or even a tablespoon of raspberry liqueur can completely transform the flavor profile into something new and exciting.Golden Easter Egg Truffles
Shape the Oreo mixture into ovals instead of rounds. Dip them in yellow or pastel-colored candy melts and, while the coating is still wet, decorate them with festive sprinkles or edible gold dust for a beautiful, shimmering Easter egg effect.How to Make No-Bake Bunny Oreo Balls
Ready to create some magic? Let’s walk through the process step-by-step. The best part about a no-bake recipe is the pure simplicity, much like the joy of making a No Bake Grasshopper Pie on a hot day.
Step 1: Crush the Oreos
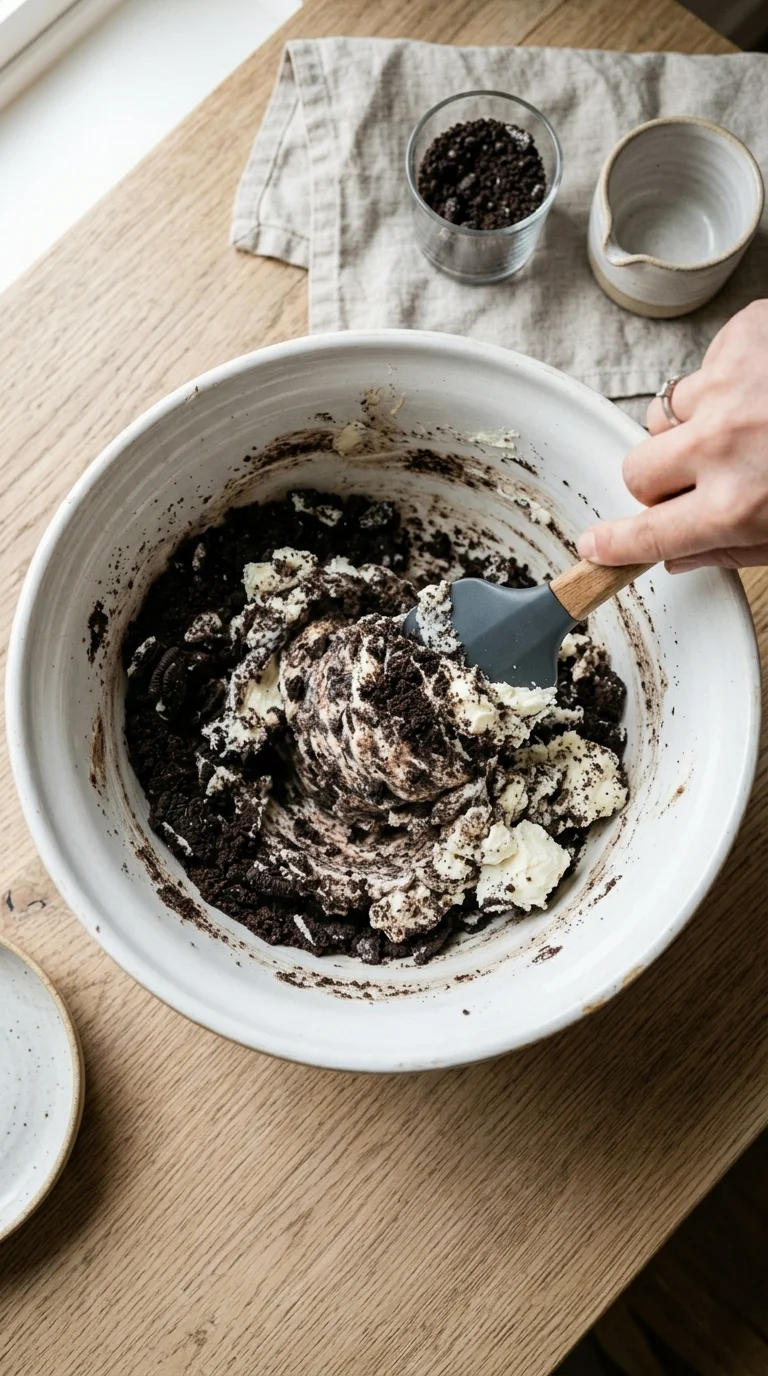
Place the entire package of Oreo cookies into the bowl of a food processor. Pulse until they are broken down into fine, uniform crumbs. You shouldn’t see any large cookie chunks remaining. If you don’t have a food processor, you can place the cookies in a large zip-top bag and crush them with a rolling pin.Step 2: Mix the “Dough”
Add the softened block of cream cheese to the food processor with the Oreo crumbs. Pulse again until the mixture is well-combined and starts to clump together, forming a thick, dough-like consistency. Scrape down the sides of the bowl as needed to ensure everything is incorporated.Step 3: Roll and Shape
Using a small cookie scoop (about 1 tablespoon), portion out the mixture. Roll each portion between your palms to form a smooth, round ball. Place the rolled balls on a baking sheet lined with parchment paper. This parchment is key for preventing sticking later on.Step 4: Chill Thoroughly
Place the baking sheet with the Oreo balls into the freezer for at least 15-20 minutes, or in the refrigerator for about an hour. This step is crucial! Chilling the balls makes them firm, which is essential for getting a clean, smooth coating of chocolate without the truffle falling apart.Step 5: Melt the White Chocolate
While the balls are chilling, prepare your dipping station. Place the white chocolate melting wafers in a microwave-safe bowl. Microwave in 30-second intervals, stirring well after each one, until the chocolate is completely melted and smooth. Be careful not to overheat it, as white chocolate can seize easily.Step 6: Dip the Oreo Balls
Remove the chilled Oreo balls from the freezer. Working one at a time, drop a ball into the melted white chocolate. Use a fork to gently roll it around until it’s fully coated. Lift the ball out with the fork and tap the fork gently against the side of the bowl to allow any excess chocolate to drip off.Step 7: Create the Bunny Bottom
Place the coated Oreo ball back onto the parchment-lined baking sheet. Immediately, before the chocolate sets, dip the bottom edge of the truffle into a small bowl of shredded coconut. This creates the fluffy tail.Step 8: Add the Feet
Now for the final, adorable touch! Place two pink heart-shaped sprinkles, points facing inward, onto the top center of the truffle to create the pads of the bunny’s feet. If you don’t have heart sprinkles, you can use a toothpick to dot on three tiny pink dots above each “pad” for the toes. Let the bunnies set completely at room temperature or in the fridge until the chocolate is firm. The decorating fun is a great way to get kids involved, just like when we make colorful Lucky Charms Marshmallow Treats.Expert Tips for Success
- Use Room Temperature Cream Cheese: Make sure your cream cheese is truly softened. This allows it to blend seamlessly with the Oreo crumbs, creating a smooth, non-lumpy texture. Cold cream cheese will be difficult to incorporate.
- Don’t Skip the Chill Time: This is the most important step for easy dipping. Firm, cold truffles hold their shape and won’t melt into the warm chocolate, ensuring a perfect, professional-looking coating every time.
- The Fork Trick is Key: Using a fork, not a spoon, to dip the truffles is a game-changer. It allows the excess chocolate to drip away easily through the tines, preventing a thick, uneven coating and a “foot” of pooled chocolate at the base.
- Work in Small Batches: If your kitchen is warm, keep the un-dipped Oreo balls in the freezer and only take out a few at a time to dip. This ensures they all stay perfectly chilled throughout the process.
Serving Suggestions
These little bunnies are perfect all on their own, but they truly shine as part of a larger celebration. Their whimsical appearance makes them a fantastic centerpiece for any spring or Easter-themed dessert spread.
Arrange them on a beautiful platter, nestled in a bed of green-tinted coconut “grass” to create a festive scene. They look wonderful alongside other holiday treats and add a playful, no-bake element to the table.
For a truly show-stopping dessert board, pair these Bunny Oreo Balls with other springtime favorites. Imagine them next to a plate of rich Double Chocolate Cadbury Egg Cookies or their delightful cousins, the Chewy Cadbury Egg Cookies. The variety of textures and chocolate flavors would be a dream for any guest.
They also make wonderful homemade gifts. Pack them carefully in a small box lined with festive tissue paper or in a cellophane bag tied with a pastel ribbon. They are a thoughtful and delicious way to share a little bit of springtime joy with friends, neighbors, or teachers.
If you tried this recipe and loved it, please leave a 5-star rating below. It helps us so much
Do I need a food processor to make these Oreo balls?
No, a food processor is not essential. If you don’t have one, the article suggests placing the Oreo cookies in a large zip-top bag and crushing them into fine crumbs with a rolling pin.
Why is it so important to chill the Oreo balls before dipping them in chocolate?
Chilling the Oreo balls is a crucial step because it makes them firm. This prevents them from falling apart in the warm melted chocolate and ensures you get a clean, smooth coating.
Can I use different types of Oreos or an alternative to white chocolate?
Yes, the recipe is very flexible. You can experiment with Golden, Mint, or Peanut Butter Oreos. For the coating, you can use milk or semi-sweet chocolate instead of white chocolate.
What can I use for the bunny tail if I don’t like coconut?
If you prefer a coconut-free option for the tail, the recipe suggests using a small dollop of white frosting, a mini marshmallow, or a white nonpareil sprinkle.
Hoppin’ Good No-Bake Bunny Oreo Balls
Ingredients
Equipment
Method
- Line a baking sheet with parchment paper.
- Place the entire package of Oreo cookies (filling included) into a food processor. Pulse until they are fine, uniform crumbs with no large chunks remaining.
- Add the softened block of cream cheese to the food processor with the crumbs. Pulse until the mixture is well-combined and forms a thick, dough-like consistency, scraping down the sides as needed.
- Use a small cookie scoop to portion the mixture into 1-tablespoon amounts. Roll each portion between your palms to form a smooth ball and place it on the prepared baking sheet.
- Place the baking sheet in the freezer for at least 20 minutes or in the refrigerator for 1 hour. This step is crucial for making the balls firm for dipping.
- Once the balls are chilled, melt the white chocolate wafers in a microwave-safe bowl. Microwave in 30-second intervals, stirring between each, until completely melted and smooth.
- Working one at a time, drop a chilled Oreo ball into the melted white chocolate. Use a fork to roll it until fully coated, then lift it out, allowing excess chocolate to drip off through the tines.
- Place the coated ball back on the parchment paper. Immediately, before the chocolate sets, gently dip one side into the shredded coconut to create a fluffy tail.
- Add the feet by placing two pink heart-shaped sprinkles, points facing inward, on the top center of the truffle. Let the truffles set completely at room temperature or in the fridge until the chocolate is firm.
