Every classic dessert holds a secret, a memory locked within its layers of flavor, and banana pudding is the queen of comforting nostalgia. It’s the taste of potlucks, family gatherings, and that one special bowl saved just for you. We’re taking that soulful, creamy, cookie-studded perfection and transforming it into something utterly new, yet wonderfully familiar: a bite-sized truffle, tailor-made for your Easter celebration.
These no-bake wonders are everything you adore about the original dessert, concentrated into a single, glorious bite. Imagine a dense, chewy center bursting with authentic banana and vanilla wafer flavor, all enrobed in a crisp, sweet white chocolate shell. They are deceptively simple to make, impossibly delicious to eat, and destined to become the most talked-about treat on your holiday table.
What Makes This Special
- Effortless Elegance: This is a completely no-bake recipe! You get a stunning, gourmet-looking dessert without ever turning on your oven, making it perfect for busy holiday prep.
- Nostalgia in a Bite: It captures the soul of classic banana pudding—the creamy banana, the sweet vanilla cookies, the rich texture—in a modern, poppable truffle form.
- Perfectly Festive: Dressed up with pastel sprinkles or a simple drizzle, these truffles are a beautiful and unique addition to any Easter basket or dessert spread.
Gather Your Supplies
Here is what you will need to get started:
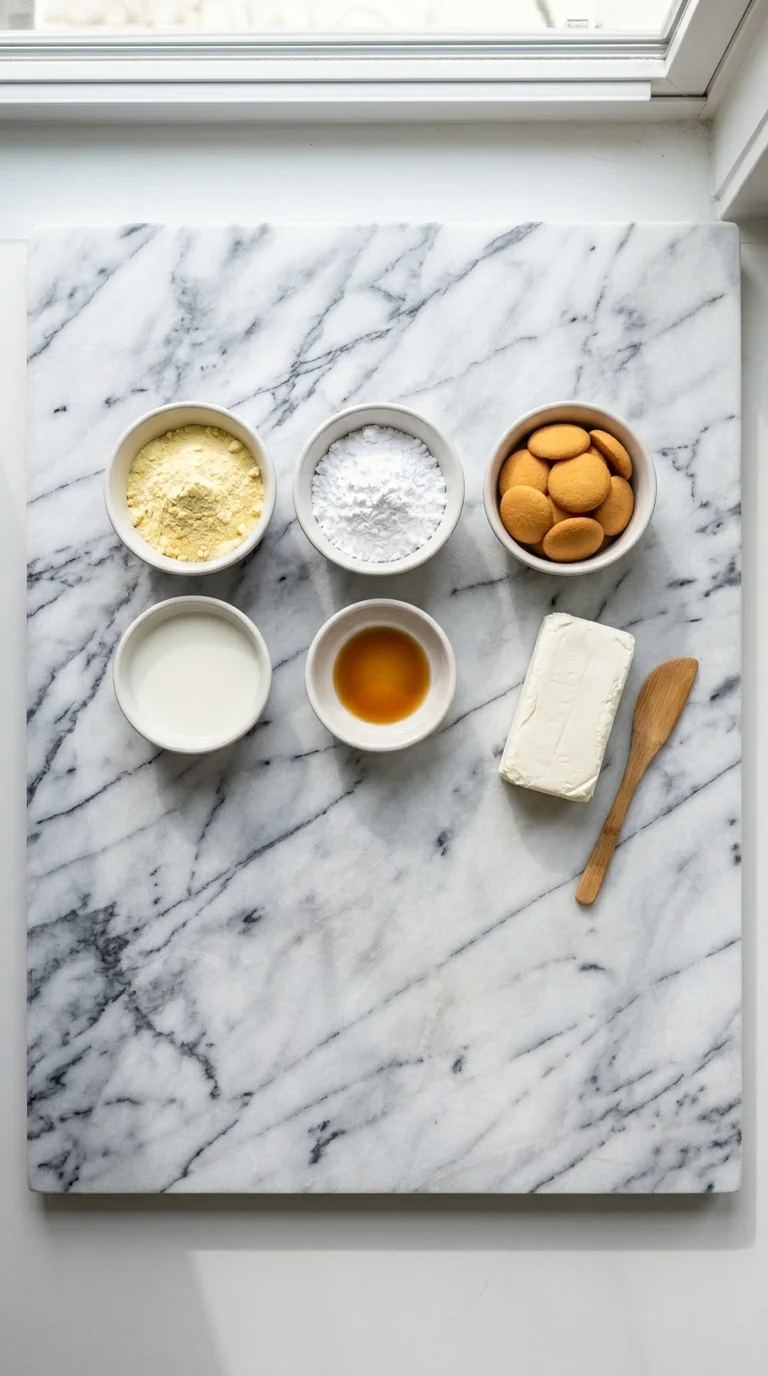
- Nilla Wafers: (The heart and soul of the recipe). These provide the signature sweet, vanilla-kissed cookie base and structure for the truffles.
- Cream Cheese: (The creamy binder). Use a full-fat block, softened to room temperature. This adds a subtle tang and creates that rich, cheesecake-like texture that holds everything together.
- Instant Banana Cream Pudding Mix: (The flavor powerhouse). Make sure you grab the *instant* kind, not the cook-and-serve. We’re using the dry powder directly for a concentrated banana flavor that won’t make the truffles soggy.
- Powdered Sugar: (For sweetness and structure). This dissolves seamlessly into the mixture, sweetening it perfectly and helping it firm up.
- Milk: Just a splash is needed to bring the mixture together into a cohesive, rollable dough.
- Vanilla Extract: A little splash enhances all the other flavors and adds a layer of warmth.
- White Chocolate Melting Wafers: (For the perfect shell). These are designed to melt smoothly and set with a satisfying snap, which is ideal for dipping.
- Coconut Oil or Vegetable Shortening: A tiny amount mixed into the melted chocolate helps it become smoother and more fluid, making the dipping process much easier.
- Pastel Sprinkles: Optional, but highly recommended for that festive Easter touch!
Pantry Alternatives
Don’t have everything on hand? No problem! This recipe is wonderfully flexible. Here are a few simple swaps you can make in a pinch.- No Nilla Wafers? You can substitute with other simple, crisp cookies. Golden Oreos (with the cream removed), shortbread cookies, or even digestive biscuits would work well.
- Different Pudding Flavor: While banana is classic, you could easily experiment! French vanilla, cheesecake, or even white chocolate instant pudding mix would create a delicious twist. Using pudding mix as a flavor booster is a fantastic trick, much like in these Soft Pistachio Pudding Cookies.
- Chocolate Coating: If you prefer, milk chocolate or semi-sweet chocolate wafers would be a delicious alternative to white chocolate, creating a “chocolate-covered banana” vibe.
- No Melting Wafers: You can use high-quality white chocolate chips, but you’ll definitely want to add the coconut oil or shortening to help them melt smoothly and prevent seizing.
Fun Variations to Try
Once you’ve mastered the basic recipe, it’s so much fun to start playing with different flavors and textures. These truffles are a perfect canvas for your creativity!One of the easiest ways to add a little something extra is by mixing in finely chopped nuts. Toasted pecans or walnuts add a wonderful crunch and nutty flavor that complements the banana beautifully.
For a more decadent, dessert-forward truffle, try adding a half cup of toffee bits to the mixture. The little pockets of crunchy caramel are an incredible surprise when you bite into the creamy center.
If you love no-bake treats, you know how adaptable they can be. Just like with a No Bake Grasshopper Pie, you can change up the core components. Try adding a tablespoon of rum extract for a bananas foster-inspired flavor that is absolutely divine for an adult-only version.
Finally, get creative with the decoration! Instead of sprinkles, you can use different colored melting wafers to drizzle contrasting lines over the top. A little yellow and white drizzle makes them look so professional and chic.
Step-by-Step Instructions

Step 1: Create the Cookie Crumbs
First, you need to turn your Nilla Wafers into fine crumbs. The easiest way to do this is in a food processor. Just pulse the cookies until they resemble coarse sand.If you don’t have a food processor, no worries! Place the cookies in a large, sealed zip-top bag, press out the air, and use a rolling pin or a heavy can to crush them until they are very fine. You want to make sure there are no large cookie chunks left.
Step 2: Mix the Truffle “Dough”
In a large bowl, beat the softened cream cheese with an electric mixer until it’s completely smooth and creamy. Scrape down the sides of the bowl to ensure there are no lumps.Add the dry instant banana pudding mix, powdered sugar, milk, and vanilla extract to the cream cheese. Mix on low speed until everything is just combined, then increase the speed to medium and beat until the mixture is smooth and well-incorporated. Finally, pour in the Nilla Wafer crumbs and mix on low until a thick, cohesive dough forms.
Step 3: Chill the Mixture
This step is crucial! Cover the bowl with plastic wrap and refrigerate the truffle mixture for at least 30 minutes. Chilling makes the dough much less sticky and significantly easier to roll into perfect little balls.Step 4: Roll the Truffles
Once chilled, use a small cookie scoop (about 1 tablespoon) to portion out the dough. This ensures all your truffles are a uniform size. Roll each portion firmly between your palms to create a smooth, round ball. The process is very similar to making classic Oreo Truffles or even these boozy Baileys Cheesecake Balls.Place the rolled balls on a baking sheet lined with parchment paper. This will prevent them from sticking.
Step 5: Freeze for Firmness
Place the baking sheet with the rolled truffles into the freezer for at least 15-20 minutes. You want them to be very firm, but not frozen solid. This quick freeze is the secret to a clean, easy dipping process. A cold truffle helps the warm chocolate set almost instantly, giving you a smooth, beautiful coating.Step 6: Melt the White Chocolate
While the truffles are in the freezer, prepare your coating. Place the white chocolate melting wafers and the coconut oil (or shortening) in a microwave-safe bowl.Microwave in 30-second intervals, stirring well after each one, until the chocolate is almost completely melted. Then, just continue stirring until the residual heat melts the remaining bits and the chocolate is perfectly smooth. This gentle heating method prevents the chocolate from burning or seizing.
Step 7: Dip and Coat
Remove the firm truffles from the freezer. Working one at a time, drop a truffle into the melted white chocolate. Use two forks or a candy dipping tool to roll it around until it’s fully coated.Lift the truffle out of the chocolate, allowing any excess to drip back into the bowl. This is a key step for a neat finish, just like when making these gorgeous White Chocolate Strawberry Truffles. Place the coated truffle back onto the parchment-lined baking sheet.
Step 8: Decorate and Set
If you’re using sprinkles, add them immediately after dipping each truffle, while the chocolate is still wet. If you wait too long, the chocolate will set and the sprinkles won’t stick.Repeat the dipping and decorating process with the remaining truffles. Let them sit at room temperature or in the refrigerator until the chocolate shell is completely firm, which should only take about 15-20 minutes.
Chef’s Tips
- Don’t Skip the Chill/Freeze: I know it’s tempting to rush, but chilling the dough and then freezing the balls is non-negotiable. It prevents a sticky mess and is the key to a smooth, professional-looking chocolate shell.
- Use Quality Melting Wafers: For the best results, use candy melts or wafers (like Ghirardelli) specifically designed for melting and coating. They provide a much smoother finish and set better than regular chocolate chips.
- The Two-Fork Method: The easiest way to dip without a special tool is with two forks. Use one to roll the truffle in the chocolate and the other to help lift it out and scrape excess chocolate from the bottom of the first fork.
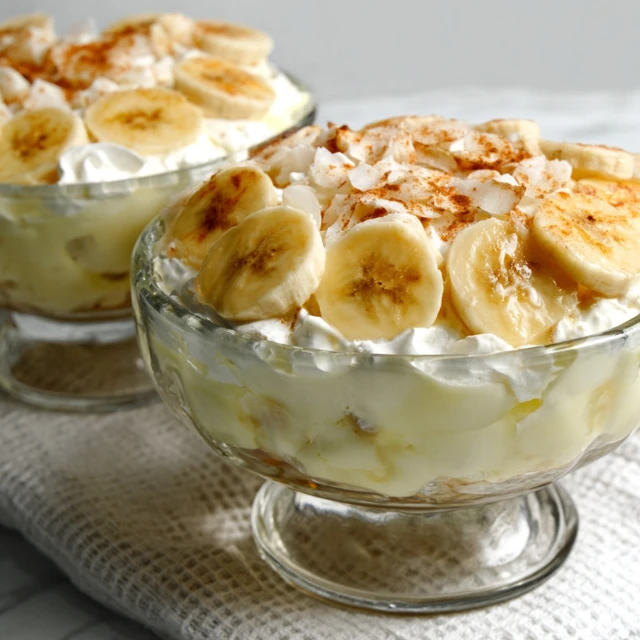
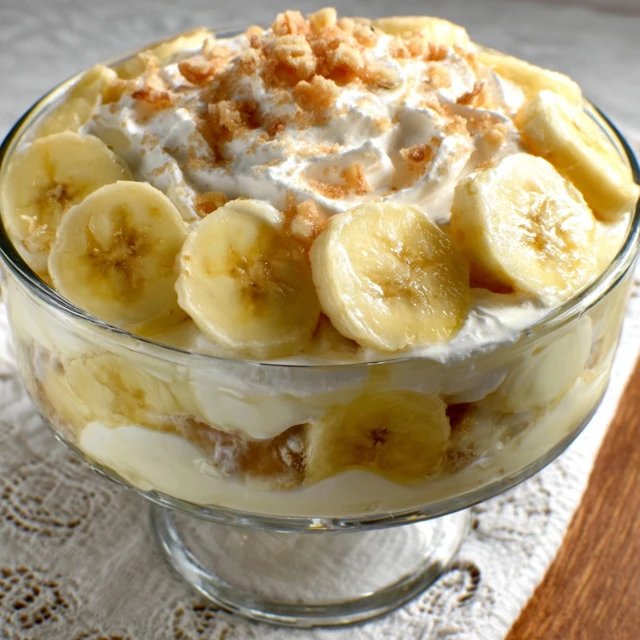
How to Serve
These No-Bake Banana Pudding Easter Truffles are the star of any dessert table. Arrange them on a pretty platter or a multi-tiered cake stand for a stunning presentation. Their pastel-flecked shells make them a perfect centerpiece for an Easter brunch or dinner.They are absolutely wonderful served alongside a hot cup of coffee or tea, providing a sweet and satisfying end to a meal. You can also package them in small cellophane bags tied with a festive ribbon to give as adorable, homemade Easter gifts to friends, neighbors, or teachers.
For a truly show-stopping Easter dessert spread, place them on a platter with other festive treats. They look beautiful next to a batch of colorful Double Chocolate Cadbury Egg Cookies, offering a wonderful contrast in both flavor and texture.
Know someone who loves No-Bake Banana Pudding Easter Truffles? Share this recipe with them
Do I have to use instant pudding mix, or will cook-and-serve work?
You must use the dry instant pudding mix. The recipe relies on the dry powder to add a concentrated banana flavor without making the truffle mixture soggy. Cook-and-serve pudding mix will not work for this no-bake recipe.
Is it really necessary to chill the dough and then freeze the balls before dipping?
Yes, this is a crucial step that should not be skipped. Chilling the mixture for at least 30 minutes makes the sticky dough much easier to roll into balls. Freezing the rolled truffles for 15-20 minutes makes them firm, which helps the chocolate shell set instantly for a smooth, clean coating.
What can I use as a substitute for Nilla Wafers?
If you don’t have Nilla Wafers, you can substitute them with other simple, crisp cookies. The article suggests using Golden Oreos (with the cream removed), shortbread cookies, or digestive biscuits as effective alternatives.
Heavenly No-Bake Banana Pudding Easter Truffles
Ingredients
Equipment
Method
- Crush the Nilla Wafers into fine crumbs using a food processor. If you don’t have one, place them in a sealed zip-top bag and crush with a rolling pin.
- In a large bowl, beat the softened cream cheese with an electric mixer until completely smooth and creamy.
- Add the dry instant banana pudding mix, powdered sugar, milk, and vanilla extract. Mix on low speed until combined, then increase to medium and beat until smooth.
- Add the Nilla Wafer crumbs to the cream cheese mixture and mix on low speed until a thick, cohesive dough forms.
- Cover the bowl with plastic wrap and refrigerate the truffle mixture for at least 30 minutes to make it easier to handle.
- Use a small cookie scoop (about 1 tablespoon) to portion the chilled dough. Roll each portion between your palms into a smooth ball and place on a parchment-lined baking sheet.
- Place the baking sheet of truffles in the freezer for 15-20 minutes until very firm. This is key for easy dipping.
- While the truffles are freezing, place the white chocolate melting wafers and coconut oil in a microwave-safe bowl. Microwave in 30-second intervals, stirring well after each, until the chocolate is completely melted and smooth.
- Working one at a time, drop a firm truffle into the melted white chocolate. Use two forks or a dipping tool to roll it until fully coated.
- Lift the truffle out, allowing any excess chocolate to drip back into the bowl. Place the coated truffle back on the parchment-lined baking sheet.
- If using sprinkles, add them immediately while the chocolate is still wet. Repeat with all truffles.
- Let the truffles sit at room temperature or in the refrigerator for about 15-20 minutes, until the chocolate shell is completely firm.
Notes
Variations: For extra crunch, mix in 1/2 cup of finely chopped toasted pecans or toffee bits. You can also use milk or semi-sweet chocolate for the coating for a ‘chocolate-covered banana’ flavor.
Storage: Store finished truffles in an airtight container in the refrigerator for up to one week.
