Decoding the Maillard Magic: The Science of Searing
The secret to stellar pan-seared scallops, like so many culinary triumphs, lies in understanding the underlying science, specifically the Maillard reaction. This complex chemical reaction occurs between amino acids and reducing sugars, requiring high heat and relatively low moisture. When scallops are seared, the Maillard reaction is responsible for the beautiful browning and the development of hundreds of flavor compounds that contribute to that characteristic nutty, savory, and slightly sweet taste. Crucially, too much moisture inhibits the Maillard reaction, leading to steamed, rubbery scallops instead of beautifully browned ones. Proper searing requires not just heat, but also dryness on the scallop’s surface. Think of it like trying to Honey Garlic Salmon Bites – you want that sticky glaze to caramelize, not boil! A dry surface is key.The Ultimate Pan-Seared Scallops Recipe
 This recipe reflects everything I’ve learned through countless batches of scallops, both successes and (admittedly) failures. Follow it closely, and you’ll be rewarded with perfectly seared scallops every time.
Ingredients:
- 1 pound large sea scallops (U-10 or U-12), dry-packed
- 1 tablespoon olive oil
- 1 tablespoon butter
- Salt and freshly ground black pepper
- 1 tablespoon lemon juice (optional)
- Chopped fresh parsley, for garnish (optional)
Equipment:
- Paper towels
- Heavy-bottomed skillet (cast iron or stainless steel preferred)
Instructions:
- Prepare the Scallops: Pat the scallops *completely* dry with paper towels. This is the most crucial step. Remove the small side muscle (the tough little tag on the side) if it’s still attached. Season generously with salt and pepper.
- Heat the Skillet: Place the skillet over medium-high heat. Allow it to get very hot. This usually takes 3-5 minutes. A drop of water should sizzle and evaporate almost immediately.
- Add Fat: Add the olive oil to the hot skillet. Once the oil is shimmering and almost smoking, add the butter. The butter should melt quickly and create a fragrant, nutty aroma.
- Sear the Scallops: Carefully place the scallops in the hot skillet, making sure not to overcrowd the pan. Work in batches if necessary. Leave at least 1/2 inch between each scallop.
- Sear Without Moving: Let the scallops sear undisturbed for 2-3 minutes, or until a golden-brown crust forms. Resist the urge to move them! This is crucial for developing the sear.
- Flip and Sear the Other Side: Using tongs, carefully flip the scallops and sear for another 1-2 minutes, or until the other side is golden-brown and the scallops are cooked through. They should be opaque and slightly firm to the touch. Avoid overcooking!
- Deglaze (Optional): Remove the skillet from the heat and stir in the lemon juice (if using). This will deglaze the pan and add a bright, acidic note to the scallops.
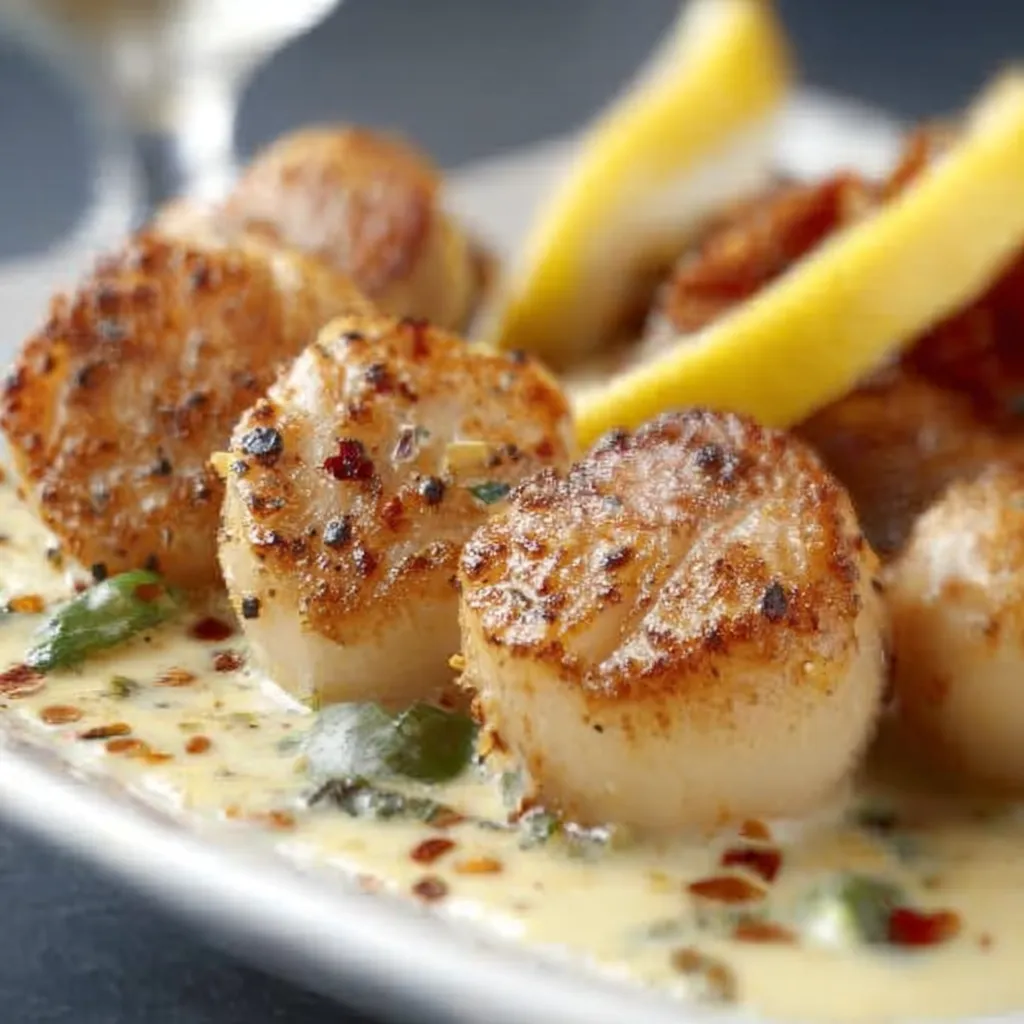
- Serve Immediately: Transfer the scallops to a serving plate and garnish with fresh parsley (if using). Serve immediately. They are best enjoyed hot.
My Scallop Saga: A Culinary Investigation
Like many of you, I initially thought searing scallops was a piece of cake. My first few attempts were a disaster. Pale, rubbery, and utterly disappointing. I knew there had to be more to it than just throwing them in a pan. Thus began my quest for the perfect pan-seared scallop.The Moisture Monster: Battle One
My first “Aha!” moment came when I realized just how much moisture scallops release when cooked. Even dry-packed scallops contain a significant amount of water. Simply patting them dry once wasn’t enough. They needed to be *aggressively* dried. I started using multiple paper towels and pressing down firmly to remove as much moisture as possible. This made a huge difference, but the searing was still inconsistent. I even considered pre-salting them like you might for Blackened Salmon to draw out moisture.Heat and the Heavy Skillet: The Dynamic Duo
Next, I tackled the heat. I was using a non-stick skillet, thinking it would prevent sticking. Wrong! Non-stick skillets don’t conduct heat as evenly as cast iron or stainless steel. I switched to a cast iron skillet and cranked up the heat. The results were immediately better. The scallops browned more evenly and developed a much more pronounced crust. Like with perfectly seared King Crab Legs Oven, consistent heat is critical.The Patience Game: Resist the Urge to Peek!
Finally, I learned the importance of patience. I was constantly fidgeting with the scallops, moving them around in the pan, and checking to see if they were done. This prevented them from developing a proper sear. I realized that the key was to leave them undisturbed for a full 2-3 minutes per side, allowing the Maillard reaction to work its magic. Only then did I achieve that perfect golden-brown crust. I even considered adding a touch of cornstarch like some do for dishes in the Mexican Street Corn And Shrimp Skillet style to really get a crispy sear!The Foolproof Technique: Sealing the Deal on Perfect Scallops
After countless experiments and a fair share of scallop-related frustrations, I’ve finally cracked the code. Here’s my foolproof technique for pan-seared scallops, distilled into a simple, step-by-step guide:- Dry, Dry, Dry: Pat the scallops *completely* dry with paper towels. Use multiple paper towels and press down firmly to remove as much moisture as possible. Consider letting them sit, uncovered, in the refrigerator for 30 minutes to further dry the surface.
- High Heat is Key: Use a heavy-bottomed skillet (cast iron or stainless steel) and heat it over medium-high heat until it’s very hot.
- Right Fat Ratio: Use a combination of olive oil and butter. The olive oil has a higher smoke point, preventing the butter from burning.
- Don’t Overcrowd: Sear the scallops in batches if necessary to avoid overcrowding the pan. Overcrowding lowers the pan temperature and results in steamed, not seared, scallops.
- Patience is a Virtue: Let the scallops sear undisturbed for 2-3 minutes per side, or until a golden-brown crust forms. Resist the urge to move them!
- Don’t Overcook: Scallops cook quickly. Sear them just until they’re opaque and slightly firm to the touch. Overcooked scallops are rubbery and tough.
- Serve Immediately: Scallops are best enjoyed hot, right after they’re cooked.
Why is it so important to dry the scallops thoroughly before searing?
Thoroughly drying the scallops is crucial because excess moisture inhibits the Maillard reaction, which is responsible for the desirable browning and flavor development. Moisture leads to steamed, rubbery scallops instead of beautifully seared ones.
What type of skillet is best for searing scallops and why?
A heavy-bottomed skillet, such as cast iron or stainless steel, is preferred. These materials conduct heat more evenly than non-stick skillets, resulting in a more consistent and pronounced sear.
What is the ideal heat level and cooking time for perfectly seared scallops?
The ideal heat level is medium-high. Sear the scallops undisturbed for 2-3 minutes per side, or until a golden-brown crust forms. They should be opaque and slightly firm to the touch. Avoid overcooking.
Why use a combination of olive oil and butter when searing scallops?
The recipe recommends using a combination of olive oil and butter. The olive oil has a higher smoke point, preventing the butter from burning while still providing a rich, nutty flavor.
Perfect Pan-Seared Scallops
Ingredients
Equipment
Method
- Prepare the Scallops: Pat the scallops completely dry with paper towels. Remove the small side muscle if it’s still attached. Season generously with salt and pepper.
- Heat the Skillet: Place the skillet over medium-high heat. Allow it to get very hot (3-5 minutes). A drop of water should sizzle and evaporate almost immediately.
- Add Fat: Add the olive oil to the hot skillet. Once the oil is shimmering and almost smoking, add the butter. The butter should melt quickly.
- Sear the Scallops: Carefully place the scallops in the hot skillet, making sure not to overcrowd the pan. Leave at least 1/2 inch between each scallop. Work in batches if necessary.
- Sear Without Moving: Let the scallops sear undisturbed for 2-3 minutes, or until a golden-brown crust forms. Resist the urge to move them!
- Flip and Sear the Other Side: Using tongs, carefully flip the scallops and sear for another 1-2 minutes, or until the other side is golden-brown and the scallops are cooked through. They should be opaque and slightly firm to the touch. Avoid overcooking!
- Deglaze (Optional): Remove the skillet from the heat and stir in the lemon juice (if using).
- Serve Immediately: Transfer the scallops to a serving plate and garnish with fresh parsley (if using). Serve immediately.
