I’ll never forget the summer I tried to impress my childhood crush by baking him a cake, and, after a few kitchen mishaps, landed on a semi-disasterous, but ultimately delicious, attempt at a Chocolate Strawberry Cheesecake. Even though the cake was a bit lopsided, the combination of rich chocolate, creamy cheesecake, and fresh strawberries was a total hit! I promise, with this recipe, your Chocolate Strawberry Cheesecake will be a showstopper, even if it’s your first time!
Let’s Bake the Ultimate Chocolate Strawberry Cheesecake
Hey there, baking buddy! Are you ready to embark on a culinary adventure that will tantalize your taste buds and impress everyone you share it with? We’re diving headfirst into the world of Chocolate Strawberry Cheesecake, a dessert that’s both decadent and refreshing. I know, cheesecake can seem intimidating, but trust me, I’m here to guide you every step of the way. We’ll break it down into manageable parts, so you can create a masterpiece without any stress. And honestly, even if it’s not “perfect,” it will be delicious!
Why Chocolate Strawberry Cheesecake?
Okay, so why this particular cheesecake? Well, besides the fact that it’s incredibly yummy, it’s also a delightful symphony of flavors and textures. The rich, intense chocolate complements the creamy, tangy cheesecake filling, while the fresh strawberries add a burst of sweetness and a touch of acidity to balance everything out. Plus, it looks absolutely stunning! Imagine presenting this beauty at your next gathering – you’ll be the star of the show!
The Anatomy of a Perfect Cheesecake
Before we get into the nitty-gritty of the recipe, let’s understand the key components of our Chocolate Strawberry Cheesecake:
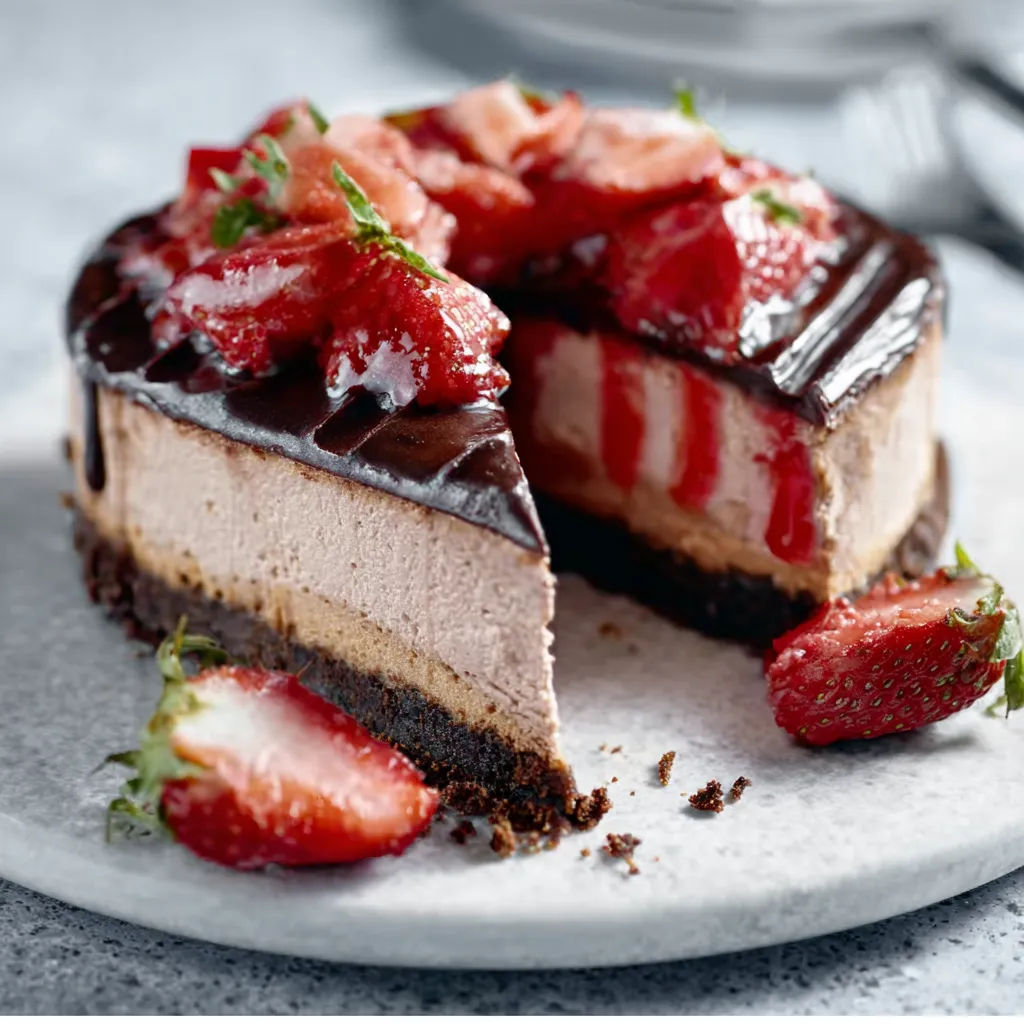
- The Crust: This is the foundation of our cheesecake, and it sets the stage for all the deliciousness to come. We’ll be using a chocolate cookie crust, because, well, why not more chocolate?
- The Cheesecake Filling: This is the heart and soul of the cheesecake. It should be creamy, smooth, and perfectly balanced in flavor. We’ll be adding melted chocolate to half the filling to get that wonderful chocolate swirl.
- The Strawberry Topping: Fresh strawberries are the perfect crown for our cheesecake. We’ll be making a simple strawberry sauce to drizzle over the top, adding both flavor and visual appeal.
Ingredients You’ll Need

Alright, let’s gather our ingredients. Make sure you have everything on hand before you start, as it will make the whole process much smoother.
For the Chocolate Cookie Crust:
- 1 1/2 cups chocolate cookie crumbs (about 24 chocolate sandwich cookies, cream filling removed)
- 5 tablespoons unsalted butter, melted
- 2 tablespoons granulated sugar
For the Cheesecake Filling:
- 32 ounces cream cheese, softened to room temperature (this is crucial!)
- 1 1/4 cups granulated sugar
- 1 teaspoon vanilla extract
- 1/2 teaspoon salt
- 4 large eggs
- 1/2 cup sour cream
- 4 ounces semi-sweet chocolate, melted and cooled slightly
For the Strawberry Topping:
- 1 pound fresh strawberries, hulled and sliced
- 1/4 cup granulated sugar
- 2 tablespoons lemon juice
- 1 tablespoon cornstarch
Step-by-Step Instructions: Let’s Get Baking!
Okay, deep breaths! We’re going to tackle this recipe one step at a time. Remember, baking is a science, but it’s also an art. Don’t be afraid to experiment and put your own spin on things.
Making the Chocolate Cookie Crust:
- Preheat your oven: Preheat your oven to 350°F (175°C).
- Combine the ingredients: In a medium bowl, combine the chocolate cookie crumbs, melted butter, and sugar. Mix well until the crumbs are evenly moistened.
- Press into the pan: Press the crumb mixture into the bottom of a 9-inch springform pan. Use the bottom of a measuring cup or your fingers to create a firm, even layer.
- Bake: Bake the crust for 8-10 minutes, or until it’s set and fragrant. Let it cool completely before adding the filling.
Preparing the Cheesecake Filling:
- Beat the cream cheese: In a large bowl, beat the softened cream cheese with an electric mixer until it’s smooth and creamy. Make sure there are no lumps! This is where room temperature cream cheese is essential. Cold cream cheese will leave you with a lumpy batter.
- Add sugar and flavorings: Gradually add the sugar, vanilla extract, and salt to the cream cheese, beating until well combined.
- Incorporate the eggs: Add the eggs one at a time, beating well after each addition. Be careful not to overbeat the batter at this stage, as it can incorporate too much air and cause the cheesecake to crack.
- Stir in sour cream: Stir in the sour cream until just combined.
- Divide the batter: Divide the cheesecake batter in half. Leave one half plain and gently fold the cooled, melted chocolate into the other half. Be gentle! We want to keep it light and airy.
- Create the swirl: Drop spoonfuls of the plain cheesecake batter and the chocolate cheesecake batter alternately onto the cooled crust. Use a knife or skewer to swirl the batters together, creating a marbled effect. Don’t over-swirl, or the colors will muddy together.
Baking the Cheesecake: The Water Bath Method
Here’s where things get a little bit fancy, but trust me, it’s worth it! Baking the cheesecake in a water bath helps to create a more even temperature and prevents the cheesecake from cracking. If you’re looking for other no-crack options, check out these Japanese Cotton Cheesecake Cupcakes; they are individually portioned which can help bake time and prevent cracking!
- Wrap the pan: Wrap the bottom of the springform pan tightly with aluminum foil. This will prevent water from seeping into the cheesecake. I recommend using two layers of foil, just to be extra safe.
- Prepare the water bath: Place the wrapped springform pan inside a larger roasting pan. Pour hot water into the roasting pan until it reaches about halfway up the sides of the springform pan.
- Bake: Carefully transfer the roasting pan to the preheated oven. Bake for 55-70 minutes, or until the edges of the cheesecake are set but the center still jiggles slightly.
- Cool gradually: Turn off the oven and crack the oven door slightly. Let the cheesecake cool in the oven for 1 hour. This gradual cooling helps to prevent cracking.
- Chill: Remove the cheesecake from the water bath and let it cool completely at room temperature. Then, cover it loosely with plastic wrap and refrigerate for at least 6 hours, or preferably overnight. This chilling time is essential for the cheesecake to set properly.
Making the Strawberry Topping:
- Combine ingredients: In a medium saucepan, combine the sliced strawberries, sugar, and lemon juice.
- Cook: Cook over medium heat, stirring occasionally, until the strawberries have softened and released their juices, about 5-7 minutes.
- Thicken: In a small bowl, whisk together the cornstarch and 1 tablespoon of cold water to form a slurry. Add the slurry to the saucepan and cook, stirring constantly, until the sauce has thickened, about 1-2 minutes.
- Cool: Remove the saucepan from the heat and let the strawberry topping cool completely.
Assembling and Serving: The Grand Finale
Alright, the moment we’ve all been waiting for! It’s time to assemble our Chocolate Strawberry Cheesecake and savor the deliciousness.
- Remove from pan: Carefully remove the cheesecake from the springform pan. Run a thin knife around the edge of the cheesecake to loosen it if necessary.
- Top with strawberries: Spoon the cooled strawberry topping over the cheesecake, spreading it evenly. You can also arrange some fresh strawberry slices around the edge for an extra touch of elegance.
- Serve: Slice the cheesecake and serve immediately. You can also garnish with a dollop of whipped cream or a sprinkle of chocolate shavings, if desired.
Tips and Tricks for Cheesecake Success
Okay, let’s talk about some common cheesecake challenges and how to overcome them.
- Preventing Cracks: The water bath method is your best friend when it comes to preventing cracks. Also, avoid overbaking the cheesecake, and let it cool gradually in the oven.
- Cream Cheese Consistency: Make sure your cream cheese is at room temperature before you start. This will ensure a smooth and creamy filling.
- Overmixing: Avoid overmixing the batter, especially after adding the eggs. Overmixing can incorporate too much air and cause the cheesecake to crack.
- Crust Issues: If your crust is too crumbly, add a little more melted butter. If it’s too hard, try using a lighter touch when pressing it into the pan.
Variations and Adaptations
Want to put your own spin on this recipe? Here are a few ideas:
- Different Crust: Experiment with different types of cookie crusts, such as graham cracker crust or Oreo crust.
- Different Chocolate: Use dark chocolate, milk chocolate, or even white chocolate in the filling.
- Different Berries: Substitute raspberries, blueberries, or blackberries for the strawberries.
- Add some booze: A tablespoon or two of your favorite liqueur can add an extra layer of flavor.
Other Decadent Desserts to Explore
If you’re craving more delightful dessert recipes, why not try these amazing options? You could start with these delightfully poppable Deviled Strawberries for a mini version of a similar flavor profile. Or perhaps you’d like to explore these fudgy Chocolate Covered Strawberry Brownies, or these rich and flavorful Chocolate Covered Cherry Brownie Bombs. If you love cheesecake, you might be interested in our Snickerdoodle Cheesecake or this fun and festive Sugar Cookie Cheesecake.
Storage Instructions
If you happen to have any leftovers (which is unlikely!), store the cheesecake in an airtight container in the refrigerator for up to 3-4 days. The strawberry topping may become slightly runny over time, but the cheesecake will still taste delicious.
Final Thoughts
Congratulations! You’ve made it through the Chocolate Strawberry Cheesecake recipe. I hope you enjoyed the process and learned some new baking skills along the way. Remember, baking is all about experimentation and having fun. Don’t be afraid to try new things and put your own personal touch on your creations. Most importantly, enjoy the fruits (and chocolate!) of your labor. Happy baking!
Why is it important for the cream cheese to be at room temperature?
Using softened cream cheese is crucial because cold cream cheese will result in a lumpy batter, affecting the overall smoothness of the cheesecake filling.
Why is a water bath recommended for baking this cheesecake?
Baking the cheesecake in a water bath helps to create a more even temperature, which prevents the cheesecake from cracking during baking.
How long can I store leftover Chocolate Strawberry Cheesecake?
You can store leftover cheesecake in an airtight container in the refrigerator for up to 3-4 days. While the strawberry topping might become slightly runny, the cheesecake will still be delicious.
What can I do to prevent my cheesecake from cracking?
The water bath method is your best bet! Also, avoid overbaking the cheesecake and let it cool gradually in the oven with the door slightly ajar. Don’t overmix the batter, especially after adding the eggs.
Irresistible Chocolate Strawberry Cheesecake
Ingredients
Equipment
Method
- Preheat your oven to 350°F (175°C).
- In a medium bowl, combine the chocolate cookie crumbs, melted butter, and sugar. Mix well until the crumbs are evenly moistened.
- Press the crumb mixture into the bottom of a 9-inch springform pan. Use the bottom of a measuring cup or your fingers to create a firm, even layer.
- Bake the crust for 8-10 minutes, or until it’s set and fragrant. Let it cool completely before adding the filling.
- In a large bowl, beat the softened cream cheese with an electric mixer until it’s smooth and creamy.
- Gradually add the sugar, vanilla extract, and salt to the cream cheese, beating until well combined.
- Add the eggs one at a time, beating well after each addition. Be careful not to overbeat the batter.
- Stir in the sour cream until just combined.
- Divide the cheesecake batter in half. Leave one half plain and gently fold the cooled, melted chocolate into the other half.
- Drop spoonfuls of the plain cheesecake batter and the chocolate cheesecake batter alternately onto the cooled crust. Use a knife or skewer to swirl the batters together, creating a marbled effect. Don’t over-swirl.
- Wrap the bottom of the springform pan tightly with aluminum foil (double layer recommended).
- Place the wrapped springform pan inside a larger roasting pan. Pour hot water into the roasting pan until it reaches about halfway up the sides of the springform pan.
- Carefully transfer the roasting pan to the preheated oven. Bake for 55-70 minutes, or until the edges of the cheesecake are set but the center still jiggles slightly.
- Turn off the oven and crack the oven door slightly. Let the cheesecake cool in the oven for 1 hour.
- Remove the cheesecake from the water bath and let it cool completely at room temperature. Then, cover it loosely with plastic wrap and refrigerate for at least 6 hours, or preferably overnight.
- In a medium saucepan, combine the sliced strawberries, sugar, and lemon juice.
- Cook over medium heat, stirring occasionally, until the strawberries have softened and released their juices, about 5-7 minutes.
- In a small bowl, whisk together the cornstarch and 1 tablespoon of cold water to form a slurry.
- Add the slurry to the saucepan and cook, stirring constantly, until the sauce has thickened, about 1-2 minutes.
- Remove the saucepan from the heat and let the strawberry topping cool completely.
- Carefully remove the cheesecake from the springform pan. Run a thin knife around the edge of the cheesecake to loosen it if necessary.
- Spoon the cooled strawberry topping over the cheesecake, spreading it evenly. You can also arrange some fresh strawberry slices around the edge.
- Slice the cheesecake and serve immediately. Garnish with whipped cream or chocolate shavings, if desired.
