Ingredients
For the Cake:
- 2 ½ cups all-purpose flour
- ¾ cup unsweetened cocoa powder (Dutch-processed preferred)
- 1 ½ teaspoons baking soda
- 1 ½ teaspoons baking powder
- 1 teaspoon salt
- 1 cup (2 sticks) unsalted butter, softened
- 2 cups granulated sugar
- 2 large eggs
- 1 teaspoon vanilla extract
- 1 teaspoon black gel food coloring (adjust to desired darkness)
- 1 cup buttermilk
- 1 cup hot brewed coffee
For the Cream Cheese Frosting:
- 8 ounces cream cheese, softened
- 1 cup (2 sticks) unsalted butter, softened
- 4 cups powdered sugar
- 2 teaspoons vanilla extract
- Pinch of salt
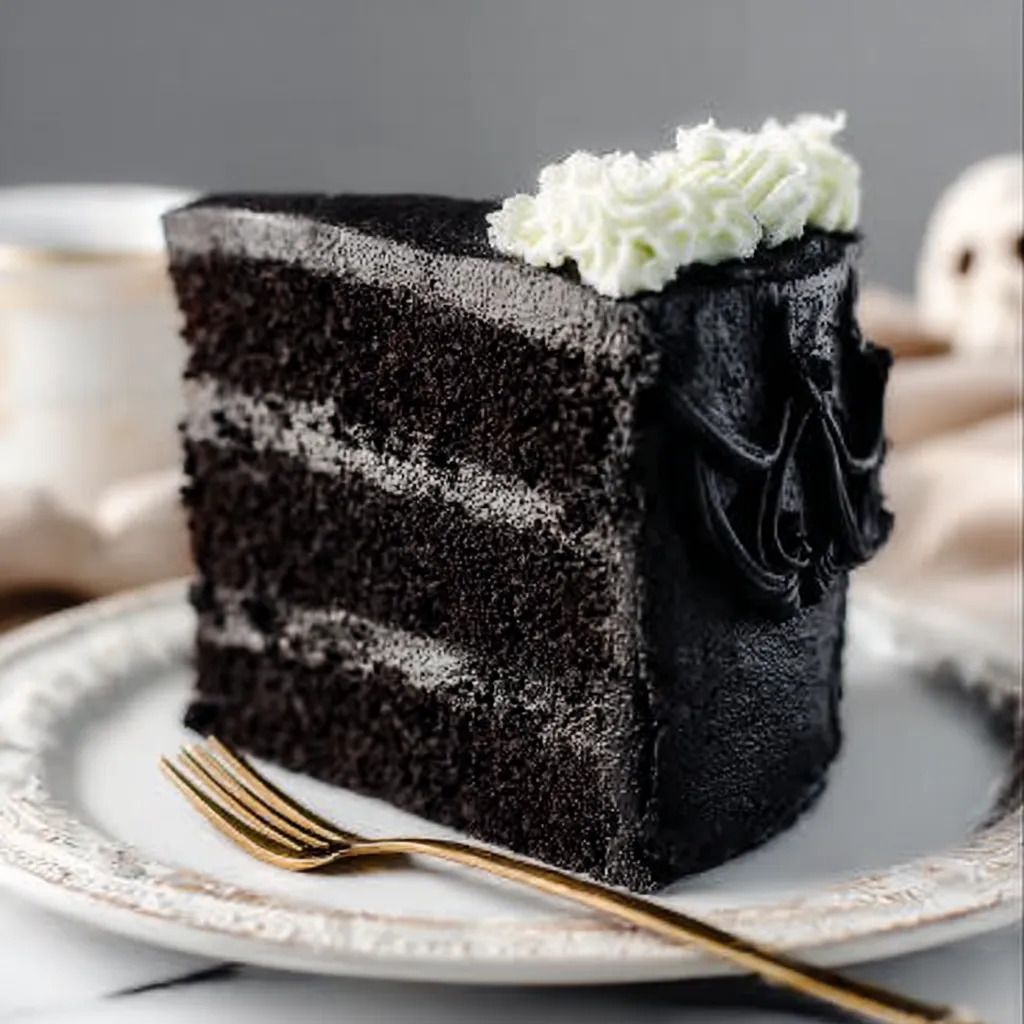
The Secret to Midnight Magic: Unveiling the Cake’s Soul
 Okay, let’s talk about what makes this Midnight Black Velvet Cake truly special. It’s not just about adding black food coloring (though that definitely plays a role!). The real magic lies in the combination of Dutch-processed cocoa powder, which gives it that intense dark chocolate flavor and deep color, and the hot coffee, which intensifies the chocolate even further. Trust me, you don’t taste the coffee *per se*, but it elevates the whole experience. Don’t skimp on these ingredients; they’re key!
Gathering Your Arsenal: Essential Tools & Prep Work
Before we even think about mixing batter, let’s get organized. It’s like prepping for a battle… a delicious battle against bland desserts!- Oven: Preheat to 350°F (175°C).
- Pans: Grease and flour three 8-inch round cake pans. You can also line the bottoms with parchment paper rounds for extra insurance. This helps the cakes release cleanly.
- Mixing Bowls: You’ll need at least two large bowls – one for dry ingredients and one for wet ingredients. A stand mixer is helpful, but a hand mixer works too!
- Measuring Cups & Spoons: Accuracy is important in baking, so use proper measuring tools.
- Sifter or Whisk: To ensure your dry ingredients are lump-free.
- Cooling Rack: For cooling the cakes after baking.
Step-by-Step Instructions: Crafting Your Masterpiece
Now for the fun part! Follow these steps carefully, and you’ll be rewarded with a stunning Midnight Black Velvet Cake. I promise it’s easier than it looks.Making the Cake:
- Combine Dry Ingredients: In a large bowl, whisk together the flour, cocoa powder, baking soda, baking powder, and salt. Sifting the dry ingredients ensures a light and airy crumb.
- Cream Butter and Sugar: In a separate large bowl (or the bowl of your stand mixer), cream together the softened butter and sugar until light and fluffy. This usually takes about 3-5 minutes. Don’t rush this step!
- Add Eggs and Vanilla: Beat in the eggs one at a time, then stir in the vanilla extract and black gel food coloring. Mix until well combined. The food coloring can be adjusted for your preferred level of darkness.
- Alternate Wet and Dry Ingredients: Gradually add the dry ingredients to the wet ingredients, alternating with the buttermilk. Begin and end with the dry ingredients. Mix until just combined. Be careful not to overmix! Overmixing develops the gluten in the flour, leading to a tough cake.
- Stir in Coffee: Slowly pour in the hot brewed coffee and mix until just combined. The batter will be thin. Don’t worry, that’s normal!
- Divide and Bake: Divide the batter evenly among the prepared cake pans. Bake for 25-30 minutes, or until a wooden skewer inserted into the center comes out clean or with a few moist crumbs.
- Cool Completely: Let the cakes cool in the pans for 10 minutes before inverting them onto a wire rack to cool completely. Make sure the cakes are completely cool before frosting, or the frosting will melt.
Making the Cream Cheese Frosting:
- Cream Butter and Cream Cheese: In a large bowl (or the bowl of your stand mixer), cream together the softened cream cheese and butter until smooth and creamy.
- Add Powdered Sugar: Gradually add the powdered sugar, one cup at a time, beating well after each addition.
- Add Vanilla and Salt: Stir in the vanilla extract and salt. Mix until light and fluffy. If the frosting is too thick, add a tablespoon of milk or cream at a time until you reach the desired consistency.
Assembling Your Crowning Glory: The Frosting Finale
This is where you transform your baked layers into a showstopper. Take your time, and don’t be afraid to get a little creative!- Level the Cakes (Optional): If your cakes have domed tops, use a serrated knife to level them for a more even stack.
- Frost the First Layer: Place one cake layer on a serving plate or cake stand. Spread a generous layer of cream cheese frosting evenly over the top.
- Add Second Layer: Carefully place the second cake layer on top of the frosting. Spread another layer of frosting.
- Top with Third Layer: Top with the final cake layer.
- Crumb Coat: Apply a thin layer of frosting over the entire cake to seal in any crumbs. Refrigerate for 30 minutes to allow the crumb coat to set.
- Final Frosting: Apply the remaining frosting to the cake, creating a smooth and even finish. You can use a spatula or a piping bag for a more decorative look.
- Decorate (Optional): Get creative with your decorations! You can use chocolate shavings, fresh berries, edible glitter, or anything else your heart desires.
Troubleshooting Tips: Because Baking Isn’t Always Perfect
Let’s be real, baking can be unpredictable. Here are some common problems and how to fix them:- Cake is Dry: Overbaking is the most common culprit. Use an oven thermometer to ensure your oven is at the correct temperature. Also, don’t overmix the batter.
- Cake is Dense: Overmixing or not creaming the butter and sugar properly can cause a dense cake.
- Frosting is Too Soft: Add more powdered sugar, a tablespoon at a time, until you reach the desired consistency. Chill the frosting in the refrigerator for 15-20 minutes to firm it up.
- Frosting is Too Stiff: Add a tablespoon of milk or cream at a time until you reach the desired consistency.
Variations and Twists: Making it Your Own
Want to put your personal stamp on this Midnight Black Velvet Cake? Here are a few ideas:- Chocolate Ganache Drip: Drizzle a rich chocolate ganache over the cake for an extra decadent touch.
- Berry Filling: Add a layer of fresh raspberries or strawberries between the cake layers for a burst of fruity flavor. Consider making some Chocolate Raspberry Truffles to top the cake.
- Espresso Boost: Add a teaspoon of instant espresso powder to the batter to enhance the chocolate flavor even more.
- Different Frosting: Experiment with different frostings, such as a Swiss meringue buttercream or a chocolate cream cheese frosting.
- Cookies: Serve slices of the cake with Chocolate Thumbprint Cookies!
Serving and Storing: Making it Last (If You Can!)
This cake is best served at room temperature. If you’ve refrigerated it, take it out about 30 minutes before serving to allow the frosting to soften slightly. Store leftover cake in an airtight container in the refrigerator for up to 3 days. You can also freeze the cake for up to 2 months. Wrap it tightly in plastic wrap and then foil before freezing. While you’re at it, you might also enjoy Chocolate Covered Strawberry Brownies or, for a festive occasion, the Chocolate Yule Log! Don’t forget about Chocolate Covered Cherry Brownie Bombs! And if you’re a fan of red velvet, give Red Velvet Blossoms Cookies a try!Final Thoughts: Bask in Your Baking Glory
Congratulations, you’ve just created a masterpiece! This Midnight Black Velvet Cake is sure to impress your family and friends. Don’t be afraid to experiment and make it your own. Happy baking!What makes this Midnight Black Velvet Cake so dark and flavorful?
The deep color and intense chocolate flavor come from the combination of Dutch-processed cocoa powder and hot brewed coffee in the recipe. The coffee intensifies the chocolate without making the cake taste like coffee.
Do I need any special equipment to make this cake?
You’ll need standard baking equipment like 8-inch round cake pans, mixing bowls, measuring cups and spoons, a sifter or whisk, and a cooling rack. A stand mixer is helpful but not required; a hand mixer will also work.
What can I do if my cream cheese frosting is too soft?
If your frosting is too soft, add more powdered sugar, one tablespoon at a time, until you reach the desired consistency. You can also chill the frosting in the refrigerator for 15-20 minutes to firm it up.
How should I store leftover Midnight Black Velvet Cake?
Store leftover cake in an airtight container in the refrigerator for up to 3 days. You can also freeze the cake for up to 2 months by wrapping it tightly in plastic wrap and then foil.
Midnight Black Velvet Cake Ultimate
Ingredients
Equipment
Method
- Preheat oven to 350°F (175°C). Grease and flour three 8-inch round cake pans. Line the bottoms with parchment paper rounds for extra insurance.
- In a large bowl, whisk together the flour, cocoa powder, baking soda, baking powder, and salt.
- In a separate large bowl (or the bowl of your stand mixer), cream together the softened butter and sugar until light and fluffy (3-5 minutes).
- Beat in the eggs one at a time, then stir in the vanilla extract and black gel food coloring. Mix until well combined.
- Gradually add the dry ingredients to the wet ingredients, alternating with the buttermilk. Begin and end with the dry ingredients. Mix until just combined. Be careful not to overmix!
- Slowly pour in the hot brewed coffee and mix until just combined. The batter will be thin.
- Divide the batter evenly among the prepared cake pans.
- Bake for 25-30 minutes, or until a wooden skewer inserted into the center comes out clean or with a few moist crumbs.
- Let the cakes cool in the pans for 10 minutes before inverting them onto a wire rack to cool completely.
- For the cream cheese frosting, cream together the softened cream cheese and butter until smooth and creamy.
- Gradually add the powdered sugar, one cup at a time, beating well after each addition.
- Stir in the vanilla extract and salt. Mix until light and fluffy. If the frosting is too thick, add a tablespoon of milk or cream at a time until you reach the desired consistency.
- Level the cakes if needed using a serrated knife.
- Place one cake layer on a serving plate or cake stand. Spread a generous layer of cream cheese frosting evenly over the top.
- Carefully place the second cake layer on top of the frosting. Spread another layer of frosting.
- Top with the final cake layer.
- Apply a thin layer of frosting over the entire cake to seal in any crumbs (crumb coat).
- Refrigerate for 30 minutes to allow the crumb coat to set.
- Apply the remaining frosting to the cake, creating a smooth and even finish. You can use a spatula or a piping bag for a more decorative look.
- Decorate as desired with chocolate shavings, fresh berries, or edible glitter.
