Crispy, golden tortillas bursting with savory, seasoned chicken and melty cheese – that’s the magic of Chicken Chimichangas! This isn’t just another boring dinner; it’s a flavor-packed fiesta in every bite, and I promise, with my guidance, you’ll whip up the best chimichangas you’ve ever tasted!
The Dream Team: Your Ingredients List
For the Chicken Filling:
- 1.5 lbs boneless, skinless chicken breasts
- 1 tbsp olive oil
- 1 medium onion, chopped
- 1 green bell pepper, chopped
- 1 (15 ounce) can black beans, rinsed and drained
- 1 (15 ounce) can corn, drained
- 1 (10 ounce) can diced tomatoes and green chilies (like Rotel), undrained
- 1 packet taco seasoning
- 1/2 cup chicken broth
- 1 cup shredded cheddar cheese, or your favorite cheese blend
For the Chimichangas:
- 8 large flour tortillas
- Vegetable oil, for frying
Toppings (Optional, but Highly Recommended!):
- Sour cream
- Guacamole
- Salsa
- Chopped cilantro
Let’s Get Cooking: Step-by-Step Instructions

Step 1: Cook the Chicken
- If you’re short on time, you can use pre-cooked shredded chicken. Otherwise, heat the olive oil in a large skillet over medium heat.
- Add the chicken breasts and cook until browned on both sides and cooked through (internal temperature of 165°F).
- Remove the chicken from the skillet and shred it using two forks. Set aside.
Step 2: Sauté the Vegetables
- In the same skillet, add the chopped onion and green bell pepper. Cook until softened, about 5-7 minutes.
- Stir in the black beans, corn, and diced tomatoes and green chilies.
- Add the taco seasoning and chicken broth. Bring to a simmer and cook for 5 minutes, stirring occasionally.
Step 3: Combine and Simmer
- Add the shredded chicken back to the skillet.
- Stir everything together and simmer for another 5-10 minutes, allowing the flavors to meld.
- Remove from heat and stir in 1/2 cup of the shredded cheese.
Step 4: Assemble the Chimichangas
- Warm the tortillas slightly in the microwave or on a dry skillet to make them more pliable (this helps prevent them from tearing).
- Place about 1/2 cup of the chicken mixture in the center of each tortilla.
- Sprinkle with a little more cheese.
- Fold in the sides of the tortilla, then tightly roll it up from the bottom.
Step 5: Fry to Golden Perfection
- Pour about 1/2 inch of vegetable oil into a large skillet. Heat over medium-high heat.
- Carefully place the chimichangas in the hot oil, seam-side down. Fry for 2-3 minutes per side, or until golden brown and crispy. Be careful not to overcrowd the pan; fry in batches if necessary.
- Remove the chimichangas from the skillet and place them on a paper towel-lined plate to drain excess oil.
Step 6: Serve and Enjoy!
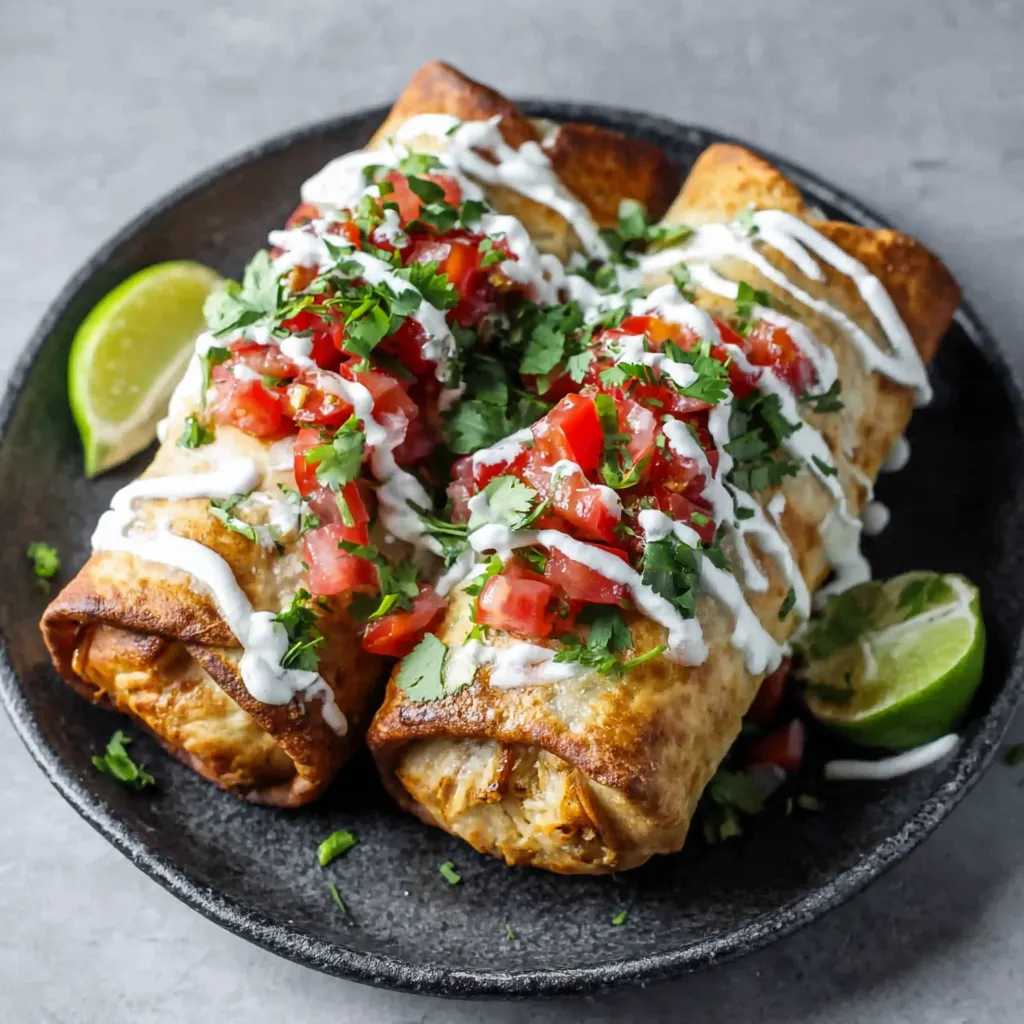
- Serve the hot and crispy Chicken Chimichangas immediately with your favorite toppings, such as sour cream, guacamole, salsa, and chopped cilantro.
Troubleshooting Time: Common Chimichanga Conundrums (and How to Solve Them!)
Okay, let’s be real – sometimes things don’t go exactly as planned. Here are a few common problems and how to fix them:
- Tortillas Tearing: This usually happens when the tortillas are too cold or dry. Warm them up slightly before filling them, and don’t overfill them. If they’re still tearing, try using a different brand of tortillas.
- Chimichangas Falling Apart While Frying: Make sure you’re rolling them tightly and sealing the edges well. You can also use a toothpick to secure the seam before frying, but remember to remove it before serving! Frying seam-down first is crucial.
- Chimichangas Not Crispy Enough: The oil might not be hot enough. Use a thermometer to ensure the oil is at the correct temperature (around 350°F). Also, don’t overcrowd the pan, as this will lower the oil temperature.
- Filling Too Watery: Make sure you drain the corn and black beans well. You can also simmer the filling for a longer time to reduce the liquid.
Spice It Up (or Tone It Down!): Customizing Your Chimichangas
This recipe is a fantastic base, but feel free to get creative and make it your own!
- Add Some Heat: Incorporate diced jalapeños, cayenne pepper, or a dash of hot sauce to the chicken filling.
- Make it Vegetarian: Substitute the chicken with extra black beans, pinto beans, or your favorite vegetarian protein.
- Different Cheese: Experiment with different cheese blends, such as Monterey Jack, pepper jack, or a Mexican blend.
- Add More Veggies: Include other vegetables like diced zucchini, squash, or mushrooms.
Side Dish Sensations: What to Serve with Your Chimichangas
Complete your Mexican feast with these delicious side dishes:
- Mexican Rice: A classic pairing that perfectly complements the savory chimichangas.
- Refried Beans: Creamy and flavorful, refried beans are a must-have side.
- Guacamole and Chips: A refreshing and satisfying appetizer or side dish.
- Mexican Street Corn Salad: A vibrant and flavorful salad that adds a touch of sweetness.
Beyond Chimichangas: More Mexican-Inspired Delights
If you’re craving more delicious Mexican food, be sure to check out these other recipes!
Try this Chicken Enchiladas for another cheesy, saucy delight. Or, for a lighter option, give White Chicken Chili a try. If you are feeling adventurous, you may like Mexican Street Corn White Chicken Chili. For a quick and easy lunch or dinner, consider Garlic Cheese Chicken Wraps or a Chipotle Ranch Grilled Chicken Burrito. You might also enjoy a warm and comforting Chicken Casserole.
Make-Ahead Magic: Tips for Prepping Your Chimichangas
Want to get ahead of the game? You can prepare the chicken filling a day or two in advance and store it in the refrigerator. You can also assemble the chimichangas ahead of time, but don’t fry them until you’re ready to serve. Store the assembled (but unfried) chimichangas in the refrigerator, covered tightly with plastic wrap, for up to 24 hours. Add a few minutes to the frying time to ensure they’re heated through.
Freezer-Friendly Fun: Storing Your Leftover Chimichangas
Leftover chimichangas can be frozen for later enjoyment. Allow them to cool completely, then wrap them individually in plastic wrap and place them in a freezer-safe bag or container. They can be stored in the freezer for up to 2-3 months. To reheat, bake them in a preheated oven at 350°F until heated through and crispy, or fry them in a skillet with a little oil.
Final Thoughts: Your Chimichanga Adventure Awaits!
So there you have it – everything you need to create amazing Chicken Chimichangas in your own kitchen! Don’t be intimidated by the frying; it’s easier than you think, and the crispy, golden results are totally worth it. Grab your ingredients, put on some music, and get ready for a delicious and fun cooking experience. You’ve got this!
What can I do to prevent my tortillas from tearing when making chimichangas?
Warm the tortillas slightly before filling them to make them more pliable, and avoid overfilling them. If they still tear, try a different brand of tortillas.
How can I make sure my chimichangas are crispy when frying?
Ensure the oil is hot enough (around 350°F). Use a thermometer to check. Also, avoid overcrowding the pan, as this will lower the oil temperature. Fry seam-side down first.
Can I prepare the chimichangas ahead of time?
Yes, you can prepare the chicken filling a day or two in advance. You can also assemble the chimichangas ahead of time, but don’t fry them until you’re ready to serve. Store the assembled (but unfried) chimichangas in the refrigerator, covered tightly with plastic wrap, for up to 24 hours. Add a few minutes to the frying time to ensure they’re heated through.
What are some side dish options to serve with Chicken Chimichangas?
Consider serving your chimichangas with Mexican Rice, Refried Beans, Guacamole and Chips, or Mexican Street Corn Salad.
Easy Chicken Chimichangas
Ingredients
Equipment
Method
- Cook the Chicken: Heat olive oil in a large skillet over medium heat. Add chicken breasts and cook until browned and cooked through (internal temperature of 165°F). Remove and shred with two forks; set aside.
- Sauté the Vegetables: In the same skillet, add chopped onion and green bell pepper. Cook until softened, about 5-7 minutes.
- Combine and Simmer Vegetables: Stir in black beans, corn, and diced tomatoes and green chilies. Add taco seasoning and chicken broth. Bring to a simmer and cook for 5 minutes, stirring occasionally.
- Add Chicken: Add the shredded chicken back to the skillet. Stir and simmer for 5-10 minutes, allowing flavors to meld.
- Add Cheese: Remove from heat and stir in 1/2 cup shredded cheese.
- Assemble the Chimichangas: Warm tortillas slightly in the microwave or on a dry skillet to make them more pliable.
- Fill the Tortillas: Place about 1/2 cup of the chicken mixture in the center of each tortilla. Sprinkle with additional cheese.
- Fold and Roll: Fold in the sides of the tortilla, then tightly roll it up from the bottom.
- Fry the Chimichangas: Pour about 1/2 inch of vegetable oil into a large skillet. Heat over medium-high heat. Carefully place the chimichangas in the hot oil, seam-side down. Fry for 2-3 minutes per side, or until golden brown and crispy. Fry in batches if necessary.
- Drain Excess Oil: Remove the chimichangas from the skillet and place them on a paper towel-lined plate to drain excess oil.
- Serve: Serve hot and crispy with your favorite toppings (sour cream, guacamole, salsa, cilantro).
